Every procurement organization has its own complex business rules and processes for purchase orders and requisitions, uniquely designed to meet their own needs. To help its customers avoid errors and risks when processing purchase orders and requisitions, the standard SAP system delivers an approval process via a release strategy concept, which companies often adapt to their specific needs by adding enhancements and custom logic to ABAP code. While this tailors release strategies to individual organizations, it can place an extra burden on the system, and the added development and testing can require a lot of effort and can be cumbersome and expensive to maintain.
Business Rule Framework Plus (BRFplus) can help make this easier. BRFplus is an SAP NetWeaver-based business rules framework that integrates with ABAP to make decisions based on the business rules defined within the framework. Using transaction codes BRF+ or BRFPLUS, you can add “n” number of rules and logic as reusable enhancements to the standard BRFplus framework. This step can be done via database lookups, decision trees, decision tables, loops, variables, if-else logic, Boolean logic, and formulas in a user-friendly way and with minimal effort. BRFplus then processes the defined rules and produces the derived output, which is passed to SAP ERP Central Component (SAP ECC) through a function that you create in BRFplus.
Here, I provide an example in which I have used BRFplus to help simplify the decision-making process for determining the release strategy for purchase orders. It picks up the appropriate release strategy based on a purchase price variance that otherwise would have required complex ABAP development with multiple lines of code. Note that although my example is specific to a release strategy, BRFplus can also be used for many other tasks, such as mapping complex business rules, enabling you to eliminate copious lines of ABAP code. You can also perform simulations and volume testing to test the functionality of the BRFplus objects you have developed using a variety of test data via file uploads. This way, you can ensure that the BRFplus objects satisfy your business needs before they are called in your ABAP applications.
Explore related questions
In short, BRFplus development includes two steps:
- Creating a function in BRFplus that uses rules, decision tables, decision trees, database lookups, Boolean logic, and formulas to generate an output.
- Calling the created BRFplus function through ABAP in a user exit, enhancement, Business Add-In (BAdI), or custom program.
In the following business scenario, I use BRFplus to create rules that help determine the appropriate release strategy for a purchase order when it is created in the system.
The Business Scenario
Let’s take a look at the parameters for the example business scenario. For material group ABC, if the purchase order (PO) price exceeds the standard price of the PO by $500, only then should the release strategy trigger a request for manager approval of the PO. For material group XYZ, if the PO price exceeds the standard price by $300, only then should the release strategy trigger a request for manager approval of the PO.
An SAP standard release strategy does not support this type of triggering and would require custom ABAP development. With BRFplus, however, it can be achieved by writing a few simple rules.
Writing Rules with BRFplus
Here, I show you how to complete the six steps necessary for writing rules with BRFplus that can help determine the right release strategy for a purchase order.
Step 1: Create an Application
The first step is to create an application. An application serves as a kind of mini project — you can group all the rules, expressions, data objects belonging to the same project, or all the functionality belonging to a project, into one application.
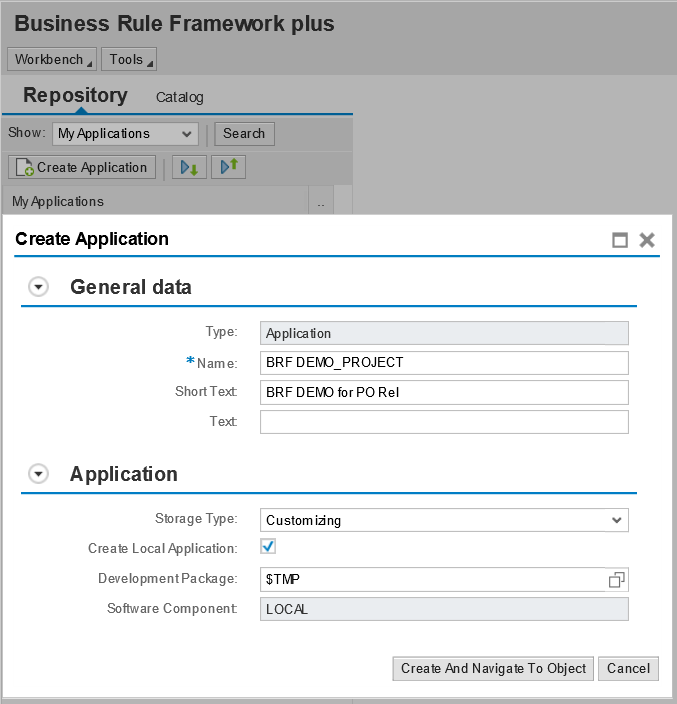
To create an application, execute transaction code BRFPLUS, and click on the Create Application button, which bring you to Figure 1. In the General Data section, enter the name of the application in the Name field (BRF_DEMO_PROJECT in the example), and in the Short Text field, enter a brief description.
In the Application section, select the Storage Type, which offers three options: Customizing, Master Data, and System. For the example, choose Customizing and for simplicity, create the application as a local copy, which will not ask for a Transport Request number. Note that if you want to move the application to higher environments, you will need to configure it as a transportable object. Keep in mind that while Customizing and System storage types can be created either locally or transportable to higher environments, the Master Data storage type can only be created locally, just like in SAP ECC, where we create/modify master data objects locally in any environment. The Development Package and Software Component fields are filled in by default when you create it as a local application; when it is not created as a local application, you need to specify the development package and software component.
Once you have completed the settings, click on the Create And Navigate To Object button.
Step 2: Define Data Elements
BRFplus allows you to create new data elements not available in SAP ECC or use data dictionary (DDIC) elements from SAP ECC.
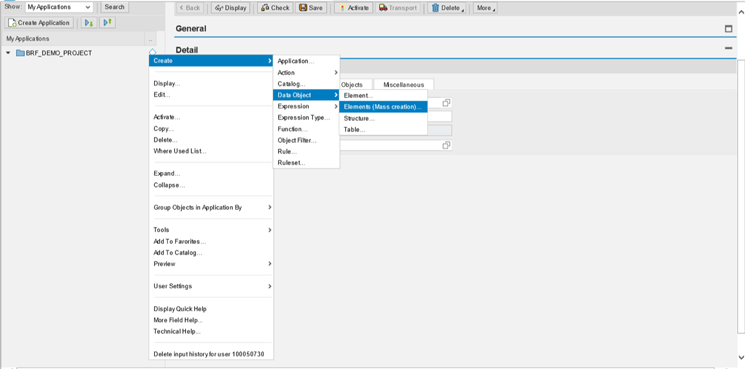
To define data elements, right-click on the application name (BRF_DEMO_PROJECT) and follow the menu path Create > Data Object > Elements (Figure 2). Choosing the Mass creation option enables you to create multiple data elements all at once.
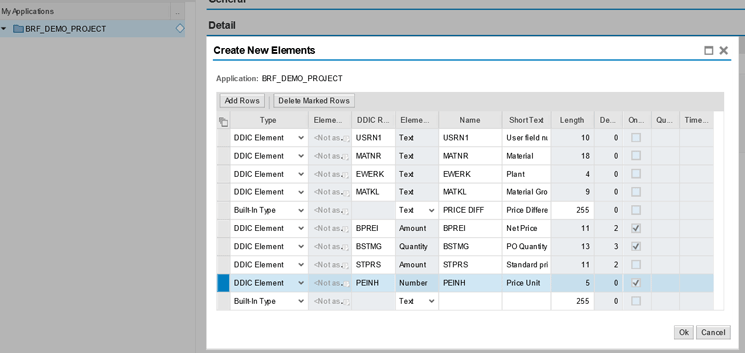
Figure 3 shows the data elements selected for the example. Note that PRICE DIFF is a new custom field we are defining, with the Built-In Type, for this application, which will be used for holding the variance between the PO price and the standard price of the material that will be derived later, and the remaining fields are SAP ECC data dictionary elements. After you click on the Ok button to save the fields, activate them by either right-clicking on the object and selecting Activate or by clicking on the Activate button at the top of the screen.
All the data objects, expressions, rules, and functions need to be activated or they cannot be used in the follow-on functions (that is, the expressions, rules, functions, and rulesets) that we will create in the next steps.
Step 3: Create Expressions
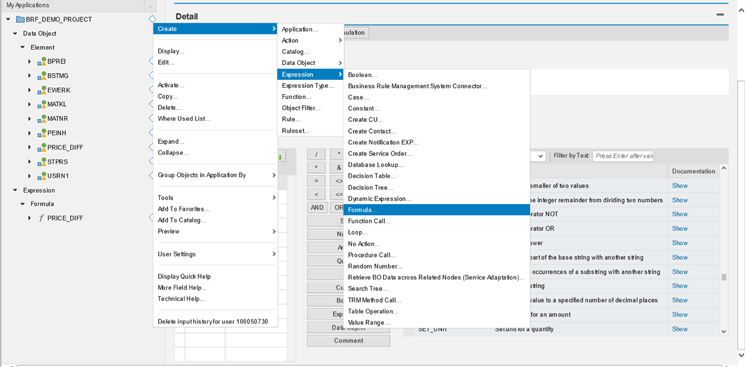
In this step, you have a lot of different options for expressions, as shown in Figure 4. You can choose the expression that best fits your purpose.
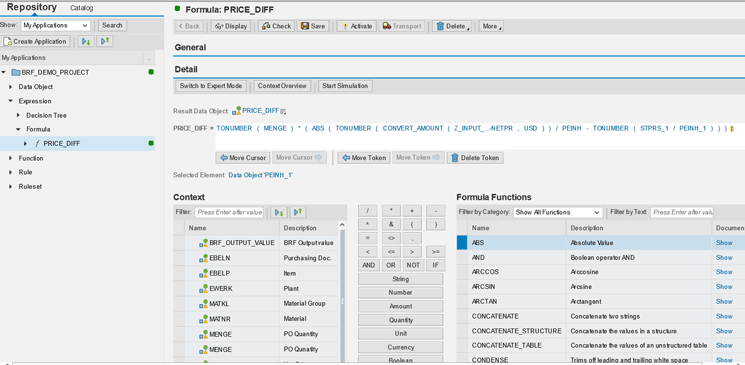
To create an expression, right-click on the application name (BRF_DEMO_PROJECT) and follow the menu path Create > Expression. For the example, you want to calculate the price difference between the PO price and the standard price, so choose Formula for the type of expression and name it PRICE_DIFF.
To write the formula expression, select the newly created formula expression and use the data elements defined earlier, which you can select in the Context section in Figure 5. You can also use the Formula Functions shown here for converting the value to absolute (ABS), to number (TONUMBER), and so on.
In the Result Data Object field, select the data element PRICE_DIFF from the dropdown that displays by clicking on the field. The result of the formula expression will be saved in the PRICE_DIFF data object, which is the custom data element defined earlier in Step 2. Save and activate the formula expression by clicking on the Ok button and then either right-clicking on the expression and selecting Activate or by clicking on the Activate button at the top of the screen.
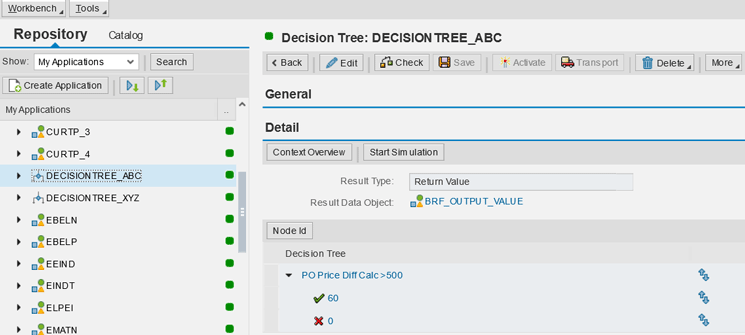
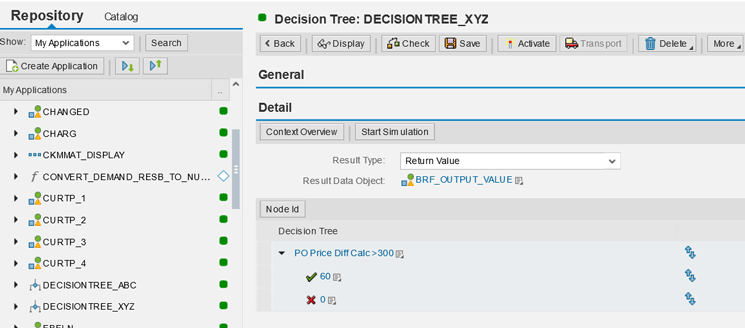
Next, we create two decision trees for the formula expression results: one for a result of >500 and another for a result >300.
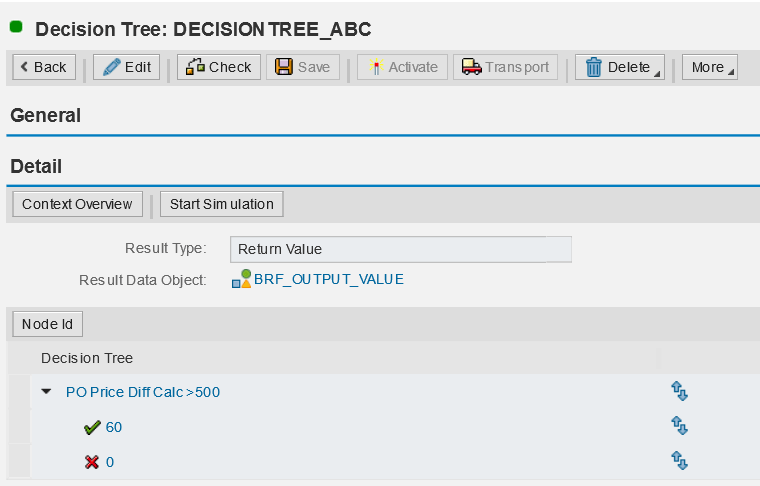
First, create DECISION TREE_ABC. This decision tree calls the PRICE_DIFF formula expression (Figure 6). If the value of the formula expression is >500, the output value is 60; otherwise, it gives an output of zero. This output value is stored in the object BRF_OUTPUT_VALUE as defined by the Result Data Object field. The BRF_OUTPUT_VALUE object must be defined as a Built-In Type data element just like the PRICE_DIFF object we defined earlier.
Next, create DECISION TREE_XYZ (Figure 7). With this decision tree, if the result of the formula expression is >300, the output value is 60; otherwise, it is 0.
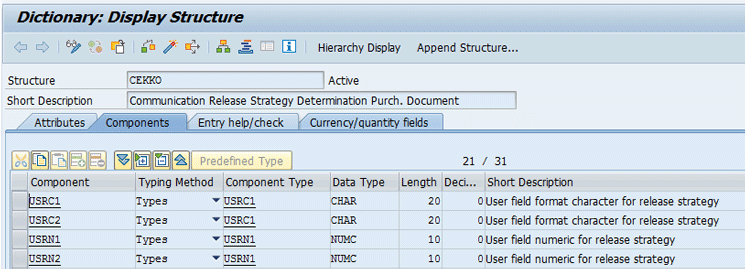
Figure 8 shows the SAP ECC fields that can be used to hold BRFplus values for determining the release strategy. Any of the four fields shown can be used for this purpose — for the example, we use the SAP ECC field CEKKO-USRN1 to store the output value returned by BRF_OUTPUT_VALUE after processing the decision trees.
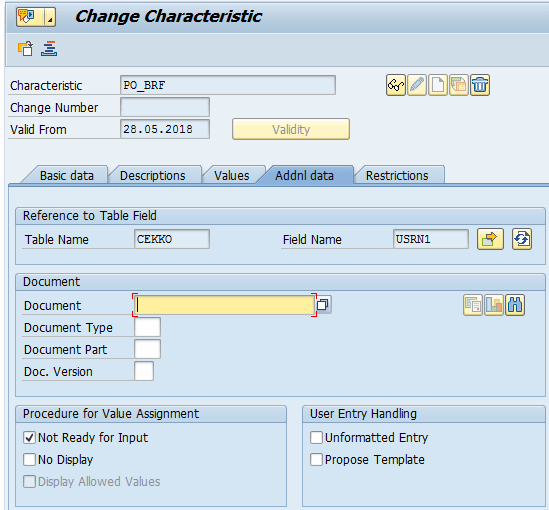
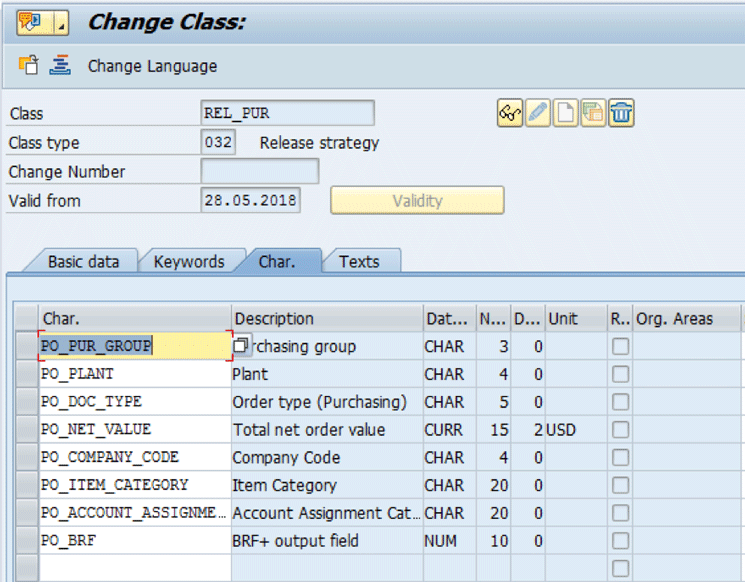
To add the BRFplus function to the CEKKO-USRN1 field, use transaction CT04 (Characteristic Maintenance) to map the PO_BRF characteristic to the field (Figure 9). Then, using transaction CL02 (Change Class), assign the PO_BRF characteristic to the PO release strategy class REL_PUR (Figure 10).
The value derived from the calculation of the BRFplus function (characteristic PO_BRF) will now be stored in the CEKKO_USRN1 field. This is where the handshake between the BRFplus application and SAP ECC occurs. The ability to use field CEKKO_USRN1 significantly enhances the PO release strategy functionality as it provides the flexibility to make use of numerous expressions types in BRFplus.
Step 4: Define a Rule
A rule mimics the business rules and executes various expressions defined for the application based on certain predefined conditions. For the example, we define two rules: one for DECISIONTREE_ABC and another for DECISIONTREE_XYZ.
To create the first rule, right-click on the application name (BRF_DEMO_PROJECT) and follow the menu path Create > Rule. Name the rule RULE_PO_REL_ABC.
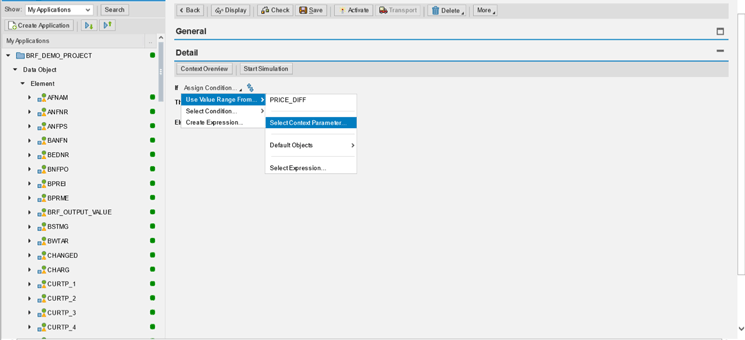
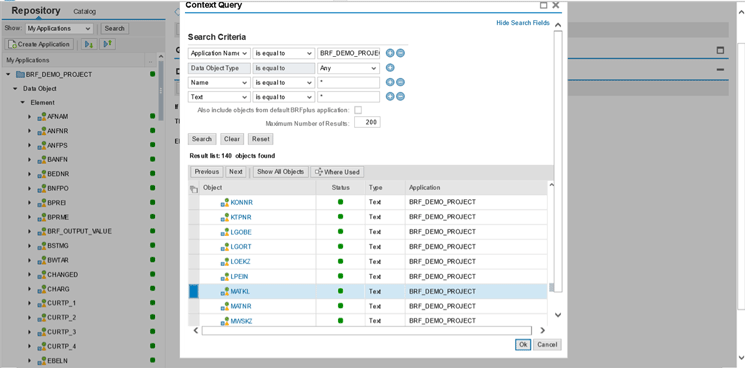
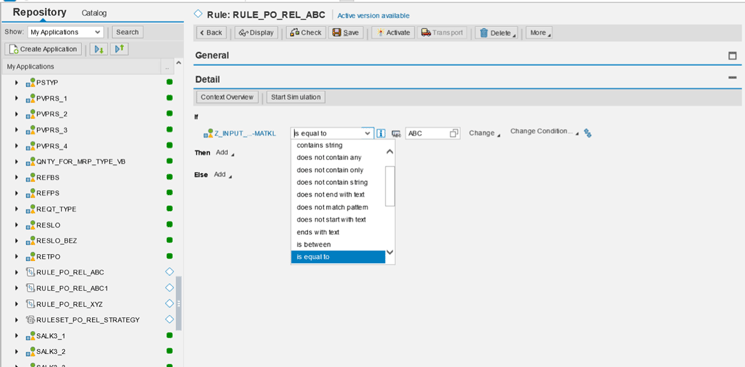
To assign the conditions, expand the list of drop-down options under Assign Condition and choose Use Value Range From > Select Context Parameter (Figure 11), which takes you to the drop-down selection of the data objects defined earlier (Figure 12). Note that you can also select the defined expression as a condition.
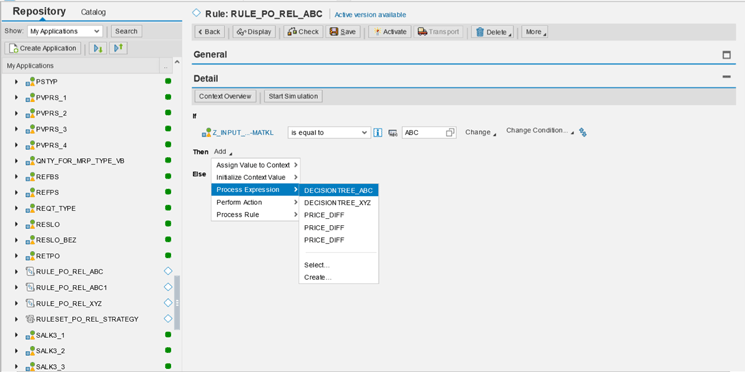
Next, define the rule — for the example, the rule will execute if MATKL is equal to ABC (see Figure 13) and the expression called in Figure 14 will be processed. Note that you can have multiple AND or OR conditions.
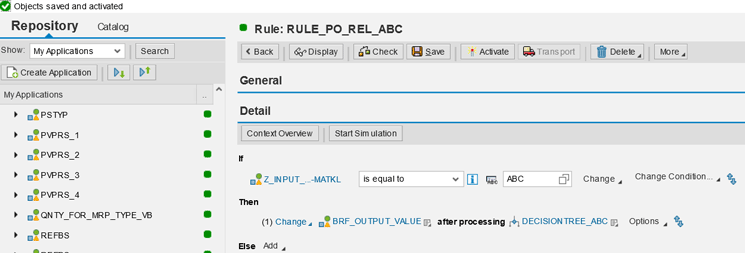
If the defined condition (MATKL is equal to ABC) is satisfied, the decision tree expression DECISIONTREE_ABC is called and the result of the rule is stored in the BRF_OUTPUT_VALUE data object (Figure 15).
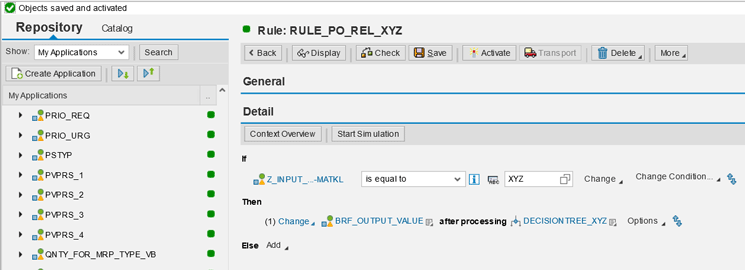
Next, create a second rule named RULE_PO_REL_XYZ. This rule is called if the material group is XYZ, and the result is stored in BRF_OUTPUT_VALUE (Figure 16).
Step 5: Define a Function
A function links the BRFplus application to SAP ECC. It receives input data, processes the data, and then returns an output value. You can call a function from SAP ECC using ABAP code, a Remote Function Call (RFC), or web services, for instance.
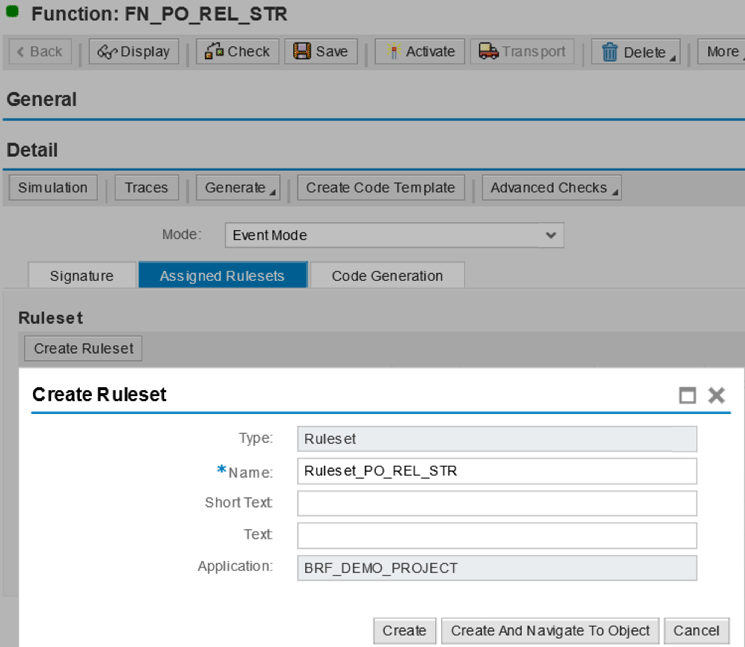
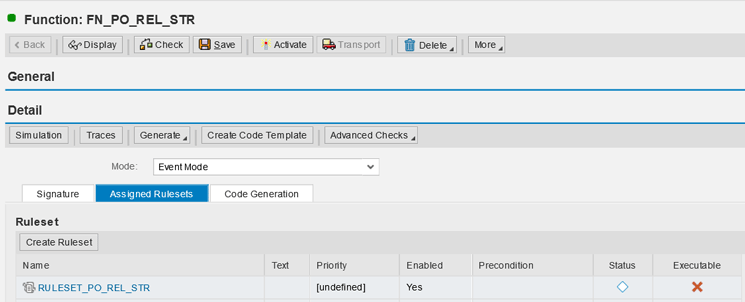
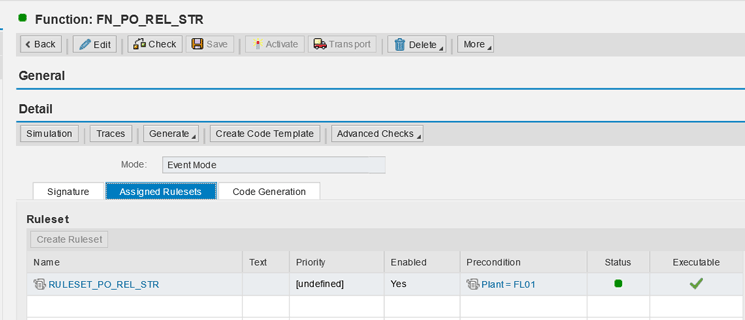
To create a function for the example, right-click on the application name (BRF_DEMO_PROJECT) and follow the menu path Create > Function. Name the function FN_PO_REL_STR and save. Then, create a ruleset within the function by clicking on Create Ruleset on the Assigned Rulesets tab. Name the ruleset RULESET_PO_REL_STR and click on Create And Navigate to Object and save (see Figure 17). The ruleset is now assigned to the function (see Figure 18).
Step 6: Define Conditions for the Ruleset
A ruleset is a collection of rules that is processed one after the other according to the sequence defined. When the function is called, all assigned rulesets are subsequently processed.
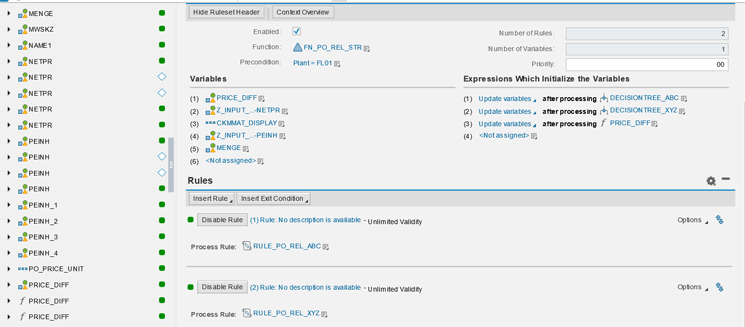
The ruleset header provides you with an option to define a precondition and allows you to define variables and expressions used in the ruleset. To update the ruleset created and assigned to the FN_PO_REL_STR function in the previous step (RULESET_PO_REL_STR), double-click on the ruleset and click on Edit. Figure 19 shows the preconditions, variables, and rules defined for RULESET_PO_REL_STR.
The precondition for the ruleset shown in the example is Plant=FL01. This precondition means that the ruleset executes only if the plant in the PO is FL01. You can assign the rules to the ruleset in the sequence you want them to process. You can also define an exit condition if you want the ruleset to stop processing further if one of the conditions is met.
Identifying Any Errors with a Simulation
BRFplus also enables you to run a simulation to check the function, rules, ruleset, and expressions you created. During a simulation, you can identify any errors or inconsistencies.
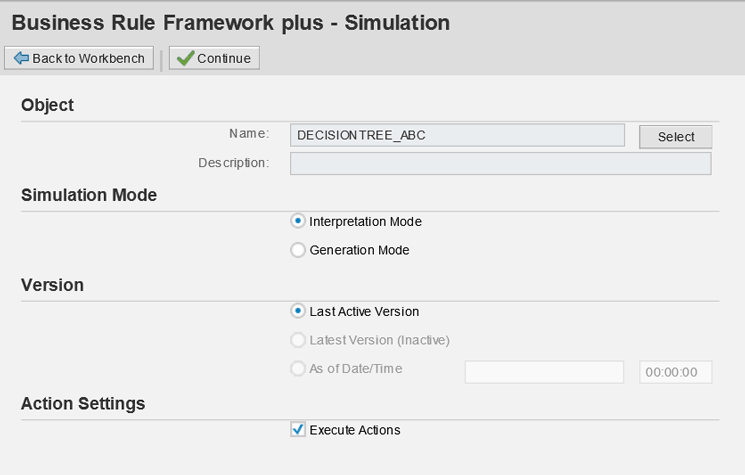
To begin a simulation of a decision tree, click on the Start Simulation button (Figure 20). Here, we are running a simulation of the DECISION TREE_ABC decision tree we created for the example.
In the simulation settings, select the Execute Actions option under Action Settings and then click on the Continue button (Figure 21).
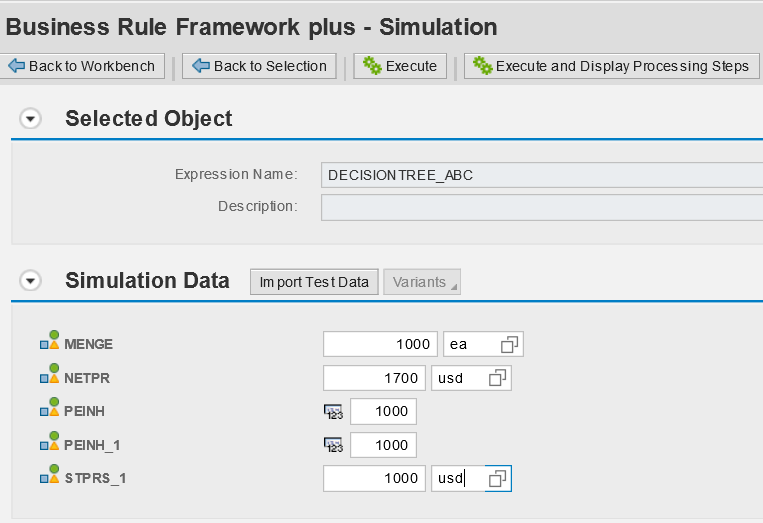
Next, specify the simulation data (Figure 22). In the example, I have manually entered the input values to be used for the simulation. You can also choose to import test data, which is the best approach when you have multiple sets of test data. You then have two options for execution: Clicking on the Execute button provides the end result whereas clicking on the Execute and Display Processing Steps button gives you a step-by-step account of how the system arrived at the result.
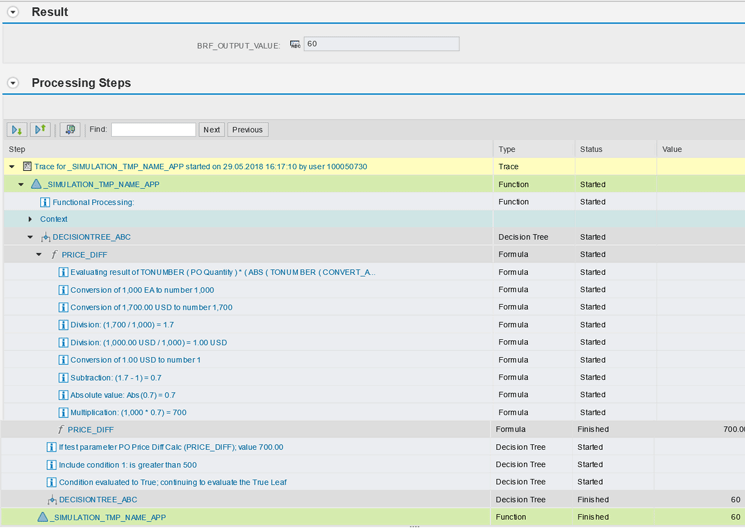
In the example, we choose Execute, which takes us to Figure 23, where any errors in any of the steps are highlighted.
Calling a BRFplus Function from ABAP
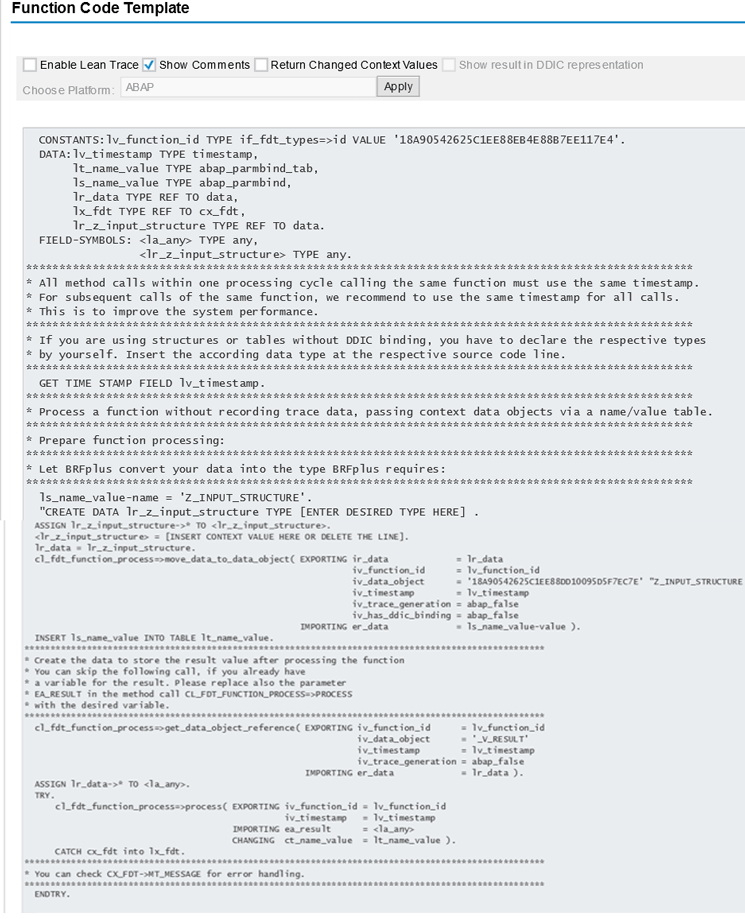
BRFplus provides a very user-friendly way to call a BRFplus function from an ABAP application: a code template that automatically generates the code for calling the function. To create the code template, display the FN_PO_REL_STR function in BRFplus and click on the Create Code Template button (Figure 24).
On the next screen, select the Show Comments indicator and then click on the Apply button. The resulting code, shown in Figure 25, is generated automatically and can be used in ABAP to call the BRFplus function.
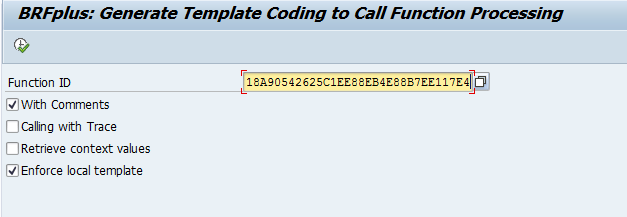
An alternative to this method is to generate the code by executing the FDT_TEMPLATE_FUNCTION_PROCESS report with transaction SE38 (ABAP Editor). In this case, you need to provide the function ID (Figure 26), which can be found in BRFplus (Figure 27).
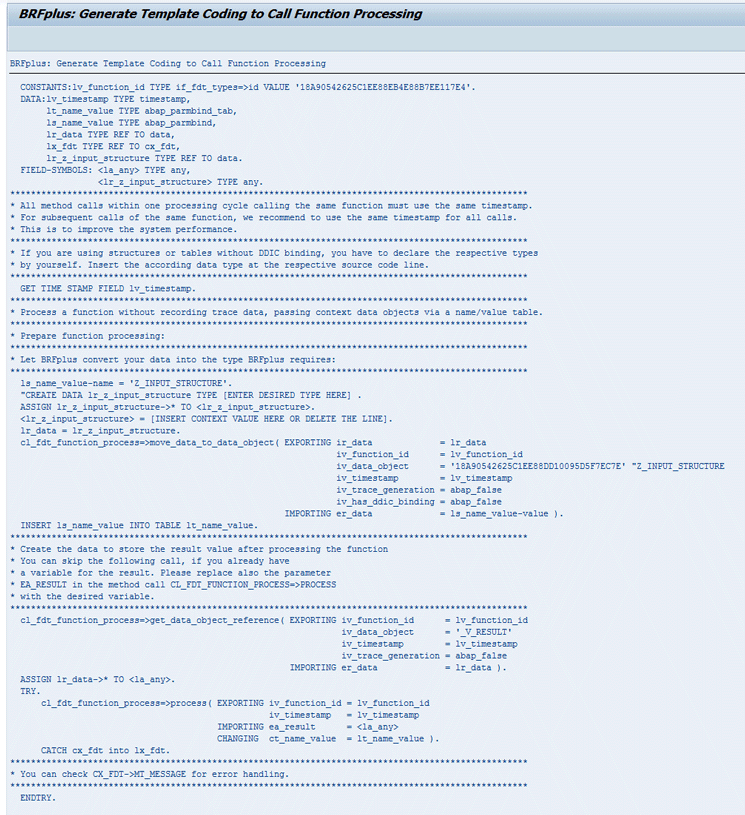
The code template shown in Figure 28 is generated when the report is executed and can be copied to an ABAP program to access the BRFplus application created earlier.
Once you can access the BRFplus application from ABAP, whenever a new PO is created for plant FL01 and material group ABC or XYZ, the system checks for the rules defined in BRFplus to come up with the appropriate release strategy based on the result stored in object BRF_OUTPUT_VALUE.
