Setting up InfoPackages for data loads is often a time-consuming process. Through examples, the author explains two time-saving ways to automate your InfoPackages. He also debates the benefits and drawbacks of each method, which will enable you to choose the best way for you to schedule your InfoPackages. Sample code is provided.
Using an InfoPackage that runs automatically can save you a lot of time when performing data load processes. So- called recursive InfoPackages can streamline your workload — especially during a BW cutover — and eliminate the need for multiple InfoPackages.
The concept of recursive InfoPackaging is simple. In table TVARVC, you set an initial date range. When the InfoPackage is launched, the date range is read from table TVARVC and updated with new dates for the next run. The same InfoPackage is called recursively using one of two methods, which I call domino triggering and time-interval scheduling.
Domino triggering causes a new load to start only if the previous load is fiished. The packets “fall” one after the other like dominos, which prevents the system from becoming bogged down because one load must finish before the next starts. Time-interval scheduling allows you to schedule loads at a prescribed amount of time, either minutes or hours. Loading starts along time intervals regardless of the status of the system or if the last load has finished.
To demonstrate the methods, I will detail a fictitious point-of-sale (POS) data cutover load from a legacy system with 52 million records for one year. This cutover could be performed in one load, but that could be a very long process. You could split the load into two-week packets, which would require you to create 26 similar InfoPackages and schedule them at different times. This setup may take you many hours and is prone to scheduling or date selection errors.
I will show you how to do the same job in less than an hour — with no errors! In addition to spelling out how to configure the recursive InfoPackages, I’ve provided the ABAP coding you’ll need and offer you some tips on choosing the method that is right for you.
Set Up the Date Selection in Table TVARVC
The first step in deploying recursive InfoPackages is to create an entry in table TVARVC to store date selection data using the edit mode in transaction SE16. Figure 1 offers an example of what the TVARVC entry should look like. A variable stored in TVARVC provides the InfoPackage with the data to use when it is launched. See Table 1 for details about the fields in table TVARVC.

Figure 1
Table TVARVC
| Field name |
Description |
Available in = BW 2.1C table TVARV |
| MANDT |
R/3 system, client number from logon |
|
| NAME |
Name of variant variable |
X |
| TYPE |
P for parameter, S for select option |
X |
| NUMB |
Seq. number from 0000 to 9999 in
case you have multiple SIGN, OPTI,
LOW, and HIGH conditions |
X |
| SIGN |
I = Include values
E = Exclude values |
X |
| OPTI |
EQ = Equal
BT = Between
LE = Less equal
GE = Greater equal |
X |
| LOW |
Low value (FROM) |
X |
| HIGH |
High value (TO) |
X |
| CLIE_INDEP |
Flag for the entry to be client independent |
|
|
| Table 1 |
Table TVARVC fields |
|
Note
The TVARVC table is widely used to store SAP variables. In BW version 2.1C and earlier, you need to use table TVARV instead because there is no table TVARVC.
Now, create a new InfoPackage for the InfoSource that will supply the data for your load. In the InfoPackage screen, go to the Data Selection tab, and enter 6 in the Type field of row 0CALDAY (Figure 2). This entry indicates that ABAP code will be used to generate the date range for 0CALDAY and prompts a coding screen.

Figure 2
Use the Data Selection tab to indicate you are adding custom code
Enter the code provided in Figure 3 ensuring that the variable name entered at line 20 is identical to that in the Table TVARVC Insert screen in Figure 1, in our example, ‘BW_INFOPACK_TEST’. The code in Figure 3 references two functions in lines 18 and 53. The code for the two functions along with the code in Figure 3 are required to complete the recursive InfoPackaging process. All of the code is available to download at by clicking this link.
|
<>DATA: l_idx LIKE sy-tabix.
READ TABLE l_t_range WITH KEY
fieldname = ‘CALDAY’.
l_idx = sy-tabix.
* Local itab to call ZREAD_TVARV
DATA: BEGIN OF itab_values OCCURS 1.
INCLUDE STRUCTURE tvarvc.
DATA: END OF itab_values.
* Local date for calculations
data: tmp_date like sy-datum.
p_subrc = 0.
* Get dates from TVARVC
CALL FUNCTION ‘ZREAD_TVARV’
EXPORTING
name = ‘BW_INFOPACK_TEST’ “<— your TVARVC entry
TABLES
t_values = itab_values
EXCEPTIONS
name_not_found = 1
OTHERS = 2.
IF sy-subrc <> 0.
p_subrc = 1.
ENDIF.
* Read the 1st line and fill in the selection for 0CALDAY
LOOP AT itab_values.
l_t_range-sign = itab_values-sign.
l_t_range-option = itab_values-opti.
l_t_range-low = itab_values-low.
l_t_range-high = itab_values-high.
MODIFY l_t_range INDEX l_idx.
IF sy-subrc <> 0.
* ERROR!
p_subrc = 2.
ELSE.
* Update the dates for the next run (in internal table)
tmp_date = itab_values-high.
tmp_date = tmp_date + 1.
itab_values-low = tmp_date.
tmp_date = tmp_date + 13. “Add 14 days (2 weeks)
itab_values-high = tmp_date.
MODIFY itab_values.
ENDIF.
EXIT. “Reading only the first line!
ENDLOOP.
* Update the dates for the next run (in TVARVC)
CALL FUNCTION ‘ZWRITE_TVARV’
TABLES
t_values = itab_values
EXCEPTIONS
unable_to_create = 1
unable_to_update = 2
name_empty = 3
commit_failed = 4
OTHERS = 5.
IF sy-subrc <> 0.
* ERROR!
p_subrc = 3.
ENDIF.
| Figure 3 |
0CALDAY ABAP code to enter in coding screen |
|
Note
BW 2.1C and earlier systems use table TVARV. Remember to download the correct code for your BW system. The code in Figure 3 can be used for any BW version.
Depending on the needs of your cutover scenario, you might want to set the ranges for order numbers instead of weeks. If so, make sure that you put your ABAP code in the order number selection criteria of your InfoPackage. If you have questions, someone on the ABAP team should be able to help.
Fill in other selections as necessary. For example, if you are doing an InfoCube re-initialization for one specific plant, you can enter the plant number as a selection.
On the Processing tab (Figure 4), select Data Targets Only. I recommend this setting because it is faster, however, you can also store the historical data in the PSA. In the Data Targets tab, select the data targets you want to update, and in the Update tab, select Full Update.

Figure 4
Processing tab
The Schedule tab settings differ depending on whether you use the domino or the time- interval method. So, let’s look at the two methods and the configuration that supports them.
Choose Your Scheduling Method
The scheduling method you use depends on the read time from the source system and update time in BW. The read time is the time it takes to gather the data from R/3 or the legacy system, and the update time represents the time required to pass the data through transfer rules and update rules, and to store it in the DataTarget. The load time is the sum of read time and update time.
If the read time for your data load is relatively short, or if the packet size varies 25 percent or more from one load to another, you should consider the domino trigger. If, on the other hand, your packet sizes have less than a 25 percent variance on average, or if the read time from the source system is larger than the update, then time-interval scheduling is probably the one for you.
I have provided two examples based on POS data loads. In the first, data packet size varies from 500,000 records to 1,500,000 records. The read time is around 5 minutes and update time ranges from 20 to 40 minutes (Figure 5). In my second example, the data packet size varies from 900,000 records to 1,100,000 records, and the read time is around 1 hour and update time is about 30 minutes (Figure 6).

Figure 5
Domino triggering

Figure 6
Time-interval scheduling
The advantages and disadvantages of each scheduling method are apparent in the figures. Time-interval scheduling presents the potential of a system crash because many loads could be running at the same time. If your system slows down, loads will continue to run at their appointed time. The warning, then, is when setting your intervals, do not to be too optimistic because you could end up with many jobs running concurrently.
While domino triggering is generally safer, this method may not be the wisest because time-interval scheduling is significantly quicker. In Figure 6, it took only 4.5 hours to schedule the load using the time-interval approach. Had I used domino triggering, it would have taken 10.5 hours — over twice as long! Table 2 offers a comparison of the two methods.
| Domino triggering |
Time-interval scheduling |
Variable packet length (i.e.,
> 25% variation from one packet
to the other) |
Relatively consistent packet
length (i.e., < 25% variation from
one packet to another) |
“Safe” method that does not
consume a lot of system
resources |
“Aggressive” method that can
use a lot of system resources |
Use when you know that other
jobs might be running in thesystem |
Use when you know that you are
alone on the system |
No knowledge of expected data
load time required |
Must know the expected data
load time for correct setup |
| Trigger required |
No trigger required |
|
| Table 2 |
Comparing domino triggering and time-interval scheduling |
|
Regardless of which method you choose, it is a good idea to do test loads beforehand to know your read and update times and to check whether they are usually the same length.
Scheduling with the Domino Method
Setting up the trigger for the domino method is not difficult, just follow these steps:
Step 1. Open a new screen and create an event. Call transaction code SM62 and select Maintain in the User event name section and press enter. Use the Create button (or F5) and enter an event name and description. In this example, the name is ZDOMINO_TRIGGER_TEST. You can close the new screen.
Step 2. Schedule InfoPackage options. In your InfoPackage Schedule tab, click on the Scheduling Options button. Click on the After event button and enter the event name created in Step 1: ZDOMINO_TRIGGER_TEST (Figure 7). Set the Periodic job check box and click on the save icon.

Figure 7
Scheduling allows you to automatically start a job after an event is completed
Step 3. Name the job. Put a name in the Job name field such as _DEMO_TEST. The complete job name will be BI_BTCH_DEMO_TEST because BW adds the BI_BTCH prefix to any InfoPackage job scheduled.
Note
Choose a job name that is easily identified so if you need to stop for any reason, you can find the job without searching. Use transaction SM37 to retrieve the job.
Step 4. Select post-processing settings. In the InfoPackage maintenance screen shown in Figure 8, click on the Subsequent Process button, select the Trigger event check mark, and press enter. In the Event following successful processing field, type in the trigger name (Figure 8). If you want the next InfoPackages to load even if an InfoPackage has failed, which I highly recommend, enter the trigger name ZDOMINO_TRIGGER_TEST in the Event following unsuccessful processing field. If you want everything to stop if one InfoPackage fails, leave it empty. Press enter to close this screen.
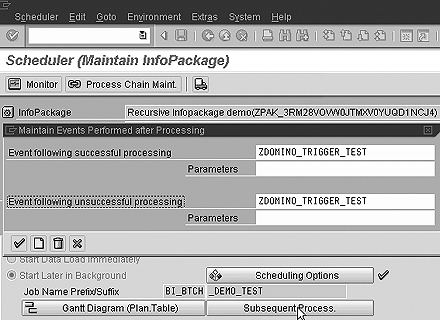
Figure 8
Post-processing event settings
Step 5. Select number of runs. Now, enter the number of runs you want in the Periodic Processing field. Select the Cancel Job After X Runs button and pick a number of runs (Figure 9). Make sure you have a check mark on the Subsequent Process button. In my example, the job runs 26 times to load one year (26 * 2 weeks = 52 weeks).

Figure 9
Select the number of runs in the Schedule tab for domino triggering
Step 6. Begin scheduling with the domino method. Click on the Start button and your “dominos” are now in place and ready to “fall” after the first one is pushed. Call transaction SM64, enter the trigger name ZDOMINO_TRIGGER_TEST, and click on the Trigger button. The first load starts and another one follows as soon as it’s finished (and so on) for 26 runs.
Scheduling with the Time-Interval Method
Setting up time-interval scheduling does not require you to establish an event like you did with the domino trigger because there are no triggers. For the time-interval method, complete the following steps:
Step 1. Select scheduling options. In the Schedule tab, click on the Scheduling Options button, and the Immediate button. Select the Periodic job check box, then click on the Period values button and select your time interval (Figure 10). If your desired time interval is not listed, click on the Other period button. For this example, enter 30 in the Minute(s) field.
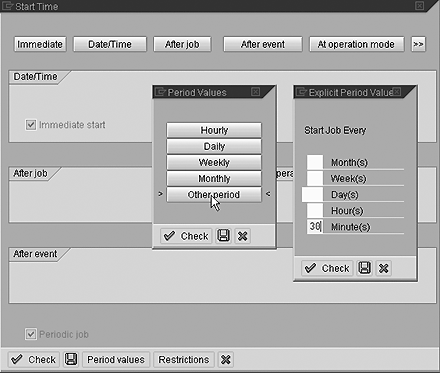
Figure 10
Select the time interval with the Other period button
Clicking on the save icon three times sets up the job to start immediately, and a new job begins every 30 minutes until the 26 biweekly POS loads are complete. If you want the job to start during the night, click on the Date/Time button instead of the Immediate button and enter the date/time you want it to start. Then, follow the same steps: Select the Periodic job, click on the Period values button, and select your time interval.
Step 2. Name the job. Like when setting up the domino trigger, enter a name in the Job name field. For this example, the complete job name is BI_BTCH_DEMO_TEST, since SAP BW adds the prefix BI_BTCH to any InfoPackage job scheduled.
Step 3. Select number of runs. You do not enter post-processing settings with time- interval scheduling, so don’t check the Subsequent Process. Proceed directly to the Periodic Processing section instead (Figure 11). Click the Cancel Job After X Runs button and choose the number of runs. My example runs 26 times to load one year (26 * 2 weeks = 52 weeks).
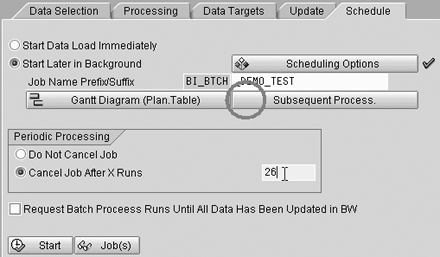
Figure 11
Select the number of runs in Schedule tab for time- interval scheduling
Step 4. Begin scheduling with the time-interval method. Click on the Start button. The InfoPackage is now running, and every 30 minutes a new one starts regardless of the status of previous InfoPackages.
If for any reason you need to stop a running recursive InfoPackage, go to the Schedule tab of the InfoPackage maintenance screen and click on the Stop button. The active InfoPackage eventually finishes loading, but no other InfoPackage begins after that.
All of the steps I’ve described are accomplished using standard SAP scheduling, so a lot more scenarios are possible than the two I provided. You can combine the two methods, e.g., set up an InfoPackage to run once at a specific time and then begin a domino-type InfoPackage. The possibilities for recursive InfoPackages are really up to you to explore and develop. Have fun!
David Theroux-Benoni
David Theroux-Benoni is a BW and ABAP certified independent consultant. He has more than three years of practice with SAP Business Information Warehouse as well as six years of overall SAP experience in ABAP. He specializes in complex and massive data extraction projects from R/3, legacy applications, and software such as Agilisys DP, AP, and AS systems.
You may contact the author at dtheroux@bigfoot.com.
If you have comments about this article or publication, or would like to submit an article idea, please contact the editor.