Learn all about the customizing options and outcomes of the Structural Graphics tool. All the customizing steps are created in transaction code PPOME. Follow these step-by-step guidelines to get the most from customizing transaction code PPOME.
Key Concept
Structural Graphics is an SAP ERP HCM Organizational Management application tool that lets users display and edit structures and objects in an organizational plan. This tool is particularly advantageous when it comes to customizing the interface according to a company’s needs. SAP offers many options to customize the functionality and appearance of this tool.
In my role as an SAP consultant, I have come across many cases in which Organizational Management (OM) requirements were solved by ABAP programming. When I delved deeper into OM customization interfaces, however, I realized that SAP offers a great framework for customizing the interface of transaction code PPOME that leaves little need for programming.
The steps for customization are not as complex as they are commonly assumed to be. In this article, I show how to use these customization details to transform regular users and super users into OM superheroes. This article consolidates all the OM customization steps in one document and also gives an overview of use cases with some real-world examples.
Transaction code PPOME offers many customization features that provide a flexible environment for users and super users to meet end users’ needs. In the following sections, I discuss the details of these customizing options and show how to do them.
Before carrying out any customization steps, let’s first learn about the technical names of the column framework, hierarchical framework scenario, object manager scenario, and tab pages.
These technical names are important since all the implementation steps in the following sections are carried out using these technical names. To make the technical names visible for these items in transaction code PPOME, the set/get parameters OM_ARRAYTYPE_DISPLAY, OM_FRAM_SCEN_DISPLAY, OM_OBJM_SCEN_DISPLAY, and OM_TABTYPE_DISPLAY should be set, respectively, via transaction code SU3 for that specific user (
Figure 1).
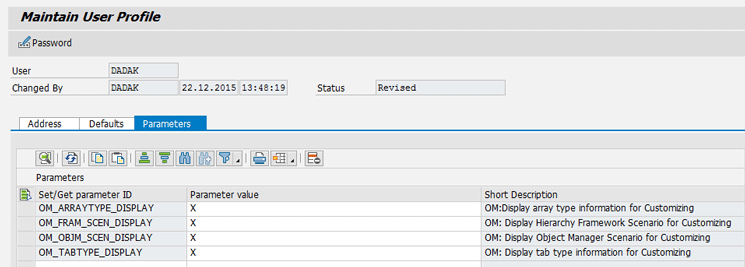
Figure 1
Update parameter values in transaction code SU3
To make the technical name of the column framework visible, you need to set the value of user parameter OM_ARRAYTYPE_DISPLAY to X (
Figure 1). To see the technical name of the column framework, click the column configuration icon in the overview area of transaction code PPOME (circled in red in the ribbon of
Figure 2), and then click the Technical information button in the screen that pops up. The technical name of the column framework (NF_GEN_OV_ORG, in this case) should be noted somewhere as it will be used in the upcoming parts of this article as an entry in customization tables. (Note all the technical names as you take these steps as you will need them later.
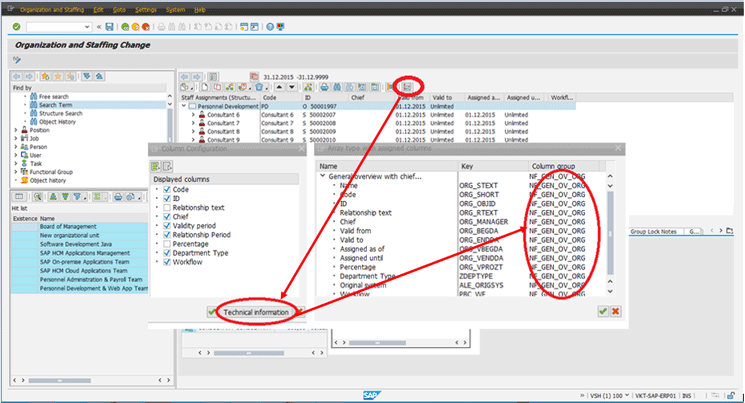
Figure 2
Column framework technical names shown in transaction code PPOME
To make the technical names of the hierarchy framework scenario, object manager scenario, and tab pages visible, you need to set the value of user parameters OM_FRAM_SCEN_DISPLAY, OM_OBJM_SCEN_DISPLAY and OM_TABTYPE_DISPLAY to X (
Figure 1).
To see the technical name of the hierarchy framework scenario, launch transaction code PPOME. The technical name is presented in the title; in this case, it is (Scenario:OME0), circled in red in
Figure 3. You can also see the technical names of the object manager scenario and the tab pages in the figure. (Note all the technical names as you take these steps as you will need them later.)

Figure 3
The hierarchy framework scenario, object manager scenario, and tab pages technical names as shown in transaction code PPOME
Making Adjustments to the Tab Pages in the Details Area
In this section I show how you can customize the text, icons, and alignment of existing tab pages, as well as how to change the visibility options of tab pages in the details area.
The standard tab page customizations are stored in view T77OMTABUS (scenario-specific tab page usage). The implementation of all views can be done via transaction code SM30 as well as in view T77OMTABUS. All of the relevant information for tab pages, including the tab page headers, function modules for displaying icons, the sequence of tab pages within a tab, and the information about the tab page’s visibility, reside in this view. However, to keep track of OM customizations separately, SAP advises using distinct views for distinct purposes. If the configuration is to be done for all tab page groups, update view T77OCTABST. If the configuration is for a specific tab page group, update view T77OCTABUS.
In the following steps, I show you how to adapt the text and the icons of a tab page in the details area to match your requirements. A tab page can be used in one or more tabs. Thus, there are two different scenarios for this implementation step:
- You want to change the title of the tab page in all the tab page groups
- You want to change only the tab page title and icons of one tab page group
Changing Tab Page Text in all Tab Page Groups
If you want to make changes to text on a tab page and the text is to be modified in all the tab page groups, first check the original entry for the tab page technical name and description in view T77OMTABUS. As seen in
Figure 4, the original text (Description) of the ADDRESS tab page is Address in view T77OMTABUS. Note the technical name of the tab page somewhere (ADDRESS in this case).
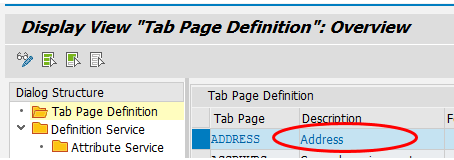
Figure 4
The standard SAP tab page text for ADDRESS tab page in view T77OMTABUS
Make an entry in view T77OCTABST with the technical name of the tab page (ADDRESS in this case) and a new description (Contact Information). The alternative SPRO path for this step is Personnel Management > Organizational Management > Hierarchy Framework > Adjust Tab Pages in Detail Area > Change Text and Icons on a Tab Page > Change Tab Page Text in all Tab Page Groups (
Figure 5).
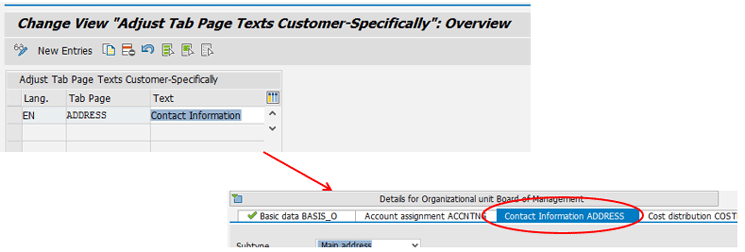
Figure 5
Insert an entry in view T77OCTABST to alter the text of an existing tab page and change how it’s displayed in transaction code PPOME
As seen on the left of
Figure 5, the text of the ADDRESS tab page is inserted as Contact Information as a new entry in view T77OCTABST. Once this is done, the result is visible in transaction code PPOME’s detail area (on the right of the figure).
This interface cannot be used to update the display of icons. Instead, you need to follow the following customization steps to change tab page icons.
Changing Tab Page Text and Icons in a Tab Page Group
To modify tab page text and icons in a specific tab page group update view T77OCTABUS accordingly. Or follow SPRO menu path Personnel Management > Organizational Management > Hierarchy Framework > Adjust Tab Pages in Detail Area > Change Tab Page Text and Icons in a Tab Page Group (
Figure 6). (The respective hierarchy framework scenario and object type should be specified along with the tab page name).
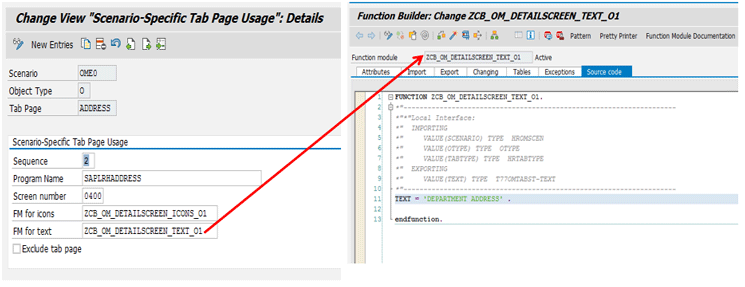
Figure 6
Alter the tab page text for a specific tab page group via view T77OCTABUS
Both the text and icons are updated via function modules. SAP provides standard function modules CB_OM_DETAILSCREEN_TEXT and CB_OM_DETAILSCREEN_ICONS for customizing text and icons, respectively.
You can either make a copy from the standard function module or create a totally new function module with the appropriate attributes (via transaction code SE37). Enter the name of this newly created function module in the FM for text field (
Figure 6). In this example, the text of the Address tab page is changed from the original value Address (
Figure 4) to the value DEPARTMENT ADDRESS (as seen in the ABAP code on the right side of
Figure 6). (The text following TEXT = in the function module body becomes the new text of the tab page.)
In the same vein, if you want to change the icon of a tab page in a specific tab page group, update view T77OCTABUS accordingly. (Note that this configuration screen is the same as the one on the left of
Figure 6.) Alternatively you can follow SPRO menu path Personnel Management > Organizational Management > Hierarchy Framework > Adjust Tab Pages in Detail Area > Change Tab Page Text and Icons in a Tab Page Group. Make a copy of the standard function module (CB_OM_DETAILSCREEN_ICONS) or create a totally new function module with the appropriate attributes (via transaction code SE37).
Enter the name of this newly created function module into the FM for icons field (the left of
Figure 7). In this example, the icon of the ADDRESS tab page is updated to be ‘ICON_ADDRESS’ (as shown in the ABAP code on the right).
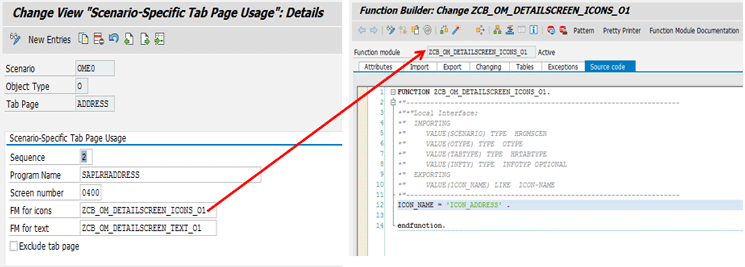
Figure 7
Alter the tab page icon in a specific tab page group via view T77OCTABUS
Note
The technical names and descriptions of icons can be checked via the transaction code icon.
Once you’ve made the changes as shown in
Figures 6 and
7 and saved your implementation entries, when you refresh transaction code PPOME, you notice that the text and icon updates now appear in the Details for Organizational unit Board of Management area, as shown in
Figure 8.

Figure 8
The changed tab page text and icons in the details area of transaction code PPOME
Changing the Tab Page Display Sequence
You can also change the sequence of the tab pages in the details area. Copy the entries of the respective columns (e.g., the columns for which you want to switch the order) from the T77OMTABUS view and paste them into the T77OCTABUS view. Or follow SPRO menu path Personnel Management > Organizational Management > Hierarchy Framework > Adjust Tab Pages in Detail Area > Change the Tab Page Sequence. You should specify the respective hierarchy framework scenario and object type along with the tab page name.
The sequence fields of the entries need to be changed as per the requirement. In the example shown in
Figure 9, the sequence of the DEPARTMENT ADDRESS ADDRESS tab and the Account assignment ACCNTNG tab are switched.
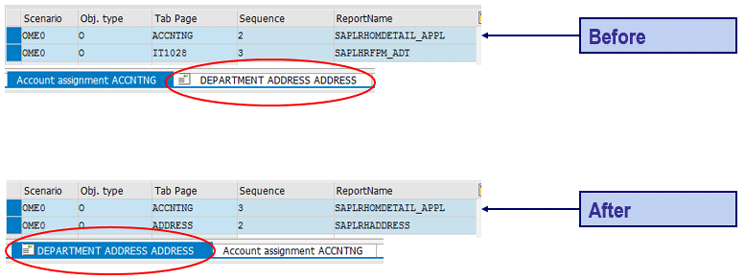
Figure 9
Change tab page sequence in the detail area
Hiding or Showing Tab Pages
You can also hide an existing tab page or make an invisible tab page visible. To do so, copy the entries of the respective column from the T77OMTABUS view and paste them into the T77OCTABUS view. Or follow SPRO menu path Personnel Management > Organizational Management > Hierarchy Framework > Adjust Tab Pages in Detail Area > Hide/Show Tab Page (
Figure 10). You should specify the respective scenario and object type along with the tab page name. To hide an existing tab page, select the Do Not Display check box next to your entries. Another option for hiding the tab page is to double-click an entry and select the Exclude tab page check box from the context-menu options that open.

Figure 10
Hide a tab page in the detail area
You can also make a hidden tab page visible. For this, follow the same steps, but make sure the Do Not Display or the Exclude tab page check box is unselected. In the example in
Figure 10, the tab page Address is hidden.
Integrating New Infotypes
To integrate either a customer-specific or an SAP standard infotype into the hierarchy framework, follow these two steps:
- Add the infotype as a tab page into the detail area.
- Display the infotype as a column in the object manager or overview area.
These steps can be implemented independent of one another.
Note
To create an organizational infotype from scratch, use transaction code
PPCI. Before executing transaction code PPCI, make sure you create the
structure HRIXXXX (XXXX stands for the infotype code). The rest of the
customization table entries are automatically created by transaction
code PPCI.
Adding an Infotype as a Tab Page in the Details Area
Many infotypes can be maintained per object type via expert mode transactions (transaction code PP01 or other object-type-specific transaction codes in the POXX format). However, in the PPOME details area, only some of these infotypes are visible as tab pages. To show other standard or customer-specific infotypes in the PPOME details area, you need to take two steps:
- Define your own tab page.
- Add your own tab pages to an existing tab page group.
Note
Tab pages don’t need to be directly linked to a specific infotype—any
screen that can somehow be related to a specific object type can be
inserted as a tab page. Details for creating tab pages which are not
directly linked to an infotype are not provided in this article.
Defining Your Own Tab Page
To insert an infotype (either a standard or customer-specific infotype) as a tab page, you first need to create an entry in view T77OMTABUS with a tab page key chosen from a custom namespace (beginning with the letter Y or Z). Then you need to maintain view T77OMTABUS, or follow SPRO menu path Personnel Management > Organizational Management > Hierarchy Framework – Integrate New Infotype > Add Infotype as Tab Page in Detail Area > Define Your Own Tab Pages.
In the screen that opens, click the Tab Page Definition folder on the left (
Figure 11). The Tab Page Definition screen on the right opens where you can insert the relevant entry by selecting the Infotype-specific check box next to it. In this example, the customer-specific infotype 9001 (Department Type) is inserted as a tab page. Then click the save icon to save your new entries.
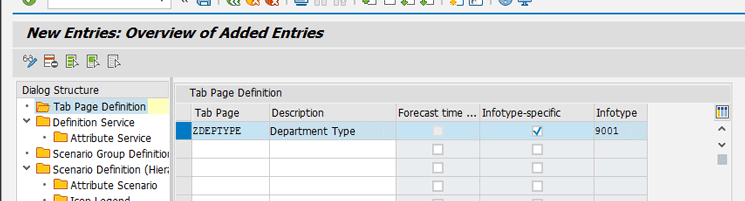
Figure 11
Create a tab page for an infotype
Adding Your Own Tab Pages to an Existing Tab Page Group
To make this new tab page visible in transaction code PPOME, you need to attach it to a tab page group. Go back to view T77OMTABUS (
Figure 11). Or follow SPRO menu path Personnel Management > Organizational Management > Hierarchy Framework > Integrate New Infotype > Add Infotype as Tab Page in Detail Area > Add Your Own Tab Pages to an Existing Tab Page Group. In the screen that opens (not shown), select the Scenario Definition (Hierarchy Framework) folder on the left. This opens the screen in
Figure 12, where you select the relevant hierarchy framework scenario (OME0 in this example). Then double-click the Tab Page in Scenario for each Object Type menu item on left, which opens the screen at the bottom of the figure where you insert the new tab page entry created in the previous step. In the example in the figure, the tab page Department Type ZDEPTYPE is inserted in the relevant tab page group for object type O – Organizational Unit.

Figure 12
Attach a tab page to a tab page group in transaction code PPOME
Note
As the tab page is marked as infotype-specific in the previous step, the
Program Name, Screen number, FM for icons, and FM for text fields do
not need entries. The system reads the relevant data from the customized
infotype tables.
Note
If the Object Type field entry is an asterisk (*), the system displays
the tab pages for all object types unless there is another entry with
the same scenario and sequence number and a specific object type.
Display Infotypes as Columns in the Object Manager and Overview Area
Another way of integrating an infotype into transaction code PPOME is to define it as a column in the object manager and overview area. For the implementation details, follow these steps.
Define Columns
To define a new column, execute transaction code SM34 (
Figure 13). There you maintain the T77COLFRAM view cluster (transaction code OOCOLFRAMCUST can also be used to access this view cluster directly). Or follow SPRO menu path Personnel Management > Organizational Management > Hierarchy Framework > Integrate New Infotype > Display Infotype as Column in Object Manager and Overview Area > Define Your Own Column. In the screen that opens (
Figure 13), double-click the Column Definition folder on the left. In the screen that opens on the right, insert an entry for the new column with a unique column name (in this example, ZDEPTYPE – Department Type).
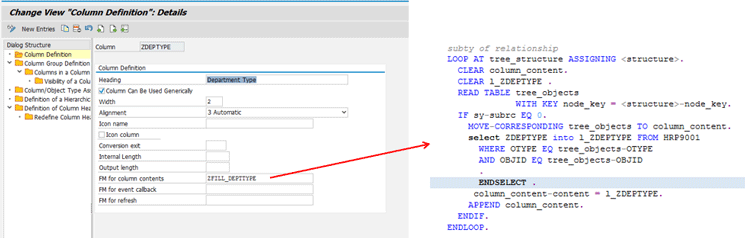
Figure 13
Define a new column
Some fields in
Figure 13 that deserve special attention are as follows:
- Conversion exit: This field is filled only for the columns whose contents cannot be sorted correctly in the display form (generally these are dates).
- Internal Length/Output Length: These fields are used in conjunction with the conversion exit field.
- FM for column contents: This function module should be specified any time the user inserts a new column. This function module is used to fill the column contents when it is displayed in transaction code PPOME. Figure 13 displays a sample code for this function module (function modules are maintained via transaction code SE37).
- FM for event callback: If the column is only used in the tree display, links, push-buttons, and check boxes, then a function module must be specified that reacts to a corresponding event.
- FM for refresh: This function module is used to refresh column content only if the content is buffered internally within the program. If this is the case, when there is a change to data this FM is called to invalidate the buffer.
Note
The standard function group OM_INTERFACE_TEMPLATES has templates for the
three function modules: FM for column contents, FM for event callback,
and FM for refresh.
Create or Customize a Column Group
After you create the new column, you need to attach it to a column group for the column to be displayed in transaction code PPOME. To do this, you have the option of either creating a new column group and inserting the column into it, or customizing an already existing column group.
To create a new column group, execute transaction code SM34, maintain the T77COLFRAM view cluster, and double-click the Column Group Definition folder on the left (
Figure 14).

Figure 14
The Column Group Definition main screen
Then click the New Entries button. This opens the screen on the right of
Figure 15 where you insert an entry for the new Column group with a unique column group name (in this case, ZFUNCGROUP). At a minimum, you must fill in at least the Column group and Name fields as they are the mandatory fields in this screen. Once you’ve made your entries, click the Save icon and the screen in
Figure 16 opens. (You can also follow SPRO menu path Personnel Management > Organizational Management > Hierarchy Framework > Integrate New Infotype > Display Infotype as Column in Object Manager and Overview Area > Customize Column Group.)
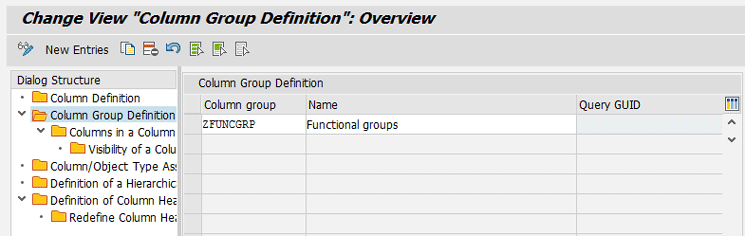
Figure 15
Create a new column group
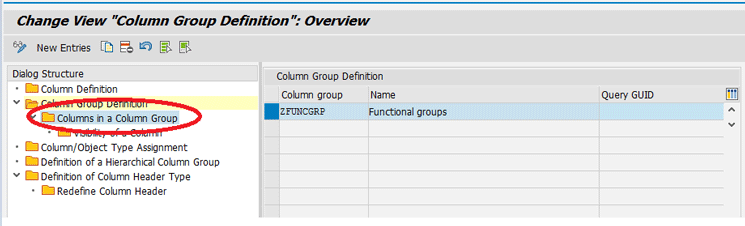
Figure 16
Insert columns into column group one
In
Figure 16, select the newly created column group entry on the right (ZFUNCGRP) and double-click the Columns in a Column Group folder on the left. This opens the screen in
Figure 17 where you can insert the columns belonging to that column group.
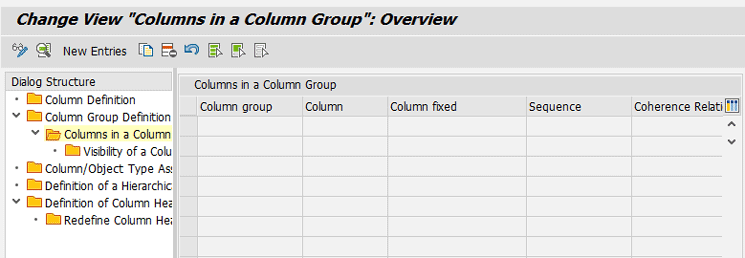
Figure 17
Insert the newly created columns belonging to the column group
In the screen that opens (
Figure 17), click the New Entries button. In the next screen that opens (
Figure 18), provide the details for the columns (created in the previous Defining Columns step) to be added to that specific column group. If one or more column needs to be visible or hidden together, you can customize them by using the Coherence Relationship field. After inserting the column to the column group click the save and back icons, respectively.
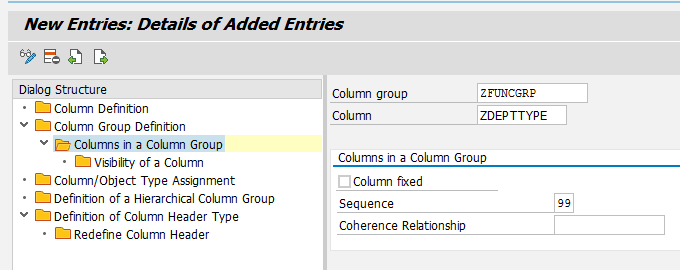
Figure 18
Insert columns into column group two
Select the newly created column entry on the right (
Figure 19), in this case, ZFUNCGRP, and double-click the Visibility of a Column folder on the left to change the visibility option of the column. In the screen that opens (not shown), click the New Entries button. This opens the screen in
Figure 20 where you set the Hidden check boxes next to the columns you want to hide.
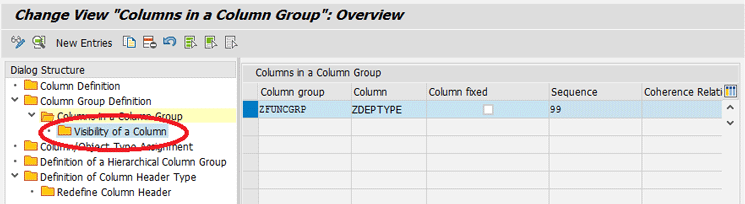
Figure 19
Select the column to change the visibility options
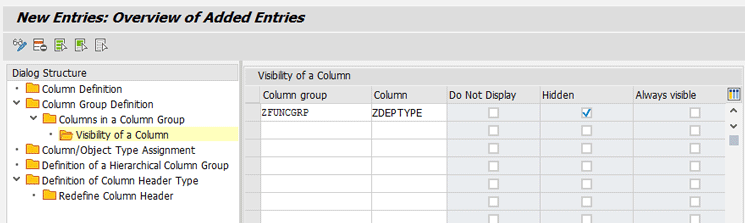
Figure 20
Change the visibility options of the column
The options for changing the visibility attributes of columns are as follows:
- Do not display – This means that the column exists within the column group, but the user cannot display it.
- Hidden – This means that the column is hidden by default when the user displays the corresponding column group for the first time. The user can then choose to show the column or not.
- Always visible – This means that the column is always displayed in the application and cannot be hidden by the user.
If you need to combine several columns from distinct column groups, use the hierarchical column group concept.
Double-click Definition of a Hierarchical Column Group folder (on the left of
Figure 19), and in the screen that opens (
Figure 21), click the New Entries button. This expands the screen at the bottom where you can choose which of the column groups’ columns (e.g., assigned column group column) are to be combined with a column group (e.g., column group column).
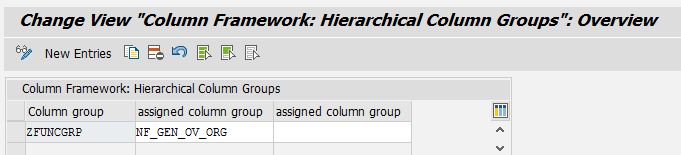
Figure 21
Define the hierarchical column groups
Note
Instead of grouping together existing or newly created columns to make a
column group, you can generate a query column group using transaction
code ARRAY_CREATE.
If you need to update an existing column group, instead of creating a column group from scratch, insert an entry for the relevant column group name and the new column name into view T77ACOLC along with the other attributes. In this example (
Figure 22), the new column ZDEPTYPE is inserted into the existing column group NF_GEN_OV_ORG.

Figure 22
Insert a new column into an already existing column group
As a result, the new column can now be seen both in the overview area and the object manager (
Figure 23).
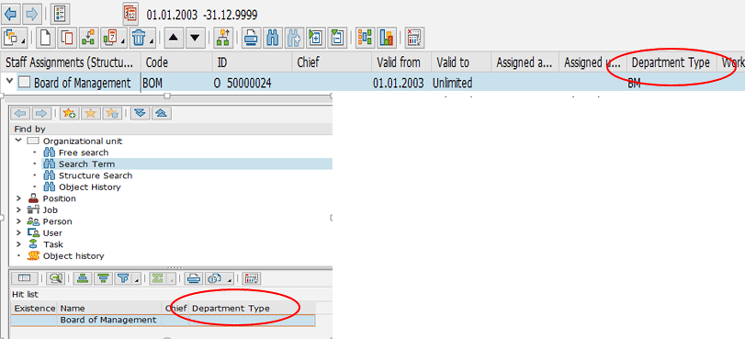
Figure 23
The Department Type column is displayed in both the overview area and the object manager of transaction code PPOME
Integrating New Object Types
Sometimes you need to integrate an object type (standard or customer-specific) into a hierarchy framework scenario that was not included before. This involves the following functions:
- Creating a new object type from scratch
- Making the object type instances searchable and selectable in the object manager
- Displaying and modifying the infotypes of the object type instances in the details area (discussed previously)
- Creating, modifying, or deleting instances of the object type and displaying and modifying the relationships of the object type instances in the overview area
Creating a New Object Type
To create a customer-specific object type, go to the view cluster T7780 via transaction code SM34 (or directly to transaction code OOOT), and in the screen that opens (
Figure 24), double-click the Object Types folder on the left. Then click the New Entries button and insert the new object type with the relevant information. (The alternative SPRO path for this step is Personnel Management > Organizational Management > Basic Settings > Data Model Enhancement > Maintain Object.) In this example, the Functional Group object type is created.

Figure 24
Create a new object type
Then, in view T777T (or transaction code OOIT), assign infotypes 1000/1001/1002 to the new object type. (The alternative SPRO path for this step is Personnel Management > Organizational Management > Basic Settings > Data Model Enhancement > Infotype Maintenance > Maintain Infotypes.) In the screen that opens (
Figure 25) select the 1000 infotype on the right and double-click the Infotypes per object type folder.
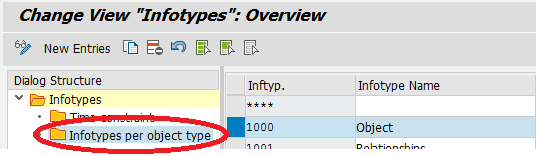
Figure 25
Assign an infotype to an object type
Click the New Entries button and the screen in
Figure 26 opens where you insert the relevant entry for the new object type.

Figure 26
Assign a second infotype to an object type
Repeat these two steps for infotypes 1001 and 1002.
If you need to assign a separate number range to the new object type, create a new entry with a subgroup name (in the format PLVAR/OTYPE) in transaction code OONR and maintain the number range accordingly (
Figure 27). (The alternative SPRO path for this step is Personnel Management > Organizational Management > Basic Settings > Maintain Number Ranges > Maintain Number Ranges.)
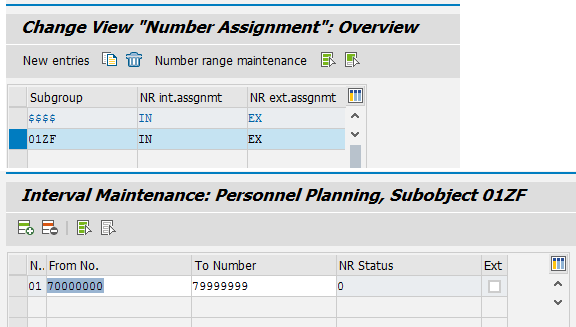
Figure 27
Create a separate number range for an object type
Adding a New Object Type to an Object Manager
This section covers the steps that are to be carried out for the newly created object type to become searchable in the object manager.
Define a Search Node for an Object Type
In view T77FOBJMAN (which can be accessed directly in transaction code OOOBJMANCUST), double-click the Definition of Search Node folder on the left (
Figure 28). (The alternative SPRO path for this step is Personnel Management > Organizational Management >Hierarchy Framework > Integrate New Object Type > Add Object Type to Object Manager > Define Your Own Search Node for Object Type.)

Figure 28
Define a Search Node for an object type
Click the New Entries button to create an entry for the new object type’s Search Node. In this case, you want the Search Node key to be selected from a custom namespace (beginning with the letter Y or Z).
Note
If the search node is tied to an object type, and if the name and icon
information are already defined in view T7780, then there is no need to
maintain the name and icon information in this step. The system
automatically populates those values from the object type’s master data.
The next step is to adjust the search area. In view T77CNODORD, click the New Entries button to insert an entry that includes the object manager scenario and the Search Node Key (
Figure 29). (The alternative SPRO path for this step is Personnel Management > Organizational Management >Hierarchy Framework > Integrate New Object Type > Add Object Type to Object Manager > Adjust Search Area.)

Figure 29
Adjust the search area for an object type
Next, assign the search tools to your own search node. In view V77CSEAT, insert an entry that includes the object manager scenario, the search node key, and the search tool name (
Figure 30). (The alternative SPRO path for this step is Personnel Management > Organizational Management >Hierarchy Framework > Integrate New Object Type > Add Object Type to Object Manager > Assign Search Tools to Your Own Search Node.)
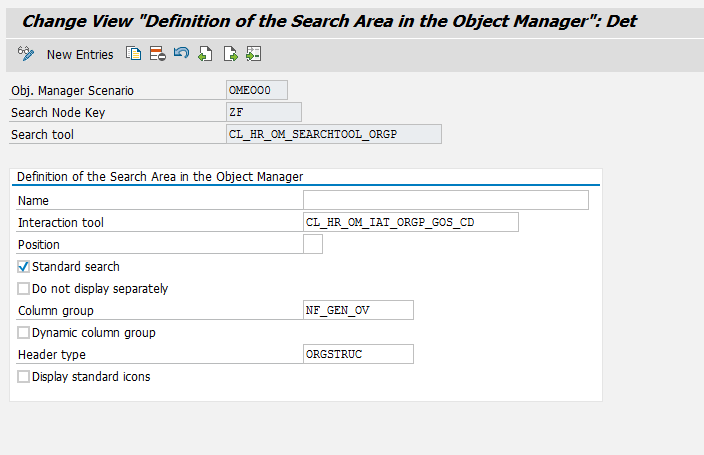
Figure 30
Assign a search tool to the search node
The number of entries to be inserted in this view depends on the number of search tools to be assigned to the new object type. The search tool named Standard Search is executed when the object type icon is clicked in the object manager.
The resulting display with the search icon (binoculars) is shown in
Figure 31.
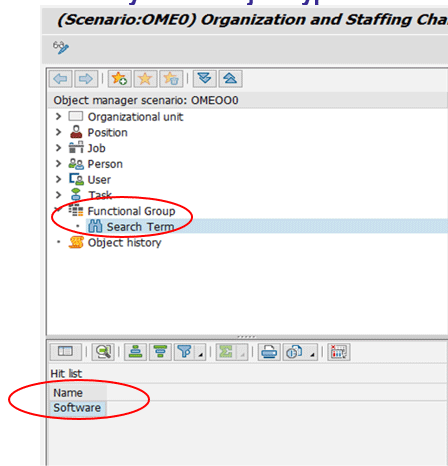
Figure 31
The Search Node for the newly created object type ZF is visible in the object manager area of transaction code PPOME
To display an object type in a structural overview object, in addition to the object manager, follow the process outlined in the next section.
Display Object Types in a Structural Overview Object
In this section, I provide answers to the following questions:
- How can you create, schedule, and delete instances of the new object type?
- How can you display and modify relationships between existing objects and instances of the new object type in the overview area?
Creating a Relationship and an Evaluation Path
To make the new object type (along with its environment) visible in the overview area, you need to create a relationship between this object type and the other objects that are to be included in the environment. Furthermore, an evaluation path involving all the relationships should also be created.
To create a relationship, you need to create two subtypes (in format AXXX and BXXX) for infotype 1001 (relationships are basically subtypes of infotype 1001), along with their time-constraint classes, in view cluster V_778U (or directly in transaction code OOSU). (The alternative SPRO path for this step is Personnel Management > Organizational Management > Basic Settings > Data Model Enhancement > Infotype Maintenance > Maintain Subtypes.)
In the example in
Figure 32, the relationship between the functional group and organizational unit is being created. Using the new entries, button entries for 1001 – A099 and 1001 – B099 should be inserted. Select an infotype and subtype on the right, and then double-click the Time constraint folder on the left to maintain the time constraint information. (Some of the available time constraint values are shown at the bottom of
Figure 32.) Then click the save icon to save your changes.
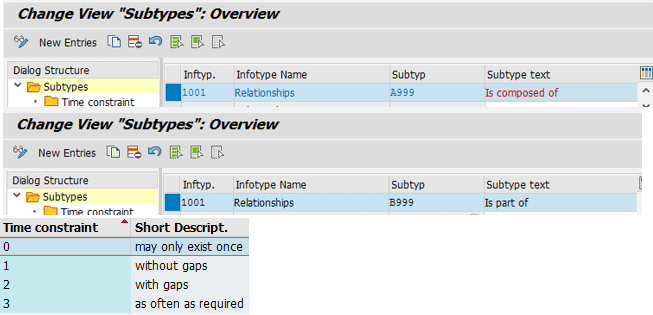
Figure 32
Create subtypes of infotype 1001 from scratch
Next, execute transaction code SM34 to access view cluster T778V (or access it directly via transaction code OOVK). In the screen that opens (
Figure 33), double-click the Links folder on the left and then click the New Entries button to insert an entry for the new relationship in the screen that opens on the right. (The alternative SPRO path for this step is Personnel Management > Organizational Management > Basic Settings > Data Model Enhancement > Relationship Maintenance > Maintain Relationship.)
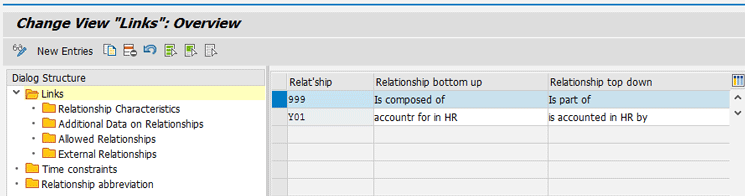
Figure 33
Insert a new relationship
Each new relationship must have an Allowed Relationships menu item. To maintain allowed relationships, select the relevant relationship entry on the right and double-click the Allowed Relationships folder on the left. In the screen that opens (
Figure 34) specify the object types for which this relationship can be created.

Figure 34
Specify the allowed relationships for the new relationship type
An evaluation path is simply a chain of relationships between the objects in a hierarchical structure. To create an evaluation path, go to the view T77AT (which can be accessed directly via transaction code OOAW). (The alternative SPRO path for this step is Personnel Management > Organizational Management > Basic Settings > Maintain Evaluation Paths.) In the screen that opens (
Figure 35), create a new evaluation path using the New Entries button. (Preferably choose the technical name of the evaluation path from the customer namespace.)
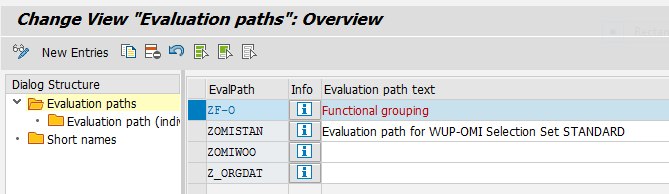
Figure 35
Create a new evaluation path
Then select the newly created evaluation path on the right and double-click the Evaluation paths (individual maintenance) folder on the left. In the screen that opens on the right (
Figure 36), assign all the objects and relationships to the evaluation path to determine the chain of relationships defined by this newly created evaluation path.
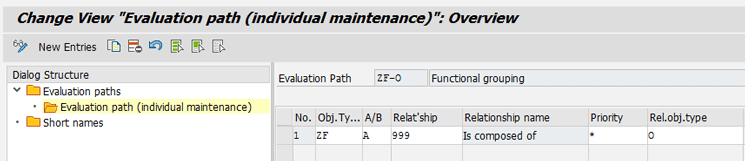
Figure 36
Assign objects and relationships to the evaluation path
Define a Service for a Structural Overview Object
To create, schedule, or delete instances of the object and to visualize and modify the hierarchical structures, the object should be visible in the structural overview object. A service—which is linked to an evaluation path—is used to make the object type visible in a structural overview object. When you call up the structural overview object from the hierarchy framework using this new service and with an object of the new object type, the structural overview object displays this object in the context of the entered evaluation path.
To create a new service, go to view T77OBJSER (which can be accessed directly via transaction code OOFRAMEWORKCUST). (The alternative SPRO path for this step is Personnel Management > Organizational Management >Hierarchy Framework > Integrate New Object Type > Display Object Type in Structural Overview Object > Define Your Own Service for Structural Overview Object.) This opens the screen in
Figure 37 where you double-click the Definition Service folder on the left and, in the screen that opens on the right, insert the object service key along with the object key.
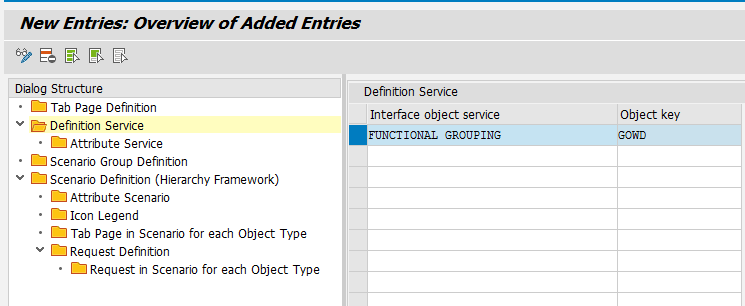
Figure 37
Define a new service from scratch
Note
The object key for the structural overview object is GOWD.
Define the Structural Overview Object Attributes for a Service
The next step is to define the technical attributes for the service entry created in the previous step. In the screen in
Figure 38, select the newly created service from the right and double-click the Attribute Service folder on the left. In the screen that opens on the right, specify all of the technical attributes (including evaluation path, technical depth, and column group) accordingly.
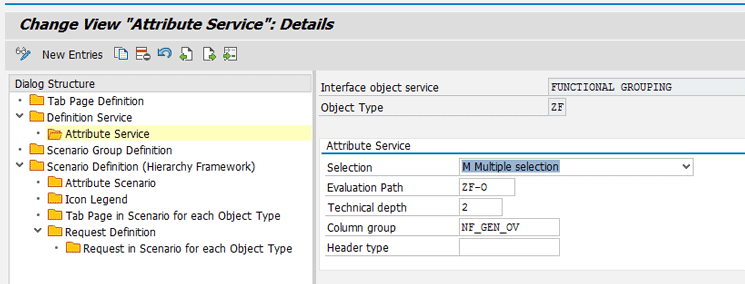
Figure 38
Specify the technical attributes of the newly created service
Define a Request
Each action to be carried out on the object type in the selection area of the object manager is defined by a request. Each request consists of two services. For each evaluation path to be visualized in a structural overview object, a distinct service and a request should be created. For each object, one service should be the standard service that is to be executed when the object is double-clicked in the object manager.
To define a request, go to view T77OBJSER (which can be accessed directly via transaction code OOFRAMEWORKCUST). (The alternative SPRO path for this step is: Personnel Management > Organizational Management >Hierarchy Framework > Integrate New Object Type > Display Object Type in Structural Overview Object > Define Your Own Request.)
In the screen that opens (
Figure 39), double-click the Scenario Definition (Hierarchy Framework) folder on the left. In the screen that opens on the right, select the respective scenario (OME0) and double-click the Request Definition folder on the left.
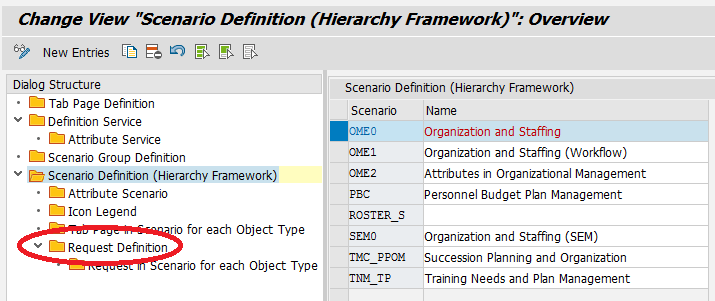
Figure 39
Define request for the first hierarchy framework scenario
In the screen that opens (
Figure 40), insert an entry for the scenario, the request, and for both services that are required.
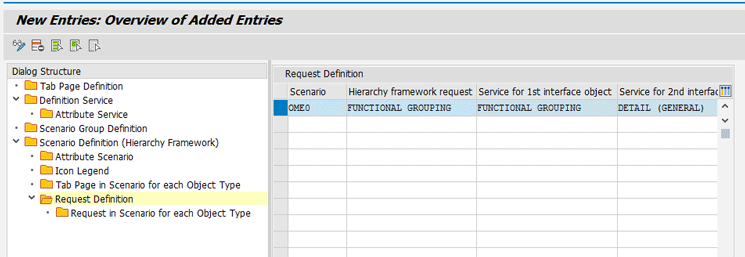
Figure 40
Define request for the second hierarchy framework scenario
Assign a Request to an Object Type
To assign a request to an object type, go to view T77OMIA_C and insert the scenario, object type, and request information (
Figure 41). (The alternative SPRO path for this step is Personnel Management > Organizational Management >Hierarchy Framework > Integrate New Object Type > Display Object Type in Structural Overview Object > Assign Your Own Request to an Object Type) If applicable, the standard action should be specified.
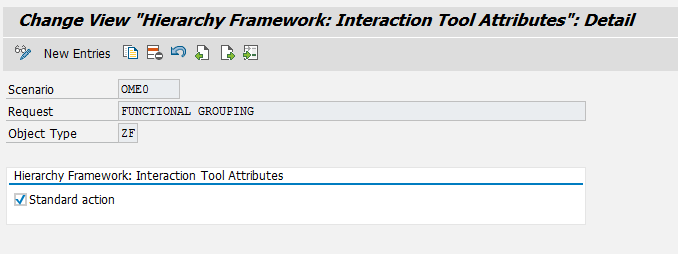
Figure 41
Assign a request to an object type
A Real-World Example: Create a Project Organization Chart
To flesh out this technical story, here is a real-world example in which all these hierarchy framework implementation steps are required.
In this scenario, a client asked me to maintain a project organizational structure in transaction code PPOME where organizational units included projects, and the projects included the roles and the employees attached to those roles. Each role was to be connected to a role type. Furthermore, they wanted this structure to be updated periodically from the project hierarchy in the Project System module. To achieve these requirements, I created the following object types, relationships, and evaluation path:
- New object types:
- ZP Project, ZR Role, and ZC Role Type
- New relationships
- 095 – Reports (line) to/is line supervisor of
- 096 – Belongs to/incorporates
- 097 – Holder
- 098 – Describes/Is described by
- 099 – Manages/Is managed by
- New evaluation path:
- O > ZP > ZR > P – Project reporting structure
The challenge I faced in this project was whether to use the standard object types, PJ – WBS Element (project and work breakdown structure, respectively) for Project, and A – Workcenter for Role. As a pro standards person, I generally avoid development and go for the standard solution. In this case, however, the tests revealed negative results because the WBS element numbering rationale caused problems, and the personnel assignments to work centers caused some issues in payroll execution. As a result of these issues, I decided to create new object types for both projects and roles.
Last but not the least, I created an ABAP program that provided integration between the project hierarchy in the project system and the organizational structure. The rationale behind the program is as follows:
- The project attributes from the project system were linked to ZP objects
- The work-center attributes from the project system were linked to ZR objects
- The work-center category from the project system was linked to ZC objects
- The project system project type was linked to the O-ZP relationship
- The project system project–work center assignment was linked to the ZP-ZR relationship
- The work-center person assignment from the project system was linked to the ZR-P relationship
I linked this program to a background job that was running daily and updating the corresponding tables in the OM side. The resulting structure for the project organizational chart is as shown in
Figure 42.
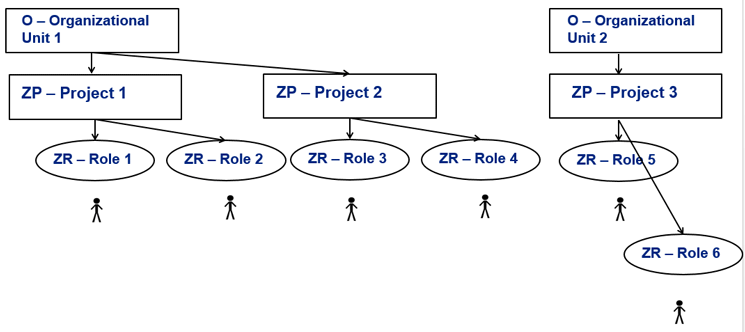
Figure 42
The project organization chart display with the required OM data
Dilek Adak
Dilek Adak has her MBA and is a computer engineer working as an SAP HCM Applications Manager for Vektora, Turkey. She has over 12 years of consultancy experience in SAP HCM, SuccessFactors, and SAP Analytics applications. Dilek is a frequent speaker at various international events on SAP HCM topics.
You may contact the author at
dilek.adak@vektora.com.
If you have comments about this article or publication, or would like to submit an article idea, please contact the
editor.