It’s a challenge to identify when a workbook or query was changed if many consultants are working on a project. You need that information when you are deciding which workbooks to transport. Learn about a method to monitor workbook changes.
Key Concept
In BW, it is important to have instruments for object monitoring. These tools are not a standard part of current versions of BW (3.0-3.5). You can use the application described in this article as part of your object monitoring strategy. It can provide you with a quick and easy understanding of the relationships among InfoCubes, queries, and workbooks.
Many BW projects have large groups of consultants heavily engaged in the development of Business Explorer (BEx) or Web Application Designer (Web AD) reports. Projects of this type usually encounter control and transport architecture problems.
For instance, picture this scenario. Ten people are working simultaneously to develop 20 BEx reports in a day. The reports are then transported to your test and production environments. After six months, BW BEx architecture involves hundreds of queries and workbooks that are constantly rebuilt and updated according to end-user demands. Every day these updates and corrections must be transported from development back to test and production environments, along with the newly developed reports.
When working in this type of environment, you might ask yourself, “Who developed this specific workbook? When was it developed? Who has changed it and when? Which queries are related to which workbooks and vice versa? How many queries or workbooks were developed since yesterday or last week?”
In addition to these questions, you are faced with another problem: transporting work-books and queries. If you and your coworkers develop 400 workbooks, nobody wants all of them to be nested into a transport because 90 percent of them are unchanged. The time required to organize such a transport could be an hour or more, which could cause the system to generate a time-out error. To prevent confusion, you should know exactly which queries and workbooks were developed or changed at a certain point in time and take only the modified ones into a transport.
To solve these problems, I’ve created an application called the MONitoring Application (MONA). It allows you to easily identify all queries and workbooks that are new or have changed. I have implemented MONA in the three largest customer sites in Israel, and the people responsible for controlling such processes are very happy with that solution.
In a two-part series, I’ll show you how to use MONA to make BEx reports that monitor and control your changed queries, workbooks, and InfoCubes. This article covers workbook monitoring and transport control. My next article will concentrate on the relationship among InfoCubes, workbooks, and queries.
Why Use MONA?
Normally, at the end of the day, report developers must develop a list containing information about queries and workbooks that they changed or created during the day. Once all the lists are collected, the person responsible for transport delivery must create a transport containing all these queries and workbooks. If you have many workbooks, the process of finding and inserting them into a transport request could take a lot of time.
You can omit all of these steps by using a part of MONA called Workbook Monitor. The process becomes simple. At the end of the day, the person responsible for transport creation and delivery uploads an ODS and runs a report that filters all workbooks that were created or changed during the day. Report developers no longer need to develop lists.
The primary purposes of MONA are:
- To improve monitoring and control of data upload processes from source systems into BW
- To increase the effectiveness of report and workbook development and to simplify the process of transports
- To understand, at a glance, the relationships among InfoCubes, BEx queries, and BEx workbooks
Although MONA is helpful under many circumstances, the application is crucial when working under the following conditions:
- Massive development and support of reports/workbooks provided by a large team of developers
- Frequent reports/workbooks redesign and transports from development to production systems
- Many InfoCubes with several workbooks and queries based on them
You can create the whole MONA application in a short development time, one to two weeks, using a number of BW-based tables. The tables RSRWBINDEX, RSRWBINDEXT, RSRWORKBOOK, and RSRREPDIR collect information about relations among InfoCubes, queries, and workbooks in the BW system. They also contain information about the changes in these relations. You can access all of these tables via transaction SE10 in your BW system. Here is what each table contains:
RSRWBINDEX — data about workbooks: IDs, creation time, change time, person who last changed them, etc.
RSRWBINDEXT — workbook IDs and their titles
RSRWORKBOOK — data about which query belongs to which workbook
RSRREPDIR — information about queries, types of reporting components (key figures, variables, etc.) for each query, InfoCubes, who queries belong to, query versions (active/modified/revised), and many other kinds of analysis-related metadata
Advantages of Workbook Monitor
Now I’ll focus on the first part of the MONA application called Workbook Monitor, which deals with workbook control. No strict dependency exists among MONA’s parts. You can choose to implement any combination of the parts according to your specific needs. For example, by implementing the workbook control functionality, you could gain control over the processes of checking and monitoring the creation and subsequent transportation of newly created or newly changed workbooks to test and production systems.
Figure 1 is an example of a report in Workbook Monitor. You can filter a Workbook Monitor report by date and time. Those parameters filter the workbooks that were changed since the selected date and time chosen. The report then presents only those workbooks that are relevant for transport.
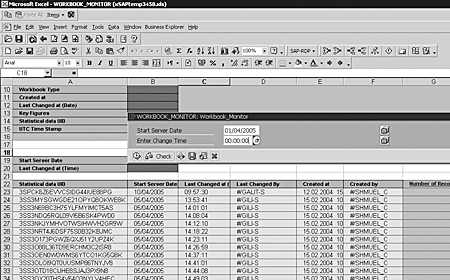
Figure 1
A Workbook Monitor report
The Workbook Monitor part of MONA observes all workbooks and breaks down the information about them by workbook ID, date and time of creation, date and time of change, person who created the workbook, person who last changed the workbook, and the object status (active/inactive/modified, etc.). The Workbook Monitor application also facilitates workbook transports. The other advantage of Workbook Monitor is that you can avoid overusing the metadata repository (transaction RSA1). Although you can get information about interrelationships between queries, query elements (such as key figures, structures etc.), and workbooks at the system level via the metadata repository, you cannot get the whole picture at a glance.
The report presents information such as Statistical data UID (the workbook ID), Last Changed at (Date), Last Changed By, Last Changed at (Time), Created at, and Created by.
Create Workbook Monitor
I created MONA using a number of ODSs and InfoSets designated for workbooks development monitoring and transport delivery. Using these structures, you can monitor what queries are related to which workbooks and InfoCubes via reports.
To implement the Workbook Monitor part of MONA, perform the following steps:
Step 1. Call transaction SBIW. In the SBIW screen, expand the Generic DataSources part of the tree and click on the Maintain Generic DataSources entry. This takes you to the Maintain Generic DataSources screen.
Enter the name for your generic DataSource in the Transaction data field, My_Transaction_DataSource, for example, and choose the Create button. This takes you to the next screen, Create DataSource for Transaction data: MY_TRANSACTION_DATASOURCE (Figure 2). Fill in all of the fields as shown in Figure 2 and click on the save icon. The system will prompt you to choose a package.

Figure 2
DataSource details
Step 2. Choose a package. In this example, I chose zsys. Fill in the appropriate package attributes and save. Note that you must configure a package or use an existing one. Use transaction SE80 to create a new package or choose from the existing ones. After assigning your DataSource to the package, the system automatically prompts you to the change request screen.
Step 3. Create a change request. This request will be assigned to the package for further delivery of the DataSource to your test and production systems. You can choose an existing change request or create a new one. I recommend creating a new one rather than putting different kinds of developments in one request. The system automatically assigns the change request number. You just have to give it a name. It also automatically assigns the object directory entry after choosing a package. Click on the save icon. The system brings you the DataSource: Customer version Edit screen after submitting the change request.
Step 4. The screen prompts you to choose which of the DataSource fields will be available for the Selection Criteria screen of the InfoPackage. Check the boxes of the Selection column to display fields in the InfoPackage Selection Criteria screen. To hide fields on this screen, check the corresponding boxes in the Hide field column. Click on the save icon to return to the previous screen. You receive the system message “DataSource has been saved successfully.”
Step 5. Use transaction RSA13 to get to the source systems inside BW. Choose your BW source system and right-click on it. In the context menu, choose the Replicate DataSources entry. The system activates the DataSource you’ve just created and it is ready to connect to the InfoSource.
Step 6. Use transaction RSA12 to go to the Administrator Workbench InfoSource screen. Right-click on the relevant part of the InfoSource tree and choose Create. Create an InfoSource to map all the fields that come from the DataSource into the ODS. First create a communication structure to include all the fields (Figure 3).
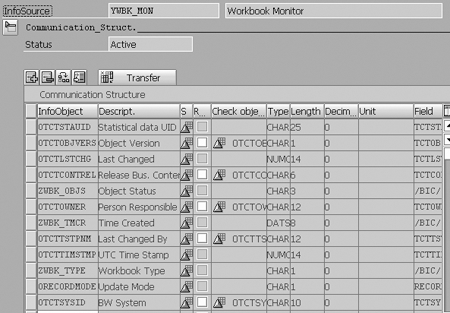
Figure 3
Create a communication structure
Step 7. Map all the fields via the transfer rules of the InfoSource without any transformations (Figure 4). The process of mapping involves filling the InfoObject column on the left part of the InfoSource screen with the InfoObjects responsible for the fields from your InfoSource.
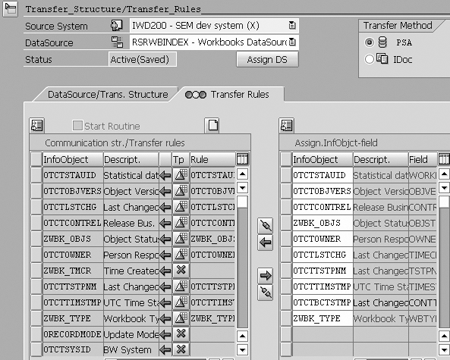
Figure 4
Map the fields that come from the DataSource into the ODS via the transfer rules
Step 8. Transaction RSA11 brings you to the InfoProvider screen in Administrator Workbench. Right-click on the relevant part of the InfoProvider tree and choose Create ODS Object. Create an ODS with all the necessary InfoObjects to receive data from your DataSource via your InfoSource (Figure 5).
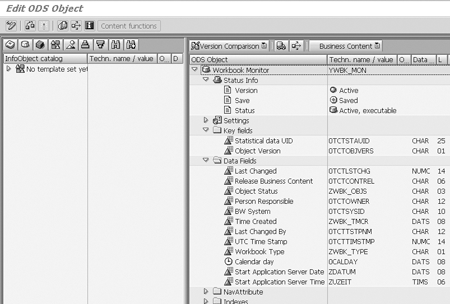
Figure 5
Create an ODS
Step 9. Create update rules for your ODS. Right-click on the ODS you’ve just created and choose Create Update Rules. Enter an InfoSource name that will feed your ODS via update rules.
Update Rules
Once you’ve created the DataSource, InfoSource, and ODS, you need to adjust the ODS’s update rules to load data properly. The problem with the DataSource is that fields that represent time and date are in the form of Universal Time Converted (UTC). They must be translated into the “normal” date and time format via two ABAP routines. These ABAP routines are implemented in ODS update rules. They transform date and time data and upload it into the ODS in the readable format. The whole process is presented next.
ABAP code is required to describe the conversion of date and time in the fields, which represent the date and time at which workbooks were changed. The code takes effect each time the ODS is updated and the date and time data is formatted just before it is uploaded into ODS. The code in Figure 6 converts the UTC date format into “normal” yyyy:mm:dd date format, which is readable. The Start Application Server Date field contains the date of the last workbook change.
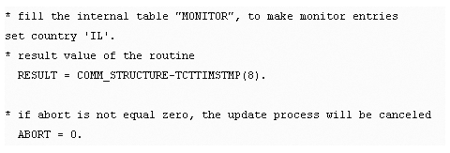
Figure 6
CONVERT_TO_DATE code
Next, convert the time into a readable format using the code in Figure 7. The Start Application Server Time field contains the date of the last workbook change. This code converts the UTC time format into “normal” hh:mm:ss time format, which is readable.
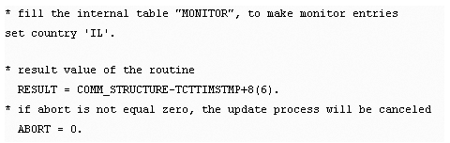
Figure 7
CONVERT_TO_TIME code
To add the code, go to the Update Rules change: Rules screen by expanding the triangle under your ODS and clicking on the green update rules icon (Figure 8). Revise your update rules by changing the fields Start Application Server Date to CONVERT_TO_DATE and Start Application Server Time to CONVERT_TO_TIME.
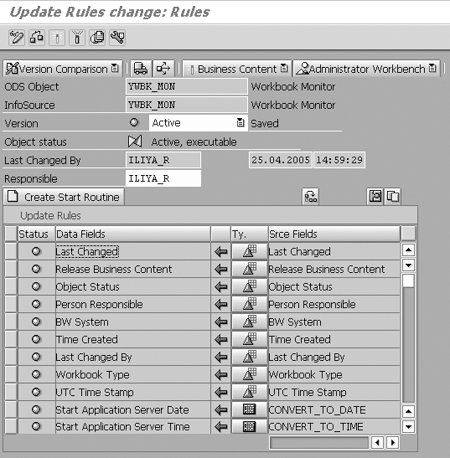
Figure 8
Change your update rules
Click on the Ty. column. Choose the Routine option from the five options and enter the name of your code, CONVERT_TO_DATE (Figure 9). This brings you to the Change Routine screen. In this screen, add the code to the routine as shown in Figure 10. Repeat the process with the CONVERT_TO_TIME code.
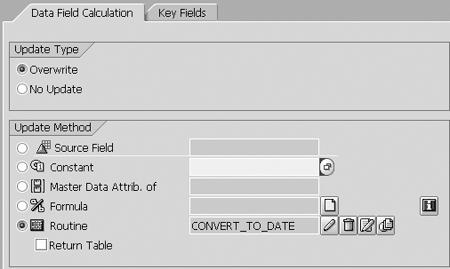
Figure 9
Choose the Routine option
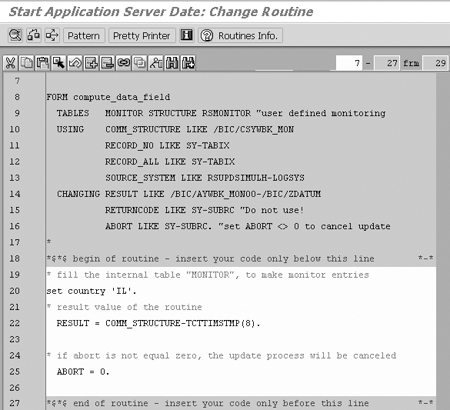
Figure 10
Enter code to modify date routine
Workbook Monitor Report
To update your ODS with data, you must create a BEx report to monitor and transport your workbooks. Use transaction RRMX to enter the BEx Analyzer screen for report creation. The structure of the BEx report is simple, as shown in Figure 11.
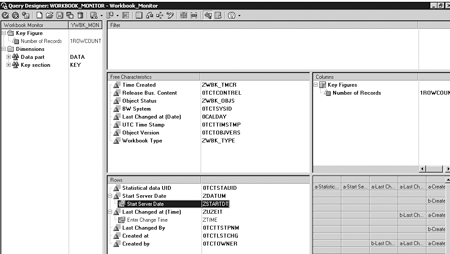
Figure 11
Structure of the BEx Workbook Monitor report
Note the two variables Start Server Date (ZSTARTDT) and Enter Change Time (ZTIME). Both of the variables are of the user entry/default value type. Configure them to filter as greater than or equal to by clicking on the Value Range option in the upper left corner of the selection screen. In the Options tab, choose the Greater than or Equal to option to configure your variable to filter the report by all values greater than or equal to those entered into the Variables prompt when reporting.
This allows the user to filter by specific dates and times. Thus, if users want to see all workbooks that have changed since 01/04/2005 at 00:00:00, they enter these parameters into the Variables prompt and run the report. The results, along with the variable parameters report, are presented in Figure 12.
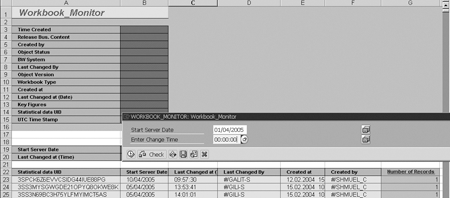
Figure 12
Resulting Workbook Monitor report that displays all workbooks that have changed since 00:00:00 of 01/04/2005
Transport Your Workbook Monitor Reports
When you open the report you created in the “Workbook Monitor Report” section, perform the following steps:
Step 1. Use transaction RSA1 to go into Administrator Workbench. Choose the Transport Connection tab. Choose Workbook and click on the drop-down arrow to the right. Double-click on Select Objects inside the Transport Connection screen to get the Input Help for Metadata screen.
Step 2. Click on the Object Name tab to choose all workbooks IDs. Then click on the filter icon to get to the Determine Values for Filter Criteria screen. Choose the multiple selection icon to go to the Multiple Selection for Object Name screen.
Step 3. Copy and paste workbooks IDs. Copy the workbooks IDs from the Workbook Monitor report (created in the “Workbook Monitor Report” section) and paste them into the Multiple Selection for Object Name screen (Figure 13). Submit the selection by pressing F8 or clicking on the copy icon. The transport delivers the exact workbooks that were chosen from the Workbook Monitor report, which was filtered by date and time to indicate those workbooks that were changed. The whole procedure is easy to operate and perform, and it saves a lot of time during transport organization.

Figure 13
Copy and paste workbook IDs from your Workbook Monitor report into the Multiple Selection for Object Name screen
Iliya Ruvinsky
Iliya Ruvinsky is a managing partner at Skywind Consulting Ltd., Israel. He is an SAP-certified BW consultant and instructor with more than 12 years of experience working with SAP BW and SAP BusinessObjects. He is an implementation and project management expert, serving for more than eight years as a trusted advisor to a wide range of Israeli enterprises, including in the insurance, energy, sales, and logistics industries. He is a graduate of the University of Tel Aviv, Israel, holding an MBA in information systems analysis.
You may contact the author at iliya.r@skywind.co.il.
If you have comments about this article or publication, or would like to submit an article idea, please contact the editor.