Learn how to configure standard and custom infotype field information in the Workforce Viewer and quick view panel of the search lane functionalities of HR Renewal 1.0.
Key Concept
The Workforce Viewer is one of the new features released with HR Renewal 1.0 Feature Pack 4. The Workforce Viewer gives users an easy to use and pleasing graphical presentation of their organizational structures. It is a web-based solution developed using SAP’s user interface development toolkit for HTML5, commonly known as SAPUI5.
HR Renewal 1.0 is an add-on for SAP ERP enhancement packages that contains new capabilities for some SAP HR areas. The HR Renewal 1.0 shipments contain functional as well as user experience (UX) improvements and are aimed at increasing the overall efficiency of SAP ERP HCM. Currently, HR Renewal 1.0 supports modules such as Organizational Management, Personnel Administration, Employee and Manager Self-Services (ESS and MSS), HCM Processes and Forms, and SAP Learning Solution. The HR Renewal 1.0 solution is based on the SAPUI5 technology. (For more details about SAPUI5, follow this link: https://scn.sap.com/community/developer-center/front-end.) HR Renewal 1.0 requires SAP Gateway, and SAP technology that allows connecting SAPUI5 with the SAP system’s back end (e.g., SAP Employee Central Component [ECC]) in a secure way.
Note
In enhancement package 6, HR Renewal 1.0 is installed as an add-on. In
enhancement package 7, HR Renewal 1.0 is delivered as a standard
solution.
The Quick View Panel
The quick view panel became available in the HR Renewal 1.0 release, and is part of the search lane and Workforce Viewer functionalities of HR Renewal 1.0. The quick view panel shows the most important facts about employees—their organizational units and positions. From the quick view panel, the employee’s information can be viewed, such as the email and cost center ID; position information, such as job, holder, and staffing status; and organizational information, such as direct reports and vacant positions. In the SAP-delivered solution, the quick view panel has little information that is retrieved from infotypes. I show a simple way to add additional standard or custom infotype field information in the quick view, which helps display important master data information such as employee, organization, and position uniformly across the employee, organizational unit, and position quick view panels.
First, here’s a brief overview of some of the salient features of HR Renewal 1.0.
The Landing Pages of HR Renewal 1.0
HR Renewal 1.0 is based on a landing page that is a web-based user interface (UI) application developed using SAPUI5. It offers the users a single point of access to their respective role-based content.
For the SAPUI5 applications to appear on the landing page, you first have to create Collaborative Human Interface Parts (CHIPS). CHIPS are contained in a small lane and are the building blocks of the landing page that contains the application UI —examples of CHIPS are circled in Figure 1. CHIPS are created using the Lanes Page Builder (LPB). CHIPs can be selected when the toggle icon is selected as in Figure 2. Click the toggle icon again and the CHIPS selection is hidden (Figure 3). There is a small expand-page icon on the upper right corner of each of these lanes. By clicking this icon (highlighted by the red boxes in Figure 3) you can open the search lanes in an expanded view.

Figure 1
An example of a landing page with CHIPS and search lanes

Figure 2
A landing page with the toggle settings option turned on
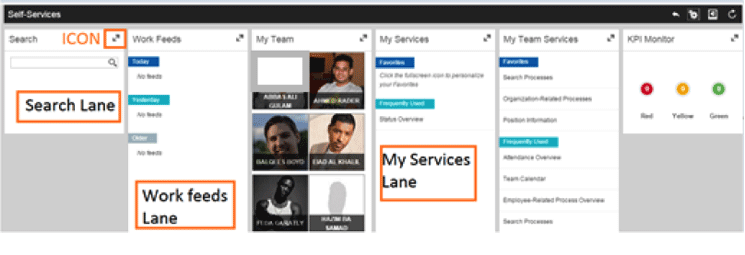
Figure 3
The lanes are expanded to view more details and search options
Note
You can follow this link to learn more information about CHIPS, LPB, and lanes:
SAPUI5 information.
Based on the SAP ECC role assignment, the landing page offers lane selection options, as shown in Figure 1. In the figure, the user has ESS, MSS, and HR Professional role assignments in the SAP back-end system. The HR Professional role is part of the HR Renewal 1.0 release. It allows users to search by employee, position, and organizational unit and lets the user perform actions on selected objects. Search lanes are part of landing pages, and the available search lanes change depending on whose landing page is being viewed.
Based on the roles assigned to the user, certain lanes can be selected. In Figure 1, by selecting the appropriate box, a lane is opened on the screen and saved for future log-in. For example, the HR Professional user selects the Actions and Organization CHIPS, and it opens the lanes as in the screen in Figure 4.
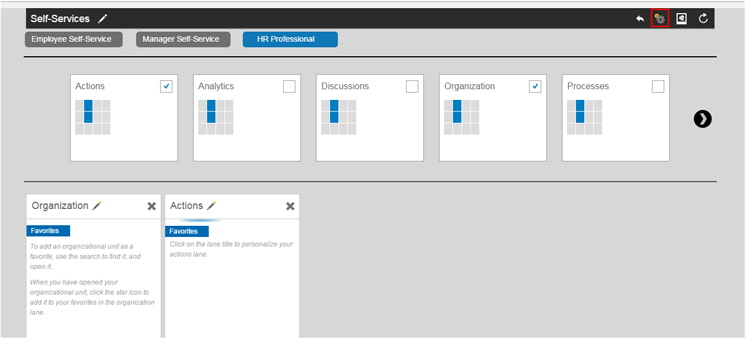
Figure 4
HR Professional user selection screen
In this example, I select the Actions and Organization CHIPS by ticking the check boxes in the upper right. Then click the toggle icon (boxed in red in Figure 4) and the screen shown in Figure 5 opens with the details for those two CHIPS.
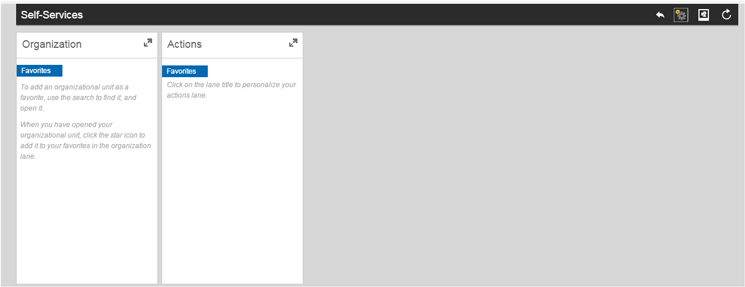
Figure 5
HR Professional lanes
Figures 6 through 8 show examples of the landing pages, with their respective search lanes, for the following roles: HR Professional, MSS, and ESS. Table 1 shows a list of the available lanes for each role.
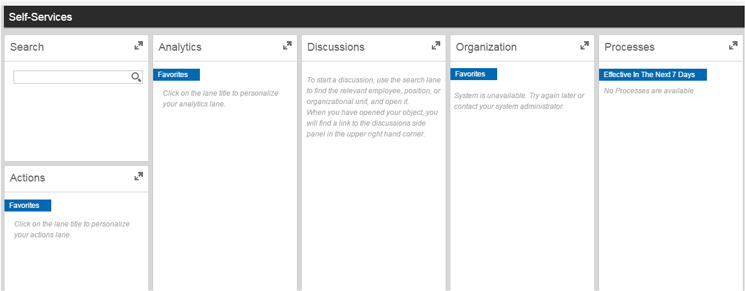
Figure 6
Example of an HR Professional landing page with its available search lanes
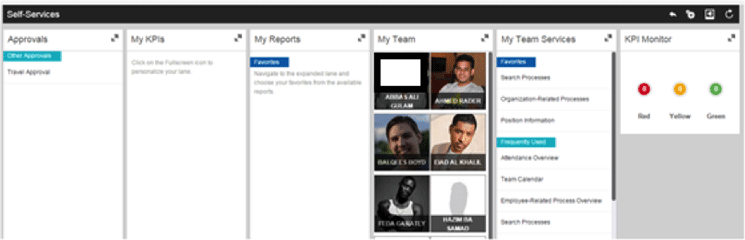
Figure 7
Example of an MSS landing page (no search lanes are available)

Figure 8
Example of an ESS landing page with its available search lanes
| ESS lanes (Figure 4) |
MSS lanes (Figure 3) |
HR Professional lanes (Figure 2) |
| My Info |
My Team |
Actions |
| My Learning |
My Team Services |
Analytics |
| My Services |
My Reports |
Discussions |
| Work Feeds |
Approvals |
Organization |
| Search |
My KPIs |
Processes |
|
KPI Monitor |
Search |
| |
|
Tasks By Draft |
| |
|
Tasks By Priority |
| |
|
Tasks By Time |
Table 1
Lanes by role
Now that you’re familiar with what these look like in the system, let’s discuss the search lane functionality and the Workforce Viewer of HR Renewal 1.0 in more detail.
Search Lanes in HR Renewal 1.0
As discussed in the previous section, each landing page displays a unique set of search lanes depending on the user’s role. A user who only has an ESS role can view only the result list that contains available ESS information, such as contact details and organizational assignments. Users who are assigned the HR Professional role can see results for all information about employees, organizations, and positions. Managers with the MSS role do not see any search lanes. Users with an MSS role see My Team, My Team Services, My Reports, My KPIs and KPI Monitor lanes.
In this example, I show how to search for a user with the ESS role. I want to see the quick view panel from the user search list. To start the search, enter a search term in the Search field and click the magnifying-glass icon  (Figure 9). In this case, I enter text Georgia as I want to find all employees with the name Georgia.
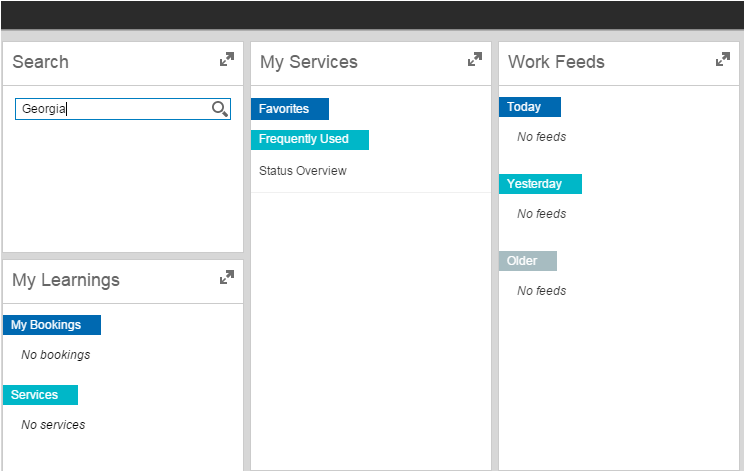
Figure 9
Start a search using the search lane
This opens a screen (Figure 10) with an expanded search lane that shows a list of Search Results. The first result’s details (for Georgia Othman) are displayed in the quick view panel (on the right of the screen). To see a quick view of any user’s information, choose a name from the Search Results and double-click to open the pop-up quick view window with their information.
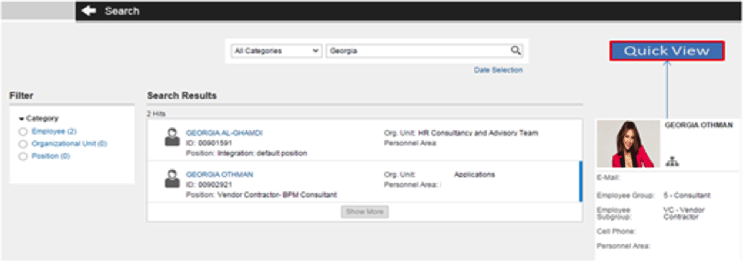
Figure 10
An employee’s quick view information from the search results
Workforce Viewer
The Workforce Viewer represents easy-to-read graphical representations of organizational structures, and is used across the ESS, MSS, and HR Professional roles landing pages. To illustrate the Workforce Viewer, I select the My Team option of the MSS landing page (Figure 11) and click the expand lane icon.
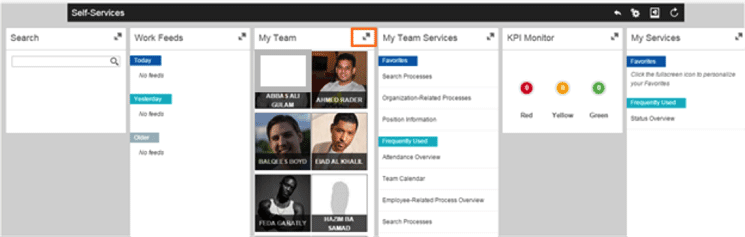
Figure 11
The My Team lane in the MSS landing page
This loads the Workforce Viewer and you can see the People and Organization tabs (Figure 12).
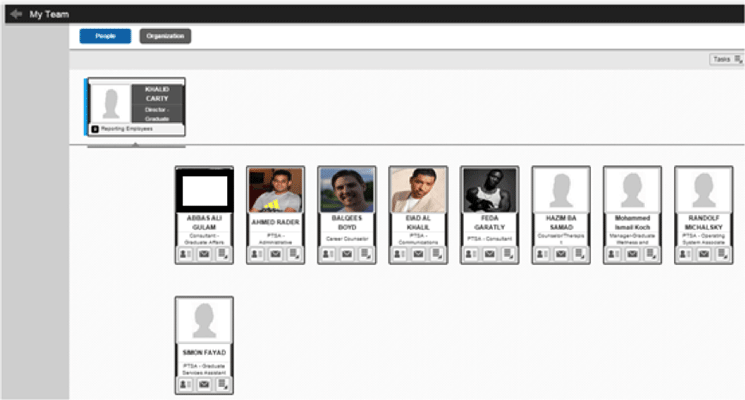
Figure 12
The Workforce Viewer
There are different types of card styles used within the Workforce Viewer—the Employee Card, Manager Card, Organizational Unit Card, and Position (or Chief Position) Card (Figure 13). On each card there is a quick view icon (boxed in red). When you click this icon a quick view panel opens (shown at the bottom of Figure 13) with the details for that respective card (such as employee, position, and organization).
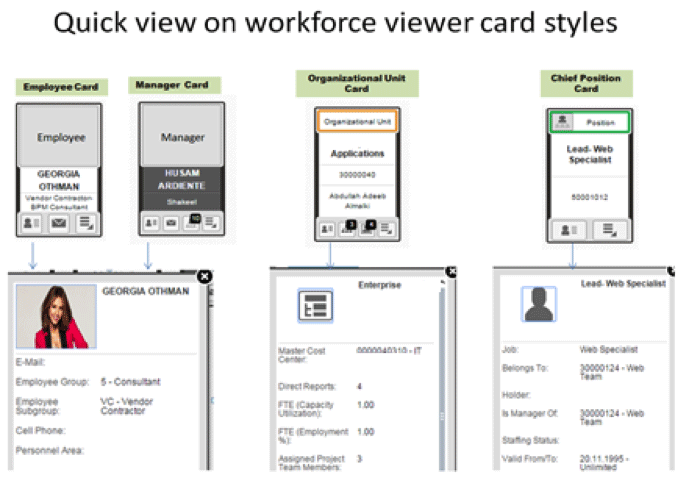
Figure 13
Card details shown in the quick view panel
SAP-Delivered Data Retrieval Configurations
The SAP ERP HCM system has standard configurations for employee, organizational unit, and position quick views. To view the configuration details of the quick view configuration IDs in the back end, follow menu path SPRO > Personnel Management > Personnel & Organization > Master Data Application > Object Profile Page > Short Profiles >Create configurations for data retrieval. This opens the screen shown in Figure 14.
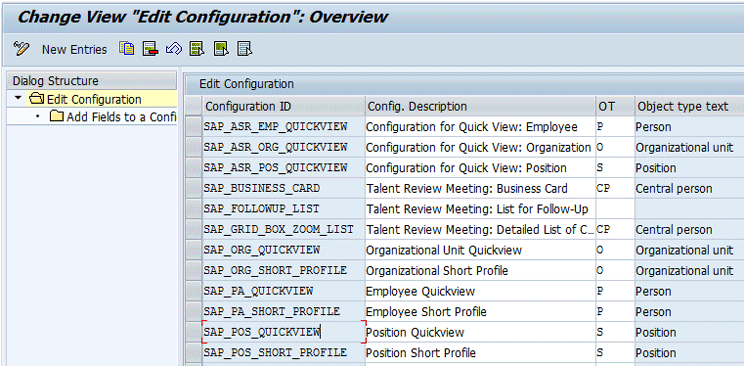
Figure 14
Configuration for quick views
Table 2 shows the configuration ID for the respective quick views. Each configuration ID has relevant fields that appear in the quick view.
| Quick view |
Configuration ID |
Employee
|
SAP_PA_QUICKVIEW
|
Organization
|
SAP_ORG_QUICKVIEW
|
Position
|
SAP_POS_QUICKVIEW
|
Table 2
Quick view configuration IDs
The next step is to configure the infotype fields so that they can be added to the quick view configuration IDs.
Configure the Infotype Field Details
In my example scenario, I show how to add the Nationality of the employee to the employee quick view. Employees’ nationality information is stored in the PA0002 field NATIO. By following these steps, additional information can be added to quick view panels to show managers, employees, and HR professional users important master data information of the employee, organizational unit, and position information uniformly across all the quick view panels.
Follow menu path SPRO > Personnel Management > Personnel & Organization > Master Data Application > Object Profile Page > Short Profiles > Extend Field selection > Add Fields to Field Selection Catalog. In the screen that opens (not shown) click the execute icon  and the screen shown in Figure 15 opens. Click the New Entries button.

Figure 15
Create new fields to retrieve data
This opens the screen shown in Figure 16 where you enter the new Field Name (ZPA0002_NATIONALITY, in this example), the new Description (Nationality), select the Category (SAP_PAIT) from the right-click context-menu options (not shown), and enter the description in the BAdI Field (ZPA0002_NATIO_BADI_FIELD). Once you’ve entered the details, click the save icon.

Figure 16
Add a new field for Nationality to the employee’s quick view window
The Category selection is important as this acts as a Business Add-In (BAdI) filter for retrieving the data in the BAdI. The BAdI field name (ZPA0002_NATIO_BADI_FIELD) is used as a reference for the field name (ZPA0002_NATIONALITY). In the BAdI implementation, the data is retrieved against the BAdI field name, and the field name is used to configure the field against the configuration ID.
In order to view the newly added field in quick view, you need to add the new field to the employee configuration ID (in this example, SAP_PA_QUICKVIEW). Since you are enhancing the employee quick view panel, use the SAP_PA_QUICKVIEW configuration ID. To define the new field, follow menu path SPRO > Personnel Management > Personnel & Organization > Master Data Application > Object Profile Page > Short Profiles > Create configurations for data retrieval. In the screen that opens (not shown), click the execute icon, which opens the screen in Figure 17.

Figure 17
Add fields to quick view configuration
Select the employee’s configuration ID (SAP_PA_QUICKVIEW). Once you’ve reviewed the information to make sure it’s accurate, double-click the Add Fields to a Configuration folder on the left and the screen in Figure 18 opens.

Figure 18
Configuration ID SAP_PA_QUICKVIEW with fields
Click the New Entries button and the screen in Figure 19 opens, where you add the new Nationality field to the configuration ID.
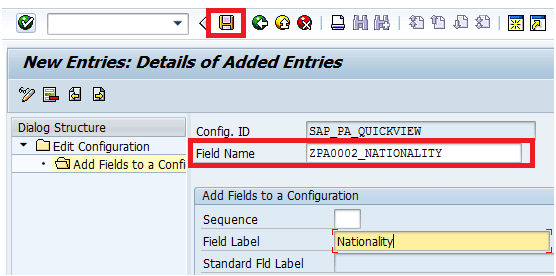
Figure 19
Add the new field to the employee’s configuration ID
Select ZPA0002_NATIONALITYas the Field Name from the right-click context-menu options (not shown), enter Nationality as the Field Label, and save your changes with the save icon.
If, as in this example, the infotype field is a PA field and you selected the SAP PAIT category (Figure 16), there is no need to implement any BAdI for retrieving the data. However, there is an additional configuration step required in the IMG path only for PA infotype fields. Follow menu path SPRO > Personnel Management > Personnel & Organization > Master Data Application > Object Profile Page > Short Profiles > Extend Field Selection > Maintain Infotype Fields for Employee Short Profile and in the screen that opens (not shown) click the execute icon. This opens the PA infotype screen (Figure 20) where you click the New Entries button, and the screen in Figure 21 opens.
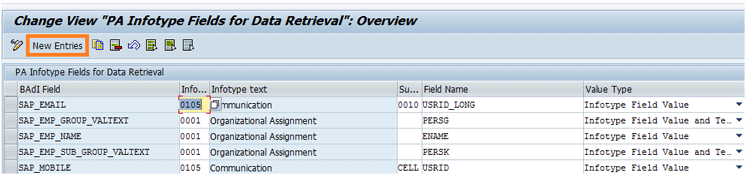
Figure 20
Add the new entry for the PA infotype field

Figure 21
Select the new infotype fields for data retrieval
Enter ZPA0002_NATIO_BADI_FIELD in the BAdI Field column and, using the right-click help option, select the infotype value as 0002. Leave the infotype text and Sub… columns blank, enter NATIO in the Field Name column, and select the infotype Field Text Value Type from the drop-down options in the Value Type Column. Then click the save icon to save your changes.
BAdI Details for Data Retrieval
For the PA infotype field, you do not have to create an implementation of the BAdI—there is already one available from SAP. In this scenario, the newly-added field ZPA0002_NATIONALITY retrieves data from the standard BAdI implementation HRPAO_DR_FIELDS_PA_INFTY_DATA. This is because the PA infotype fields by default are handled in the implementation class CL_HRPAO_IM_DR_PA_INFTY_DATA class of BAdI implementation HRPAO_DR_FIELDS_PA_INFTY_DATA.
BADI Details for Non-PA Infotype Fields
For fields that are not for PA infotypes, there is a separate BAdI implementation to retrieve the data. To see the SAP-delivered BAdI implementations, follow IMG path SPRO > Personnel Management > Personnel & Organization > Master Data Application > Object Profile Page > Short Profiles > Extend Field Selection > BAdI: Evaluate Fields for Data Retrieval and in the screen that opens (not shown) click the execute icon. This opens the screen shown in Figure 22.
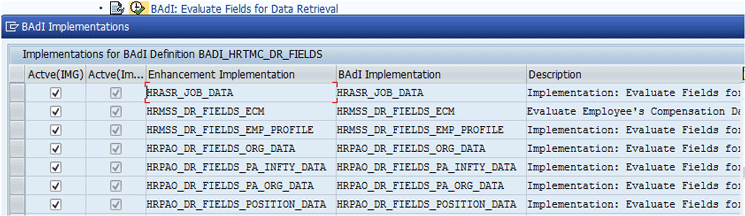
Figure 22
SAP-delivered BAdIs for data retrieval
To implement the additional, separate BAdI implementation, you need to deactivate the standard BAdI and implement a custom BAdI to retrieve the data. In this article I have covered only displaying the PA infotype information in the quick view. If you want to learn the steps for displaying master data information of the non-PA infotype information, then follow the details as explained in the IMG path. To see the SAP-delivered BAdI implementations, follow IMG path SPRO > Personnel Management > Personnel & Organization > Master Data Application > Object Profile Page > Short Profiles > Extend Field Selection > BAdI: Evaluate Fields for Data Retrieval, and click the eyeglass icon. This opens a screen (not shown) where you can see and follow the steps for creating a custom BAdI implementation.
Overriding Standard Configuration Tables and Creating Web Dynpro Components
Next you have to configure a new Web Dynpro component and override the standard configuration table. In the standard SAP ERP HCM system, the quick view Web Dynpro configuration IDs are read from table V_T77PAOMDQVCF. In this case, you have to define a new Web Dynpro configuration ID in order to view the Nationality field. The newly created configuration ID then has to be added to table V_T77PAOMDQVCFC.
Note
Be aware that you should not make any changes to the configuration
entries in the standard SAP table V_T77PAOMDQVCF. Once the new Web
Dynpro configuration ID is added to table V_T77PAOMDQVCFC, the SAPUI5
application reads the configuration entries from the table
V_T77PAOMDQVCFC irrespective of the entries available in the standard
table V_T77PAOMDQVCF.
Here are the details for creating the custom Web Dynpro configuration. Execute transaction code SE80 and in the screen that opens (Figure 23) select the Repository Browser option. Then, in the field that shows Web Dynpro Comp. / Intf., select FPM_QUICKVIEW_THING from drop-down options and click the eyeglass icon. This opens the screen shown in Figure 24.
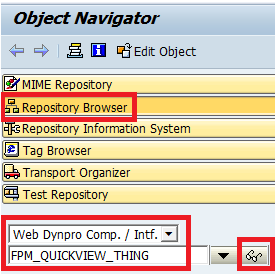
Figure 23
Select the Web Dynpro component FPM_QUICKVIEW_THING
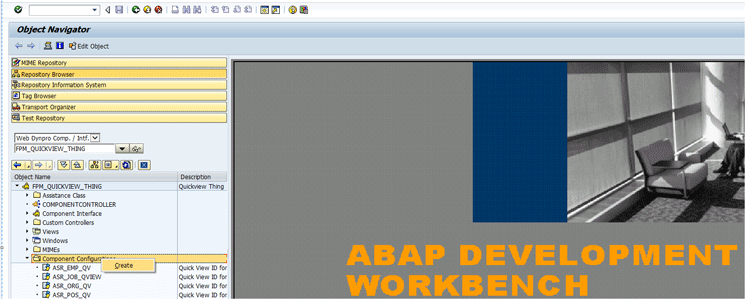
Figure 24
Configure the component
Select the Component Configurations folder, right-click to open the context menu, and choose Create (Figure 24). This opens the Editor for the Web Dynpro ABAP Component Configuration screen (Figure 25) where you enter the Web Dynpro component configuration. Enter FPM_QUICKVIEW_THING in the Component Name field, Z_EMP_QUICKVIEW in the Configuration ID field, and then click the New button. This opens the screen shown in Figure 26.

Figure 25
Enter the new Web Dynpro component configuration details
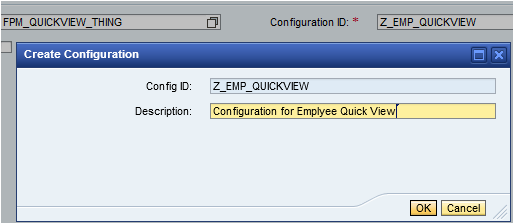
Figure 26
Add a description for the new configuration ID
Enter the Description (Configuration for Employee Quick View, in this example) and click the OK button. This opens the Select Package dialog box (not shown). Enter your SAP package name for transporting to different landscapes (the SAP development, quality, and production systems) and click the OK button. This opens the pop-up window in Figure 27. Enter the Feeder Class name (CL_HRPAO_QV_TH_HROBJECT) and click the Edit Parameters button and the pop-up window in Figure 28 opens.

Figure 27
Add the feeder class for the component configuration
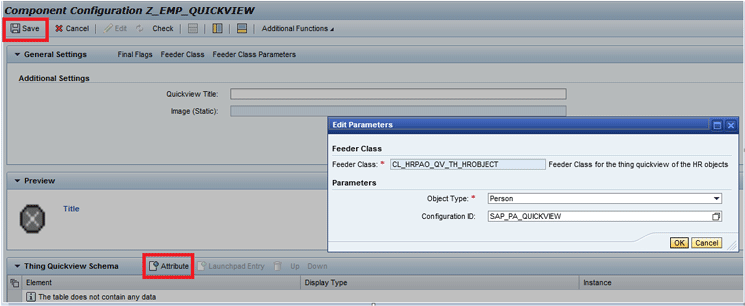
Figure 28
Create the new attribute to be added to the quick view panel
In the Object Type field, select Person from the drop-down options. Then select the icon to the right of the Configuration ID field to see your choices and make your selection—in this case, SAP_PA_QUICKVIEW. Click the OK button and, in the next screen click the OK button again which takes you back to the Component Configuration screen shown in the rear of Figure 28.
To add the new attribute to the quick view configuration, click the Attribute icon (highlighted in Figure 28). This opens the screen shown in Figure 29, where you select the Nationality Field Name and Field Label row and click the OK button. Again, the rear screen in Figure 28 opens where you click the save icon to save the entire component configuration.
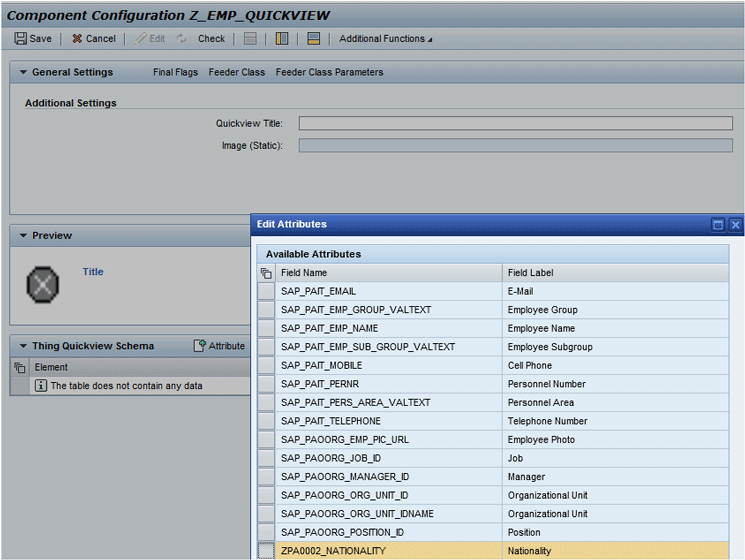
Figure 29
Add the new attribute
Note
The help value for the configuration ID changes based on the Object Type selection made in the screen in
Figure 28.
This is because when you make a change to the object type it also
changes the configuration for the entire configuration ID as configured
in the IMG (menu path SPRO > Personnel Management > Personnel
& Organization > Master Data Application > Object Profile Page
> Short Profiles > Create configurations for data retrieval for
respective Object types).
Table 3 shows the quick view configuration IDs for all the object types delivered by SAP.
Quick view
|
Configuration ID
|
Object type
|
Employee
|
SAP_PA_QUICKVIEW
|
P
|
Organization
|
SAP_ORG_QUICKVIEW
|
O
|
Position
|
SAP_POS_QUICKVIEW
|
S
|
Table 3
Quick view configuration ID for the different object types
In the screen that opens (Figure 30), check to see that your new field has been added to the quick view schema. Then click the save icon to save the component configuration.
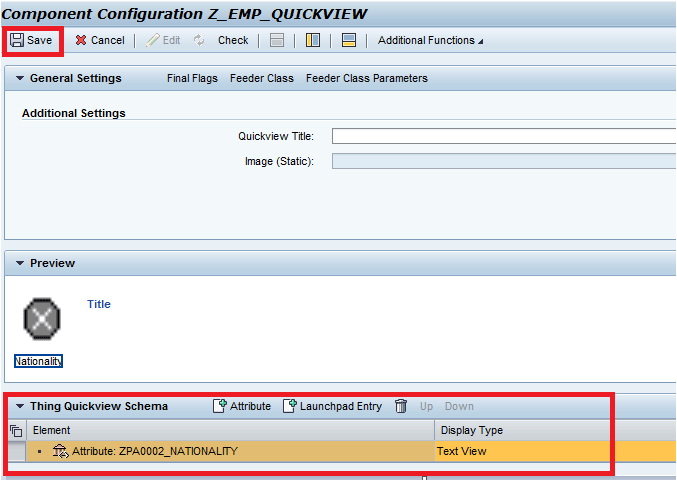
Figure 30
Save the new component configuration
The next step is to configure the newly created Web Dynpro component configuration in the table V_T77PAOMDQVCF. Execute transaction code SM30 and in the screen that opens (not shown) enter V_T77PAOMDQVCF in the View Name field and click the maintain button  . This opens the screen in Figure 31, where you can see the configuration table entries. This is just to show you the standard SAP configuration—you don’t make any entries in this screen.
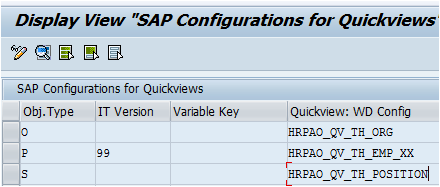
Figure 31
The SAP-delivered configurations
Note
If you want to display the custom-defined quick view panel instead of
the SAP-delivered quick view, you first have to define the
Z_EMP_QUICKVIEW Web Dynpro configuration in table V_T77PAOMDQVCFC.
If there are configurations maintained for the object types O, P, or S
in table V_T77PAOMDQVCFC, then during run time the configurations for
the quick view are picked from custom table V_T77PAOMDQVCFC and not from
the SAP-delivered table V_T77PAOMDQVCF.
The screen in Figure 32 opens where you select P as the Object Type from the Help pop-up options, 99 (international version) as the infotype version, and Z_EMP_QUICKVIEW in the QV: WD Config field. Then click the save icon to save your entries.

Figure 32
Create a new configuration table V_T77PAOMDQVCFC
The New Quick View Panel View with the New Configuration ID Component
After these configuration steps have been completed, the quick view for the employee displays the nationality information as configured in the Web Dynpro component configuration.
To see this in action, let’s search for an employee name in the search lane of the ESS landing page. As I did in the first part of this article, enter Georgia in the search lane (Figure 9). The Search opens the expanded lane (Figure 10).Click the Search List to open the quick view in the right of the Search list. The quick view displays only the Nationality field as per the new configurations (Figure 33).
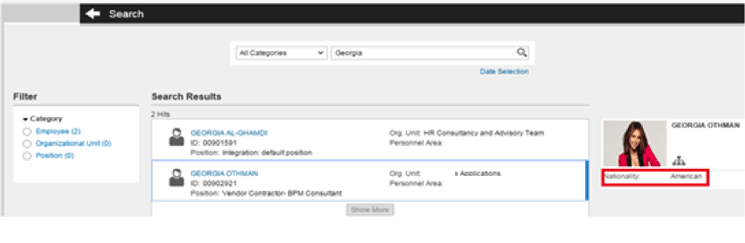
Figure 33
The employee’s quick view with just the Nationality field showing
You can make changes to the information for the Organizational Unit and Position quick views by following these same steps.
Rajkumar Shanmuganathan
Rajkumar Shanmuganathan is a freelance SAP Lead Technical Consultant. He has worked in SAP for over 10 years, seven of which he focused on SAP HCM as a techno-functional consultant on several international projects. He is SAP-certified in ABAP, CRM, and SAP HANA, and currently is working projects that involve new SAP technologies, such as SAPUI5, SAP Gateway, and SAP Fiori. Rajkumar regularly shares his knowledge in the SAP SDN/SCN forum. You can view his blog posts by following this link: https://scn.sap.com/people/rajkumar.shanmuganathan3/content.
You may contact the author at ssrajkumar2004@gmail.com.
If you have comments about this article or publication, or would like to submit an article idea, please contact the editor.