Learn about the Advanced Shipping Notification (ASN) functionality available in the materials management module. Discover how its integration with other modules helps you receive updated information from vendors, create a reliable production plan, and meet your customer’s delivery date. Find out details about the customizations you need to set in the system to activate ASN.
Key Concept
Advanced Shipping Notification (ASN), also known as vendor confirmation, refers to information that vendors (or other external business partners) provide about ordered goods. An ASN can be a loading or transport confirmation, an order acknowledgment, or a shipping notification. Use ASN to update transactional purchasing documents such as purchase orders, scheduling agreements, stock transfer orders, and intercompany stock transfer orders based on the latest information received from vendors or other business partners.
Order and shipping confirmations are important components in a company’s ability to ensure punctual delivery to its customers. A form of confirmation in purchasing is inbound delivery, which is created on the basis of an incoming shipping notification. The shipping notification represents a vendor’s confirmation (Advanced Shipping Notification [ASN]) to a purchasing organization of a delivery date for a certain quantity of ordered materials (or the date of performance of ordered services). Some of the benefits of using ASNs are:
- Confirmations enable the customer to plan better. During the period between a transactional purchasing document date and the planned delivery date, the customer receives increasingly precise, reliable, and up-to-date information from the vendor pertaining to the expected delivery.
- Inbound delivery can streamline the entire supply chain, especially in the case of a long vendor lead time. An inbound delivery can be created automatically based on ASN settings. This is reflected in more accurate production and purchasing planning. Inbound delivery is a must in the case of handling units (e.g., containers) because you can only use it via an inbound delivery in the receiving processes.
- Inbound delivery is a must in the case of a decentralized warehouse, because inbound delivery manages the goods receipt (GR) processes between the decentralized warehouse management system and the central SAP ERP system
I use a real case to provide a practical example of how ASN works. I use a purchase order as the purchasing document, but you can apply the concepts to other ASN-relevant documents such as scheduling agreements or contracts. The main elements of ASN are:
- The confirmation category, which represents a specific event to be tracked (e.g., order acknowledgement, goods loading, and shipping notification)
- The confirmation control key, which links the various confirmation categories in a specific order
Table 1 provides the details of the example business case that was implemented in production. In this scenario, the company used the confirmation control keys Z001 and Z002 to track regional and intercontinental deliveries, respectively. The confirmation categories track the following due dates:
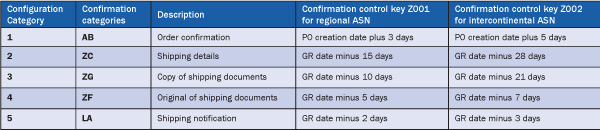
Table 1
Example confirmation categories and confirmation control keys
Customizing Activities
All customizing activities are done before you test anything in the system. This section outlines the main customizing steps necessary to activate an ASN solution in SAP ERP.
Step 1. Define external confirmation categories. These categories represent the steps to process an ASN. To create these categories, follow menu path Tools > Customizing > IMG > Execute Project > Materials Management > Purchasing > Confirmations > Define External Confirmation Categories or use transaction SM30 with view V_T163E (Figure 1).

Figure 1
Define external confirmation categories
Step 2. Define internal confirmation categories. Assign an external confirmation category to each internal confirmation category to enable the system to recognize which confirmation category represents order acknowledgments and which represents shipping notifications, for example.
The internal confirmation categories control message processing when a confirmation is received via Electronic Data Interchange (EDI) or transactions for the manual creation of inbound deliveries or via rough GRs. (If a GR takes place in two steps, it is first entered as rough and then as exact. A rough GR can only be entered if a special confirmation key is set for the purchase order items, which is beyond the scope of this article.)
Follow menu path Tools > Customizing > IMG > Execute Project > Materials Management > Purchasing > Confirmations > Define Internal Confirmation Categories or use transaction SM34 with the view cluster T163D. SAP provides the standard values in Figure 2, but you can overwrite them (e.g., if you are using a custom inbound delivery document type).

Figure 2
Define the internal confirmation categories
The Intern. Conf. Cat. 2 (shipping notification/inbound delivery) is assigned automatically to the external confirmation category LA (shipping notification, which is linked to the inbound delivery type EL). This means that when an EDI message with the 2 is received, the system recognizes that it is a shipping notification. It creates an inbound delivery and updates the confirmed quantities and dates in the confirmation overview of the purchasing document.
Step 3. Set up confirmation control keys. Define the confirmation control keys that represent the schema of the ASN process by following menu path Tools > Customizing > IMG > Execute Project > Materials Management > Purchasing > Confirmations > Set Up Confirmation Control or by using the transaction SM34 and the view cluster VC_T163G (Figure 3).

Figure 3
Set up confirmation control
After defining the confirmation control keys, define the confirmation sequence. For the confirmation sequence, you specify the order in which the individual confirmations defined in a confirmation control key are expected and which confirmation categories should be automatically monitored. Additionally, you can specify whether each confirmation category is for your information only or also relevant to material requirements planning (MRP) and the GR. To meet the sample customer’s needs, the confirmation categories linked to the confirmation category key Z001 and Z002 have been reported in Figures 4 and 5.
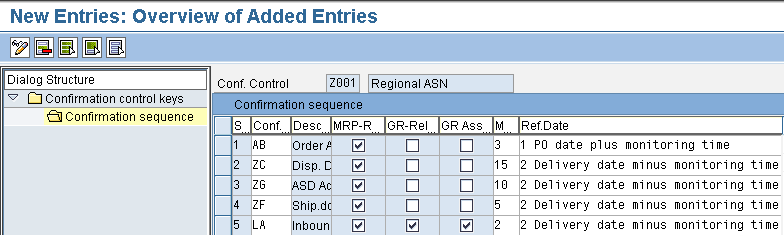
Figure 4
Set up confirmation control key confirmation sequence for Z001
The meanings of the fields in Figures 4 and 5 that are relevant for the confirmation sequence are:
- Sequence: The sequence in which the confirmations from the vendors are expected
- Confirmation: The confirmation categories relevant for the confirmation control key
- MRP-Relevant: Categories relevant for planning processes. If this check box is selected, then the MRP is updated from a quantity and date point of view by those categories. In this case, you can see that all confirmation categories are in the MRP Stock Requirement List
- GR-Relevant: Only one confirmation category can have this option selected and usually it is the last one that is replaced by a GR. Consequently, the transactions are closed from a planning point of view.
- GR Assignment: This flag is needed in case some sites do not allow the GR quantity to be different than the ASN quantity. For example, suppose you have the following situation: PO (100 EA) – ASN (50 EA) – GR (80 EA). Say you want the GR to be possible only for 50 and not for 80 because the GR quantity is greater than the ASN quantity. You also want to post the 20 from the inventory difference account. In this example the confirmation control keys Z001 and Z002 do not allow receipts that exceed the ASN quantity (up to the PO quantity and tolerance).
- Monitoring.Period: Monitoring period for confirmation expressed in days. It takes the validity based on the reference date field’s value.
- Reference.Date: This field can have two values (PO date plus monitoring time or GR time minus monitoring time)
Together, the Monitoring.Period and Reference.Date define the due time for a vendor’s confirmation. Note that each confirmation control key has additional fields specifically for EDI transmissions, as shown in Figure 6. (Figure 6 is the continuation of the screen shown in Figure 5.)
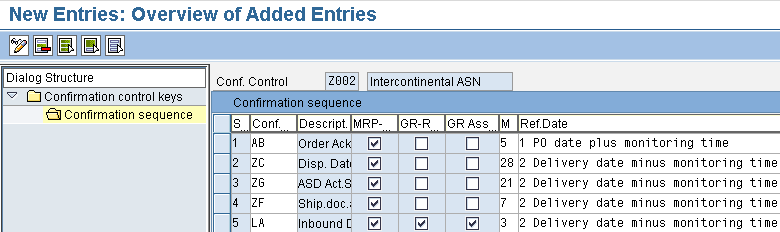
Figure 5
Set up confirmation control key confirmation sequence for Z002
The meanings of the fields in Figure 6 are:
- Tol2Early: Tolerance for too-early confirmation dates via EDI expressed in days. If the date defined in the PO differs from the one confirmed by the vendor exceeding this value, then the system sends an error message. Note that to enable the system to generate an error message, you have to define the system message ME 795 as an error in purchasing customizing. You can do this by using transaction S_ALR_87002225 or following menu path Tools > Customizing > IMG > Execute Project > Materials Management > Purchasing > Environment Data > Define Attributes of System Messages > System messages (Figure 7).

Figure 7
Change system messages in materials management purchasing
- Tol2Late: Tolerance for Too-Late Confirmation Dates via EDI expressed in days. If the date defined in the PO differs from the one confirmed by the vendor exceeding this value, then an error message is provided by the system.
- VMat: Adopt Vendor Material Change. If this box is checked, the vendor’s material number transmitted via EDI (in inbound) is adopted in the PO (it will overwrite the existing vendor’s material number).
- Price: Adopt Price Change. If this box is checked, the vendor’s price transmitted via EDI (in inbound) is adopted in the PO line item. This occurs only if the price is within the tolerance limits defined in the fields PrOverr. % and PrShfl. %.
- PrOverr. %: Permitted Price Overrun in % for inbound EDI
- PrShfl. %”: Permitted Price Shortfall in % for inbound EDI
- Sbj.to. Rem.: Confirmation Subject to Reminder/Expediting. If this box is checked, the date specified for the corresponding confirmation category is taken into account to generate reminders and urgent messages.
Step 4 (optional). Set up defaults for confirmation category keys in a purchasing document. Depending on the contractual terms of agreements with vendors (e.g., if a vendor usually delivers the products in the same manner), you can default the confirmation control key in the PO line item. Otherwise, you should maintain the key at the purchasing information record level. Note that defaulting the confirmation control key is not a mandatory step but it is important to know that the system has this option.
To default the confirmation control key from the vendor master record (purchasing view) or from the purchasing info record, use the customizing transaction S_ALR_87006716 or follow menu path Tools > Customizing > IMG > Execute Project > Logistics Execution > Shipping > Deliveries > Define Order Confirmations for Inbound Deliveries. Specify the combination of Purchasing Document Category/Order Type/Plant/Storage Location/Control Key that is relevant to default the control key in a purchasing document line item. In this article, I use the default specified in the first line of Figure 8.

Figure 8
Confirmation control key default
As shown in Figure 8, you can default a confirmation control key by purchasing document category (Cat), purchasing order type (OTyp), plant (Plnt), storage location (SLoc), and confirmation control key (Ctr.).
This option is useful if you need an inbound delivery automatically created for a PO for external non-SAP systems. In fact, there are some warehouse systems that require an inbound delivery as the basis for the GR posting, depending on certain business requirements.
Step 5. Define packaging material types. Here you define the various packaging material types that the business uses. You can assign this key to inbound deliveries to identify a transport, which is very beneficial if you handle your goods movements via handling units. To do so, follow menu path Tools > Customizing > IMG > Execute Project > Materials Management > Purchasing > Confirmations > Define Packaging Material Types (or use transaction S_ALR_87002419). In Figure 9 you see the standard SAP entries, but you can add as many entries as the business requires.
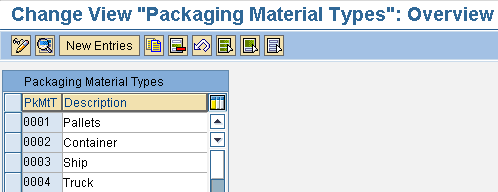
Figure 9
Define packaging material types
Note that to have a packaging material type relevant as a means-of-transport type for an inbound delivery, you have to define it in customizing as shown in Figure 10. To do this, use transaction VHAR or follow menu path Tools > Customizing > IMG > Execute Project > Logistics – General > Handling Unit Management > Basics > Define Packaging Material Types.

Figure 10
Define internal confirmation categories
ASN in SAP ERP
This section outlines the main transactional steps necessary to use ASN in SAP ERP and the main documents you can use to track ASNs.
Note
The manual ASN process should be limited to specific cases. If your company must exchange notifications with a large volume of external business partners, then I recommend implementing an automatic solution based on EDI/XML technology.
Step 1. Set up the ASN in a PO. When you are working with different confirmation categories, you must enter a confirmation control key on the item detail screen when creating a PO or outline purchase agreement (e.g., a scheduling agreement or a contract). This key determines which confirmations are expected from the vendor (e.g., an order acknowledgment and a shipping notification) and in which sequence. To set up the control key on the PO, use transaction ME21N or follow menu path Logistics > Materials Management > Purchasing > Purchase Order > Create > Vendor Known. After entering the initial details about the vendor and enterprise structure details, you see the screen in Figure 11.

Figure 11
Specify the confirmation control key in the PO line item
In the Order Ack. (order acknowledgment number) field, specify the number of the vendor’s order acknowledgment (i.e., the number assigned to incoming mail or date of receipt). This provides a basis for monitoring the acknowledgments. Select the Conf.Req. (order confirmation [acknowledgment] requirement) check box so that the vendor can acknowledge the purchasing document (such as PO or outline agreement). Choose Z001 Regional AS in the Cont. Ctrl. Menu dropdown menu.
Step 2. Follow up on expected confirmations. To track the missing vendor’s confirmations, you can use two transactions:
- ME92F to monitor the receipt of order acknowledgments. Alternatively, follow menu path Logistics > Materials Management > Purchasing > Purchase Order > Messages > Monitor Order Acknowledgements
- ME2A to monitor the receipt of order confirmations. Alternatively, follow menu path Logistics > Materials Management > Purchasing > Purchase Order > Reporting > Monitor Confirmations
Step 3. Enter the ASNs in a PO. Use transaction ME22N to enter the confirmations received from the vendor or other business partners in the PO. Alternatively, you can follow menu path Logistics > Materials Management > Purchasing > Purchase Order > Change > Vendor Known. After you enter the PO document number, you see the screen in Figure 12.
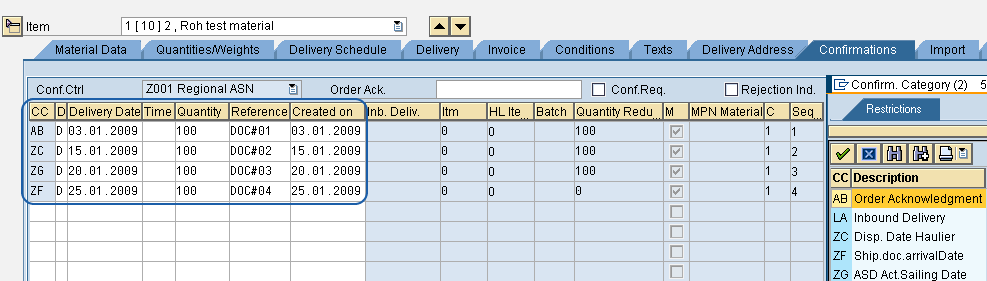
Figure 12
Enter the confirmation categories in the PO
The expected confirmation categories and their dates have been manually entered by the buyer based on the documents. Note that the picking list is in random order and has nothing to do with the order defined by the business: AB, ZC, ZG, ZF, and LA (the LA confirmation category is created automatically upon the creation of the inbound delivery referenced in the PO line item, and LA represents the SAP transportation document Refer to Table 1 for category definitions.
Step 4. Create an inbound delivery against a PO. In the previous step, the PO was changed (updated with the confirmations received from the vendor), but no document was generated. In addition to the updates shown in Figure 12, you can generate an inbound delivery with its own document with reference to a shipping notification sent to you by your vendor (e.g., to improve the warehouse planning activities in terms of GR or to communicate with external systems).
If a confirmation control key with the confirmation category for inbound delivery exists in the relevant PO item, the PO item data is updated with the data from the inbound delivery document. To create an inbound delivery, use transaction VL31N or follow menu path Logistics Execution > Inbound Process > Goods Receipt for Inbound Delivery > Inbound Delivery > Create > Single Documents. After you enter the PO and other delivery information on the initial screen, you see the details in Figure 13.
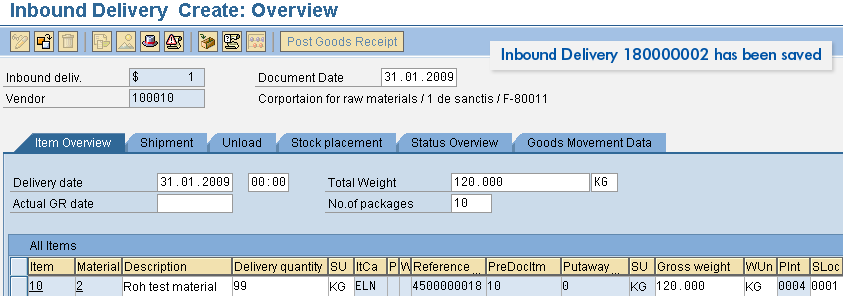
Figure 13
Inbound delivery creation
You can also enter a transport identification code (e.g., a vehicle registration number) to group deliveries for several purchase orders together. The default quantity is taken from the PO item. However, you can overwrite this suggested quantity and enter a different unit of measure. To do this, you must define the desired unit as an alternative unit of measure in the material master record with the appropriate conversion factor. The system converts all quantities into the order unit and records them in the PO. As soon it creates the inbound delivery, the system updates the confirmation overview details in the relevant purchase order’s line item.
Create an Inbound Delivery Automatically
To create an inbound delivery automatically for a specific PO line item, use transaction VL64 or follow menu path Logistics > Logistics Execution > Inbound Process > Goods Receipt for Inbound Delivery > Extended Inbound Delivery Processing > Subsequent Functions > Generate Inbound Deliveries (Figure 14). When the inbound delivery is generated successfully, you see an Inb. Deliv. has been saved message text.

Figure 14
Inbound delivery generation
Tip!
You can also schedule this transaction as a background job according to the number of the POs created per day. Then, in the item details of the purchase orders, you can see the inbound delivery created for the entire quantity of the line item.
The prerequisites for creating an inbound delivery using transaction VL64 are the following:
- You must define the confirmation control key in customizing as relevant for automatic inbound delivery
- You must use that confirmation control key with each relevant PO line item
- You have not yet confirmed the PO line items with confirmation category LA
- You have not selected the Test Run check box in Figure 14
As soon as an inbound delivery is created with reference to a PO, the confirmation overview of the PO line item is updated. To display both inbound deliveries created so far, you can use transaction ME21N or follow menu path Logistics > Materials Management > Purchasing > Purchase Order > Display (Figure 15).

Figure 15
PO confirmation details
Additional Use of Inbound Delivery
The inbound delivery represents the central document of communication in handling units and decentralized Warehouse Management systems (decentralized WMS). Additional uses are:
- Specifying the storage containers in the inbound delivery. To specify the containers, use the handling unit, which is a logistic unit that contains the goods and the associated packaging. Specify the containers in the inbound delivery line item via menu path Edit > Pack.
- Operating a decentralized WMS independent of a central SAP ERP system. All putaway processes between the central SAP ERP components and the decentralized WMS are handled with inbound delivery.
Step 5. Post a GR. To post a GR with reference to the inbound delivery, use transaction VL32N or follow menu path Logistics Execution > Inbound Process > Goods Receipt for Inbound Delivery > Post Goods Receipt > Inb.Delivery Indiv.Document. After you enter the inbound delivery document number on initial screen you see Figure 16. Click the Post Goods Receipt button to complete the transaction.

Figure 16
Goods receipt posting
Note
If you don’t know the inbound delivery document number that you want to process, use the inbound delivery monitoring tool via transaction VL06IG or follow menu path Logistics Execution > Inbound Process > Goods Receipt for Inbound Delivery > Post Goods Receipt Collective Processing Via Inbound Delivery Monitor.

Gaetano Altavilla
Dr. Gaetano Altavilla is a senior SAP practice manager. His focus is on pre-sales, delivery of SAP application solutions for large international corporations, and SAP knowledge management in Europe, the Middle East, and Africa (EMEA).
In his 18 years of SAP application experience working for many multinational companies, such as Procter & Gamble and Hewlett-Packard, he has covered a wide range of ERP logistic areas, focusing on the MM, WM, SD, LES, PP, PP-PI, PLM (QM, PM, PS) modules, as welll as CRM (TFM), SRM (EBP), SCM (SAP APO), and MES (ME) components.
Dr. Altavilla holds a degree with first-class honors in mathematics from the University of Naples and is certified in many SAP modules: SAP Logistics Bootcamp, SAP MM, SD, LE (SHP/WM/LE), PP, PLM (PM, QM, PS), SRM, CRM, SCM (APO), SCM (TM), FI, CO, and Solution Manager. He also has experience in ABAP/4 and application link enabling (ALE) and IDocs. He has participated in numerous industry conferences, such as the SAP Skills Conference in Walldorf at SAP SE.
You may contact the author at Gaetano_altavilla@hotmail.com.
If you have comments about this article or publication, or would like to submit an article idea, please contact the editor.