In this article, we delve into the fundamental aspects of BW/4HANA conversion when dealing with Analysis Process Designers (APD). In any organization, it is common to have multiple Analysis Process Designers (APD’s) in BW 7.X systems. With APD, users can visually create analysis processes and merge data from various sources within the BI system. APD is not available in BW/4HANA, and these cannot be handled by the three types of Conversions approaches: In-Place, Remote and Shell. The option is to use the separate APD Conversion tool in BW 7.X system which can be executed in parallel to BW/4HANA conversion. The APD Conversion tool is used to convert the APD processes into the corresponding process chains based on the data flow. We will learn the process to use the APD conversion tool.
You can follow the steps given below.
1) Use Transaction RSB4HAPD in the SAP system to access the APD Transfer Tool, which serves as the central interface for managing Analysis Process Designer (APD) scenarios. Upon opening the transaction, you will see a list of all existing APD processes within the system, systematically organized under the APD Scenario folder. Each APD entry represents a predefined data transformation or extraction process. The interface provides an intuitive way to navigate through the scenarios, ensuring efficient management of APD workflows. The tool includes multiple action icons that enable key functionalities such as refreshing the list to retrieve the latest updates and scheduling jobs to automate APD executions at predefined intervals. These options allow users to monitor, execute, and manage data transformation processes seamlessly. As shown in (Figure 1), the APD Transfer Tool presents a structured view with essential controls, ensuring that users can efficiently handle data extraction and transformation tasks within SAP.
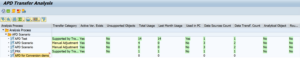 Figure 1: APD Conversion Tool
As shown in the above screen, multiple APDs are listed. In this example, our APD named "APD for Conversion Demo" has not yet been analyzed, which is why the Transfer Category field is blank. Before proceeding, we need to analyze the APD. To do this, click on the Run APD Analysis icon labeled Job to start the process. A popup will appear, informing you that the tool will perform a full system analysis. Select the System Analysis option in the popup, then click OK to proceed. Another confirmation popup will appear for the APD analysis—choose "Yes" to confirm. Once confirmed, a message will indicate that the analysis has started, running as a background process. You can refresh the screen to check the progress.
After the analysis is complete, refresh the screen again to view the final status. If the Transfer Category is updated to "Supported by Transfer Tool," it means that the APD can be successfully converted using the tool. Additionally, you can review other relevant details in the analysis results, as shown in (Figure 2)
 Figure 2: APD Analysis Status
The status of "APD for Conversion Demo" is now marked as "Supported by Transfer Tool." After a successful analysis, APDs are categorized into the following groups:
- Supported by Transfer Tool: Can be automatically transferred to a process chain using the tool.
- Manual Adjustment: Requires modifications to certain APD nodes before transfer.
- Manual Redesign: Contains unsupported APD nodes and must be redesigned before transfer.
- Incorrect Structure: The APD process lacks the correct structure and could not be analyzed.
Based on these results, the next steps for APD conversion must be planned accordingly. If an APD requires Manual Adjustment, necessary modifications should be scheduled and included in the project timeline. If it is Supported by Transfer Tool; it can be directly converted into a process chain. However, if an APD falls under Manual Redesign, it is advisable to develop a new data model aligned with BW/4HANA. Additional details, such as usage, data transfer, and process chains, can also be reviewed for further insights.
2) Double click on the APD that we need to convert; it will navigate you to the below screen as which has the Analysis results as shown in (Figure 3)
 Figure 3: APD Transfer tool analysis result.
You can see that Open Hub Destination is created for the PC target from our APD, but you need to provide the name for the Open Hub Destination, Choose the icon Specify New Name and provide a new name for Open Hub Destination as shown in (Figure 4).
 Figure 4: Open Hub Name maintenance
3) In Transaction RSPC, create a new chain grouping. You will find the input label for the Application Group. For our demo, use the name ZAPDCHAIN and provide a long description for the Application Component.
Once you check Transaction RSPC, you will see that the application group has been created in the Process Chain folder. Return to the APD Analysis result screen, select the Technical Settings icon (located before the Job icon), and enter the Process Chain name as shown in Figure 5. The chain ZAPDCHAIN1 will then be created under the display component.
 Figure 5: Process Chain Name
Click on the Generate icon to initiate the Process Chain generation. A popup will appear, prompting you to execute the generation process. This popup will guide you through generating the BW object data flow from APD. Once you confirm the selection in the popup, a background job will be created to handle the process. You can monitor the progress of this job in Transaction SM37, where it will be listed as RS_B4HTAPD_GENERATION. After the job successfully completes, proceed to the next step to continue the configuration.
4) Open Transaction RSPC, where you will find the Display component containing the newly generated process chain, ZAPDCHAIN1. This confirms that the process chain has been successfully created and added to the system. You can now review its structure, dependencies, and any associated processes to ensure it aligns with the intended workflow. If needed, you can make modifications or enhancements before proceeding to the next steps.
Open the chain (ZAPDCHAIN1) and you can see the details of the nodes in the chain which will have the Data Transfer process, the DTP will have the details of the Open Hub destination When you open the DTP (Data Transfer Process), you can view the objects involved in the data flow. The Extraction tab displays the Source Object, which in this case is the InfoCube. By navigating to the Update tab, you can identify the Target Object—in this scenario, the Open Hub Destination. This setup, as illustrated in (Figure 6), provides a clear view of the data movement between source and target systems.
 Figure 6: DTP- Update Tab
The flow for the Open Hub Destination is illustrated in (Figure7) below. In the data flow, the Source System serves as the foundation. The DataSource is derived from the source system, establishing the initial connection. The InfoCube is linked to the DataSource through a Data Transfer Process (DTP) and Transformation, ensuring structured data movement. Finally, the Open Hub Destination is connected to the InfoCube, facilitating data extraction and distribution.
 Figure 7: OHD Data flow
Based on the above-mentioned process you can start analyzing and converting the APD’s in your system during the BW/4HANA conversion projects.