Learn how to implement SAP Representational State Transfer (RESTful) Web Services within SAP BusinessObjects Data Services jobs to organize email delivery of reports that meet certain conditions and to prevent empty reports delivery.
Key Concept
The standard SAP BusinessObjects Enterprise scheduler tool does not allow the creation of schedules with conditions. With the help of SAP BusinessObjects Data Services (BODS) and SAP Representational State Transfer (RESTful) Web Services, the standard scheduler can be enhanced with if–then–else logic according to the company’s needs. For example, the enhanced SAP BusinessObjects Enterprise scheduler enables you to send emails to stakeholders if marketing costs exceed 10 percent of costs. It also prevents an empty error report from being sent unnecessarily.
The standard SAP BusinessObjects Enterprise scheduler is a user-friendly tool, but, in some cases, it does not provide enough flexibility to satisfy companies’ needs. Email delivery of regularly scheduled reports makes sense only if these reports are not empty (e.g., error reports that are automatically generated, but actually do not contain meaningful data—in other words, no errors occurred during the data-quality check process).Otherwise, such emails waste peoples’ time. This situation is similar to reports that are much more interesting to stakeholders if certain conditions are fulfilled.
With the help of SAP BusinessObjects Data Services (BODS) and SAP Representational State Transfer (RESTful) Web Services, the standard scheduler can be enhanced with if–then–else logic to prevent empty reports from being delivered or check to ensure that conditions are fulfilled. We show you how to create BODS jobs with a user-defined transform (UDT) that is able to send REST requests to refresh Web Intelligence (also known as WebI or WEBI) documents, check if they contain data or fulfill conditions, and then schedule them. This article is intended for technical users.
In our example, we create a simple SAP BODS job to schedule documents only if they contain data. To do this, follow these steps:
- Prepare a list of document IDs for scheduling
- Create a job and the required underlying objects in SAP BODS
- Develop Python script for a UDT to send REST requests to the SAP BusinessObjects Business Intelligence (BI) platform and implement if–then–else logic
- Schedule the job to execute automatically when required
Step 1. Prepare a List of Document IDs for Scheduling
You can manually get document IDs in the BI Launch Pad by right-clicking the needed document and choosing Properties (
Figure 1).
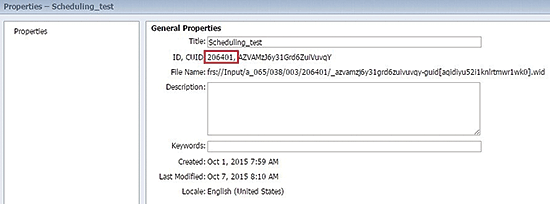
Figure 1
Open the document’s properties to find the ID number
Step 2. Create a Job and the Required Underlying Objects in SAP BODS
In the example shown in
Figure 2, we transfer one value from RowGeneration (RG_Scheduling) as the source, to the table type (TT_Scheduling) as the target, via a UDT (transformations).This is because we are only scheduling one document and its ID is easier to set as a constant in the Python code of a UDT. If you need more than one document to be scheduled, you can use a database table or a flat file with the document’s ID list as the source. In that case, all other operations are repeated for each document in the list. There is no transformation in Q_Scheduling, but in this case we use it as a connection link between RG and a UDT according to SAP best practices. This approach is widely used in BODS jobs. RG_Scheduling is used for starting the dataflow, Q_Scheduling is used to pass the parameters, all logic is implemented in UDT_Scheduling, and TT_Scheduling is used as the finishing element.
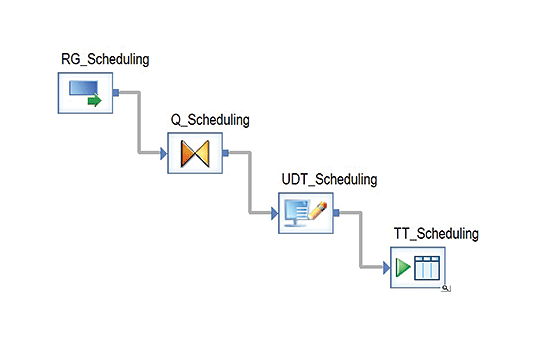
Figure 2
Proposed data flow
Step 3. Develop Python Script for a UDT to Send REST Requests to the BI Platform and Implement If–Then–Else Logic
Select the instance UDT (double-click UDT_Scheduling in
Figure 2) and, in the screen that opens (
Figure 3), select ROW_ID and map it from the Schema In to the Input tab of the User-Defined Editor. Then, in the Options tab (at the bottom of
Figure 3), click the Edit Options… button to open the User-Defined Editor (
Figure 4).
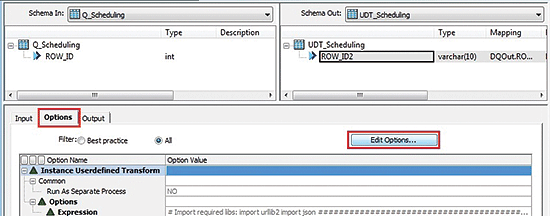
Figure 3
The User-Defined Transform Editor
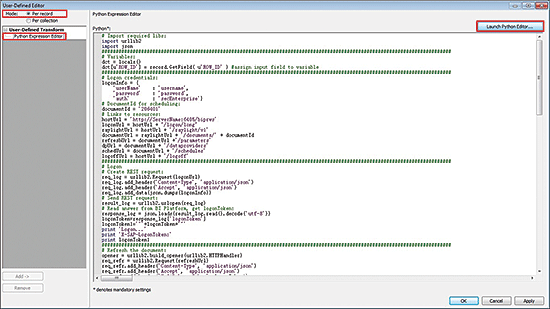
Figure 4
Select Per record mode
In the User-Defined Editor, select the Per record radio button. You select this option because you need to schedule many documents with the same conditions, and all the next steps need to be repeated for each document in the list. (Note that you select Per record mode if you want to schedule only one document to be processed or if you’re scheduling multiple documents to be processed. Either way, they’re processed one by one. Per record is the default and most-often-used option.) Then select the Python Expression Editor option and click the Launch Python Editor… button on the right. This action opens the screen in
Figure 5.

Figure 5
Open the Python Expression Editor to import libraries, variables declaration, and logon
Note
Per collection mode (Figure 4) applies the expression to the entire data collection. This option cannot be used in this example—you would only use this mode when adding new records (i.e., ones that previously did not exist), into the data flow. Selecting this option displays the Group Forming option group, in which you set up break groups and candidate selection. Per record mode, on the other hand, applies the expression to each record. You cannot add new records into the data flow with this option.
Click the I/O Fields tab of the Python Expression Editor, select Output Fields, and right-click. From the content-menu options that open (not shown), choose Insert. This opens a pop-up screen (
Figure 6) in which you can create output fields for the UDT and pass the results of the Python script execution through them. Don’t forget to map the output fields in the User-Defined Transform Editor as well.

Figure 6
Open the pop-screen to create new output fields for the UDT
The commands record.GetField() and record.SetField() are used to assign input and output fields to variables for transformation. In this example, we set the document’s ID as a constant. Therefore, the input and output fields are used only as connection links between the source and target. If you need more than one document to be scheduled, use the command record.GetField() for the document ID field of your source.
To send REST requests from Python code, you need to import the urllib2 library. The Python Editor uses Python version 2.6.2, and urllib2 is the only library for REST requests in this version. SAP BusinessObjects RESTful Web Services support both XML and JavaScript Object Notation (JSON) requests and response formats. In this example, we use JSON because it’s more convenient to use with Python. Therefore, an import of that JSON library is needed.
To be able to work with the BI platform via SAP BusinessObjects RESTful Web Services, you need to get a logon token and pass it as an X-SAP-LogonToken header in each subsequent request.
To ensure that the report data is up to date, you need to refresh and save the document (
Figure 7). In this example, the document has no prompts and the refresh request has no payload. (Payload is the XML or JSON code that you send to the server.) If your document has prompts, you need to pass the required parameters to refresh the document by adding the payload to the request. To get a template of the needed payload for prompts, send a GET request to your document from any REST client using the following link pattern: https://{{hostname}:{port}}/biprws/raylight/v1/documents/documentId/parameters.

Figure 7
Refresh and save the document
The document has no data if its dataprovider has no data. To check if the dataprovider is empty, you need to get its ID and then get rowCount property of the dataprovider. In our example, the document has only one dataprovider (
Figure 8), but documents can have multiple dataproviders. (In cases where there are multiple dataproviders, you need to get the list of existing dataproviders for the document and check rowCount property for each dataprovider in the list.) If at least one property is not equal to null, a schedule is required.
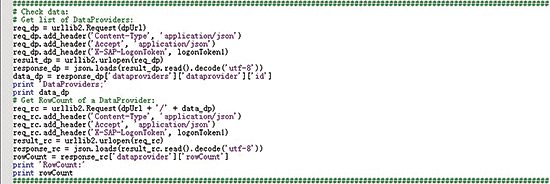
Figure 8
Check to see if the data exists
If you need to check condition fulfillment, you can get the target report’s dataset via the following link pattern: https://{{hostname}:{port}}/biprws/raylight/v1/documents/documentId/reports/reportId/elements/elementId/dataset.
A dataset node (
Figure 9) consists of two underlying nodes: metadata and row (i.e., data). Either of these nodes contains the value node for each column in the table. Metadata value nodes describe columns (e.g., dataObjectId, data type, and column name). Row value nodes contain data for each row. All value nodes are placed respective to the column order in the table and have the same index.

Figure 9
Dataset sample in XML format
When reading a dataset, you can get values, compare them with constants and each other, perform arithmetic operations, and so on. Once you’ve checked the dataset, check to see if the required conditions are fulfilled and if a schedule is needed.
In this example (
Figure 10), we’re creating payload to post a new schedule if it is needed. You can specify delivery format type, destination, subject, and message. E-mails for delivery can be written after to, cc, or bcc. The schedule needs to be run right after request sending and only once. To achieve this, use the once option and enter a start date before the current date and an end date after the current date.
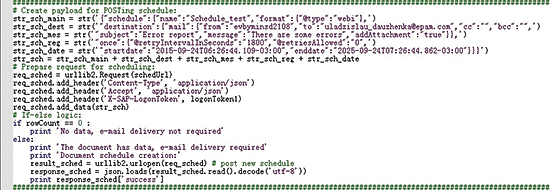
Figure 10
Create a schedule if the document contains data
Next, you need to unload the document to free the server’s memory (e.g., send the PUT request to the server). The link pattern is as follows (shown in
Figure 11): https://{{hostname}:{port}}/biprws/raylight/v1/documents/documentId/Payload (JSON): {"document":{"state":"Unused"}}.
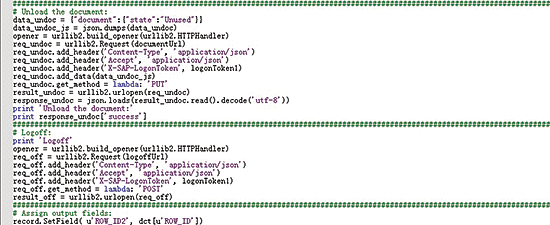
Figure 11
Unload the document and log off
After you’ve done this, log off to close the current session. In this example (
Figure 11), the input and output fields are connected through the dct variable without any transform. If you need special data in the target table, you can connect the output field to any other variable using the command record.SetField().
Apply the Python code in the Python Expression Editor and save the data flow and job. Then run the job and monitor the job log (
Figure 12). In the job log you can see the job execution progress and other messages created by using the print command in the Python Expression Editor. These messages help you to test and debug your prototype.
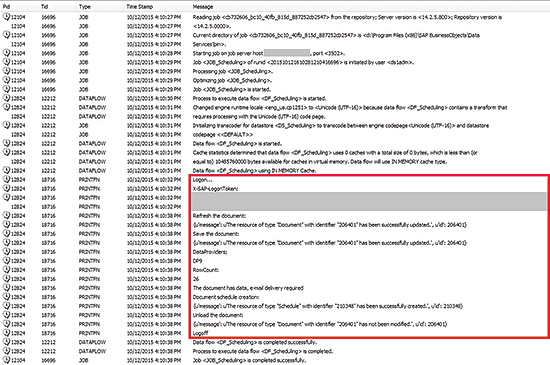
Figure 12
The SAP BODS job log
Step 4. Schedule the Job to Execute Automatically When Required
To open the SAP BODS Management Console and create a schedule for the job, follow BODS menu path > Tools > Data Services Management Console (MC) and log on using your BusinessObjects credentials. Once logged on (screen not shown), select the Administrator link option, and in the screens that open (also not shown) select your repository, go to the Batch Job Configuration tab, and click the Add Schedule option for your job. This opens the screen in
Figure 13 where you can schedule the job according to your production needs.
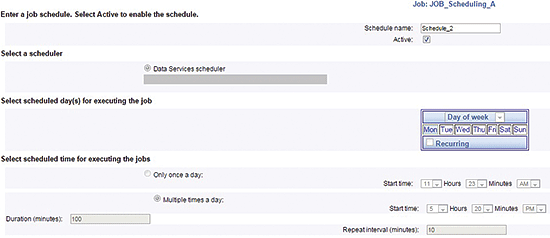
Figure 13
The SAP BODS scheduler
The SAP BODS scheduler triggers job execution on dates that you define. At job execution the Python script accesses the BI platform, refreshes required documents, and schedules them if they contain data.
You can check scheduled documents’ instances in the documents’ history in the BI Launch Pad by right-clicking the instance and selecting History from the context menu that opens (not shown). This opens a screen like the one in
Figure 14).

Figure 14
Check the scheduled documents’ history
Uladzislau Dauzhenka
Uladzislau Dauzhenka is a consultant for the SAP Solutions Organization at EPAM Systems. He has more than 2 years of experience in IT technologies, including experience in development, implementation, customizing system settings, and support of SAP BI products. His main focus is reporting, SAP BusinessObjects, SAP BW, and SAP HANA solutions.
You may contact the author at
uladzislau_dauzhenka@epam.com.
If you have comments about this article or publication, or would like to submit an article idea, please contact the
editor.

Syargei Rassadzin
Syargei Rassadzin is a consulting team leader for the SAP Solutions Organization at EPAM Systems. He has more than 10 years of experience implementing SAP BI products and more than 14 years of experience implementing SAP Business Objects products. In addition, he has more than 17 years of experience in consulting, software development, and testing. An SAP-certified application associate and certified project manager at the International Project Management Association (IPMA) level C, his main area of expertise is data warehouse design and reporting with multiple back-end systems (e.g., SQL Server, SAP NetWeaver BW, and Oracle).
You may contact the author at
syargei_rassadzin@epam.com.
If you have comments about this article or publication, or would like to submit an article idea, please contact the
editor.