Learn to configure and implement SAP Quality Management (QM) in SAP production planning (PP) production processes. You can use QM for inspection during production, in-process inspection, and inspection of semi-finished and finished goods on a goods receipt against a production order (discrete manufacturing) or process order (process industry).
Key Concept
Standard solutions and configuration delivered by SAP are sufficient to independently configure and implement Quality Management (QM) in production processes for discrete manufacturing or the process industry. After setting up the relevant QM master data, a one-time task, you can then record results of all the important inspection parameters and make usage decisions for the in-process or finished goods. Companies implementing QM are uniquely positioned to take advantage of various checks and balances on the quality of materials being procured and produced. This ensures that not only are no raw materials released to production until specifications have been adhered to, but also no finished goods are dispatched to the customer until they meet the quality standards set by the company. Additionally, when a customer registers a product complaint, it is far easier for the company to trace back the origin of raw material which was used in production when QM has been implemented.
You have the option to integrate either of the two production processes with QM or both, as deemed applicable to the business. For example, if only in-process inspection during the production process is of importance, then QM can be implemented as stand-alone. If only the quality monitoring and inspection of the semi-finished or finished goods is vital for business, then this stand-alone option is available. If necessary, you could implement both at the same time.
I cover both options to show how comprehensive the QM role in the production processes is. I begin with configuration activities to ensure the material type for which QM needs to be activated is properly configured. Then, the focus shifts to setting up required QM master data and culminates in running the entire end-to-end business process of the production cycle. That cycle includes the creation of a process order, in-process inspection, its goods receipt, and all the related QM activities, such as results recording, usage decisions (UDs), and stock posting.
Note
For the purposes of this article, I assume the materials you intend to
include in the QM process have already gone though the production
process and have other master data, such as material master, available
in the SAP system. I also assume that the QM view in the material master
is not activated yet.
The relevant QM master data forms the backbone of integrating QM in production processes. QM master data plays an integral role throughout the process. Setting it up is a one-time, dedicated activity that requires significant planning and concerted efforts. The need to train the business process owners while implementing QM in production processes needs to be given due importance, especially results recording, defects recording, and usage decisions. You also need to train them about the organizational changes QM brings to stakeholders.
Note
I suggest that you create a test implementation of QM on a few selected
materials to fully understand the series of activities involved. You can
learn valuable lessons that enhance your full-scale implementation.
Let’s begin with the configuration checks needed to activate QM in production processes. If your company uses the standard SAP material types, such as FERT (finished goods) or HALB (semi-finished goods), create a tasklist type-material type assignment. Also, if there is a customer-specific material type, you need to add it as shown in Figure 1.

Figure 1
Task list type assignments with material type
Figure 1 is the tasklist type assignment to material types. The tasklist type Q is used for quality management along with material type. To access this list, follow menu path SPRO > SAP Reference IMG (or Press F5) > Quality Management > QM Planning > Inspection Planning > Assign Task List Type to Material Type. Click the New Entries button to create a new relationship. Save either by pressing Ctrl+S or clicking the save icon  .
.
The second configuration activity is the assignment of inspection type 03 for in-process inspection to a plant and order-type combination. In my example, I assign process order type PI01 and plant 1000 to inspection type 03. An inspection type is a control function that defines how an inspection is performed. Some examples of inspection types are:
- 01 is for goods receipt against purchase order
- 03 is for in-process inspection
- 04 is goods receipts inspection for process and production orders
- 09 is recurring inspection for batch-managed, shelf-life expiry materials
- 89 is for manual inspection
To define inspection types, follow IMG menu path Production Planning for Process Industries > Process Order > Master Data > Order > Define Order Type Dependent Parameters or use transaction code COR4 (Figure 2). Click the details icon  to bring up the details screen (Figure 3). Assign the inspection type and save by pressing Ctrl+S or by clicking the save icon.
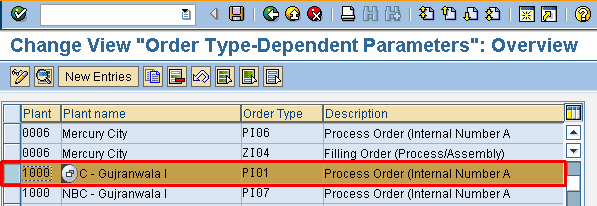
Figure 2
Overview screen for order type dependent parameters
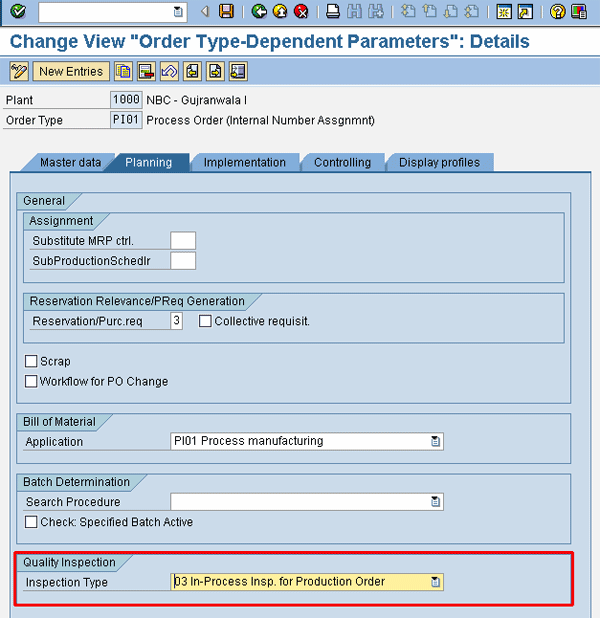
Figure 3
Inspection type 03 is assigned to the order type and plant combination in the planning tab
QM Master Data
I now describe the QM master data you need to set up in the system prior to beginning quality checks of production processes. The required QM master data is:
- QM view in material master
- Master inspection characteristic (MIC)
- Inspection plan
QM View in Material Master
While the material is already created, you need to activate its QM view at the organizational level (plant). Follow menu path Logistics > Materials Management > Material Master > Material > Create (General) > Immediately or use transaction code MM01 (Figure 4). Enter the material number and click the Select view(s) button. In my example, I entered material 1980.

Figure 4
Select Quality Management view for material master and plant combination
Select the Quality Management view and then click the Organizational levels button to see the organizational level in which the plant is defined (Figure 5). In my example, you can see that the material 1980 belongs to the plant 1000.

Figure 5
Organization level (plant) selection
Press Enter or click the continue icon  to get to the quality management view of material 1980 and plant 1000 (Figure 6). From here, select the Insp. Setup button to view the inspection setup data in which individual inspection types for the material are defined (Figure 7).

Figure 6
Quality management view of material master
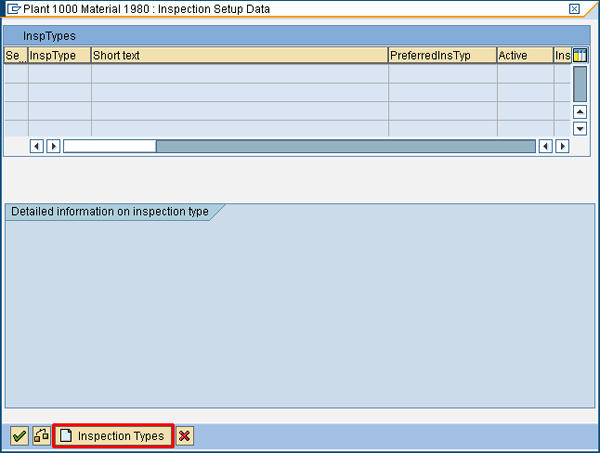
Figure 7
Inspection setup data in which inspection types are defined
Click the Inspection Types button to get to the screen shown in Figure 8. Inspection type 03 is available in standard SAP and is used for in-process inspection. Make sure to select the check boxes Preferred Inspection Type (PreferredInsTyp) and Active so that inspection type 03 is active. Click the inspection type detail icon  to bring up the Detailed information on the inspection type section seen at the bottom of Figure 8.
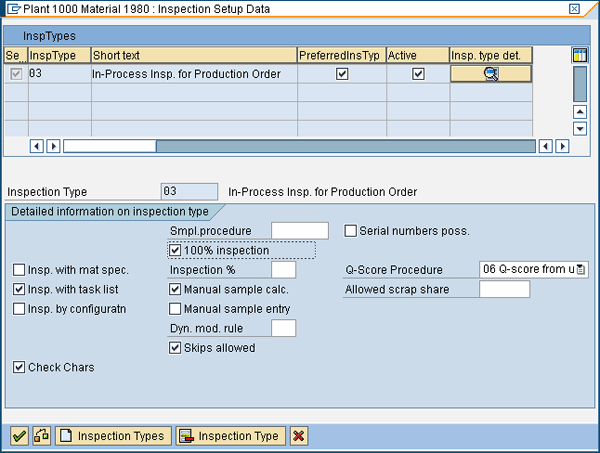
Figure 8
In-process inspection for a process order is activated in the inspection setup
Additional important settings in Figure 8 include:
- The Inspection with task list check box means that plant dependent task lists (inspection plan) must be defined as QM master data. I have covered in detail the creation of an inspection plan. The Check Characteristics check box checks the validity and other details of the MIC before it can be used.
- The 100% inspection check box ensures that the sample size of all incoming inspections will be 100% (goods receipts against process order quantity will be equal to the sample size quantity) even when the results recording is summarized. The Manual sample calculation check box means that even if there is a system-based calculation of sample size, this can be overwritten by a manual sample calculation, if needed.
- The check box Skips allowed lets you to skip results recording if it is deemed that the produced goods are of acceptable quality and a direct usage decision can be made.
Next, repeat the process steps of Figure 7 and Figure 8 for inspection type 04. Inspection type 04 is activated for final inspection at goods receipt from production. On successful activation of inspection types 03 and 04, the results in Figure 9 display.

Figure 9
In-process inspection 03 and final inspection type 04 are both activated for material 1980 and plant 1000
In Figure 9, selecting the Post to inspection stock check box ensures that all goods receipts against process orders are posted in Quality Inspection stock status until cleared. The Automatic assignment check box ensures that as soon as an inspection lot is created, the system checks for relevant quality specifications (in this case, it is task list or inspection plan) and automatically assigns it to the material’s inspection lot. This option is a time-saver as it ensures that only relevant specifications of materials that are to be checked for conformity are assigned.
Click the continue icon. The material can now be saved by pressing Ctrl+S or by clicking the save icon.
There is the option to select or deselect some of the check boxes in Figure 8 or Figure 9
if it is established they are not required in a business process. The
important aspect to note is that all options selected in check boxes
subsequently act as controlling functions. For example, if the Automatic
UD check box is deselected, no automatic usage decisions for inspection
lots belonging to this material are possible. Similarly, if the Manual
Sample Entry check box is selected, the user has the option of manually
entering the sample size of the inspection lot if there is any such
business requirement.
Master Inspection Characteristic (MIC)
An MIC is the quantitative or qualitative attribute of a material. It has its own set of specifications that needs to be defined as important QM master data. To create an MIC, follow menu path Logistics > Quality Management > Quality Planning > Inspection Characteristic > Create or use transaction code QS21 (Figure 10). In my example, I have created a quantitative MIC named QM01 on plant 1000.

Figure 10
Initial screen for the creation of an MIC
After defining the MIC, click the Master inspection characteristic button, which brings up Figure 11. Here, I defined the MIC to be quantitative (1) and gave its short text the status of Released (2). I then clicked the Control Indicators button (3), which leads to the Edit Characteristic Control Indicators screen (Figure 12).
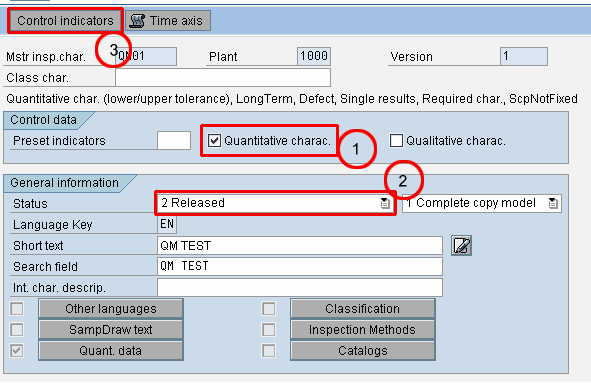
Figure 11
Overview of a quantitative MIC
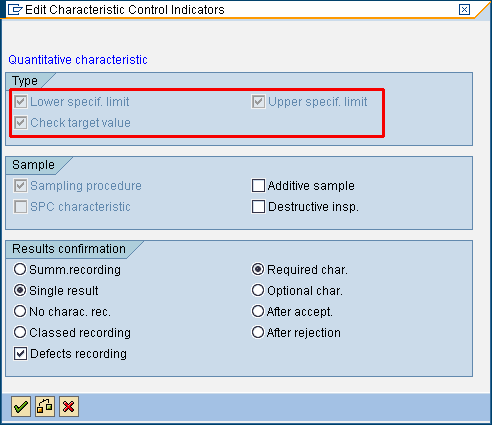
Figure 12
Control indicators for the creation of a quantitative MIC
In Figure 12, the control indicators are defined for the MIC QM01 with requirements to define lower and upper limits as well as target values. Some of the other control indicators selected are Single results, which means that each result of a sample needs to be entered individually, and Defect recording, which means that you can record any defects noted in production. Finally, I specified that the MIC QM01 is a required characteristic and that the results must be recorded.
Click the continue icon to access further control indicators (Figure 13). Here I’ve defined that the MIC QM01 does not have a fixed scope, which means you can still change its details later if necessary. I’ve also selected Long-term inspection, which means that in case the results recording of this specific MIC is delayed, the usage decision can still be undertaken. I’ve also chosen the option to print the MIC in an inspection report.

Figure 13
Further control indicators for quantitative MIC
Click the continue icon. This leads to the screen in Figure 14, in which quantitative data is defined, such as the number of decimal places, the value of upper and lower limits, and the target value.
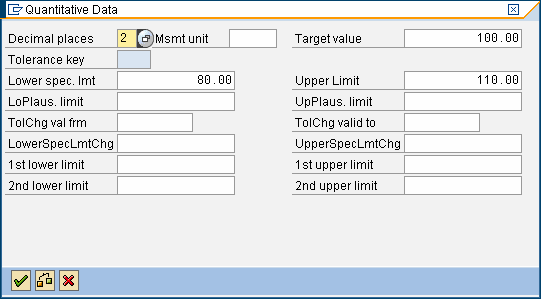
Figure 14
Specific quantitative data is entered for the MIC
Click the continue icon. The MIC can now be saved either by pressing Ctrl+S or by clicking the save icon.
Inspection Plan
An inspection plan is the task list referred to whenever an inspection lot against a process order is created. An inspection plan can have different usages such as a separate inspection plan for during-production quality checks in which extensive checking and results recording is performed, or finished goods inspection that may have a different set of specifications (MICs) to check. An inspection plan consists of MICs previously created.
To create an inspection plan, follow menu path Logistics > Quality Management > Quality Planning > Inspection Planning > Inspection Plan > Create or use transaction code QP01 (Figure 15). In my example, I define the material as 1980 and plant as 1000 for the creation of an inspection plan.

Figure 15
Initial screen for the creation of an inspection plan
After entering the details for your inspection plan, press Enter or click the continue icon to enter header details (Figure 16). I’ve entered that the usage is 5, which is for goods receipt, and the status of the inspection plan is set to 4, which is released.

Figure 16
Header details for inspection plan
A usage specifies the purpose for using a specific inspection plan. A material can have different inspection plans for different usages – for example, for goods receipt-specific usage or for a universal usage. A universal usage can be for all the different inspections or for a goods issuance usage that is used in a sales order-related quality check before goods are sent to the customer against a sales order.
Next, click the Operations button to view the Operations Overview screen (Figure 17). I assign the work center MACH90, on which the inspection is carried out. Normally, a production work center is used to carry out an inspection. A work center is a production or assembly line, and an inspection is carried out by taking a sample from the production line (work center).
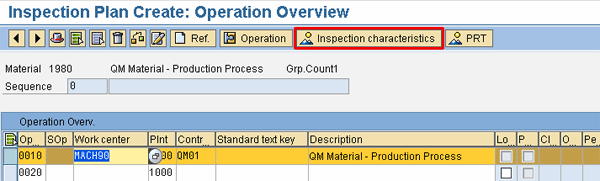
Figure 17
Operations view of an inspection plan
Select the line item 0010 and click the Inspection characteristics button. This leads to Figure 18. Here I assign the previously created MICs QM01 and QM03. All other details are automatically copied from the MIC, such as the upper and lower limits and the target value.

Figure 18
Inspection characteristics (MIC) in the inspection plan
You can now save the inspection plan by pressing Ctrl+S or clicking the save icon. The message in Figure 19 appears saying that the inspection plan for material 1980 for plant 1000 has been saved in group 280. A group is the internal number given to every inspection plan as identification.

Figure 19
A message appears when the inspection plan is successfully created
To create an inspection plan for in-process inspection (inspection type 03) with the usage type 3 (universal), repeat all the steps from Figure 15 through Figure 19 and assign the status as 4 (released). When these steps are successfully done, two inspection plans with different usages — 5 (goods receipt) and 3 (universal), both having the status as 4 (released) — are created for material 1980 and plant 1000 as shown in Figure 20.
Note
You can also incorporate MICs into the master recipe of a material for
in-process inspection (inspection type 03). However, this is outside the
scope of this article.
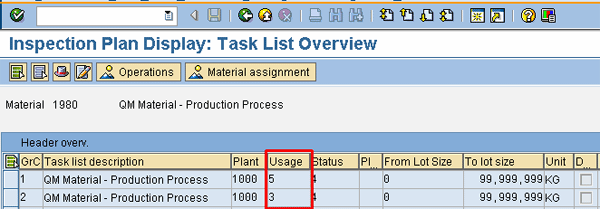
Figure 20
Inspection plan with two different usages
This brings to an end the QM master data required to implement QM in production processes. However, to explain the actual use of all the QM master data created so far and how it affects the business, I cover the end-to-end production cycle in the next section.
End-to-End Production Process Flow
The end-to-end process flow for two different types of inspections during the production process is detailed in Figure 21. The process begins with the creation and release of a process order for material 1980 and plant 1000. As soon as the process order is released and saved, an in-process inspection lot is created automatically by the system. You then take the results recording and usage decision on the in-process inspection of the during-production run to confirm that it meets the pre-defined specifications. When the goods are produced, you perform a goods receipt with reference to the process order, which generates another inspection lot for the finished goods. Similar activities of results recording, followed by usage decision, are taken. This is then concluded by stock posting of the quality stock. I detail these steps in the next sections.
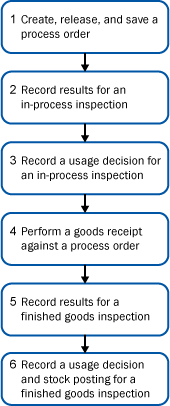
Figure 21
End-to-end process steps of in-process and goods receipt inspection
1. Create, Release, and Save a Process Order
To create a process order, use menu path Logistics > Production – Process > Process Order > Process Order > Create > with Material or use transaction code COR1 (Figure 22). In my example, I entered material 1980, plant 1000, and order type PI01.
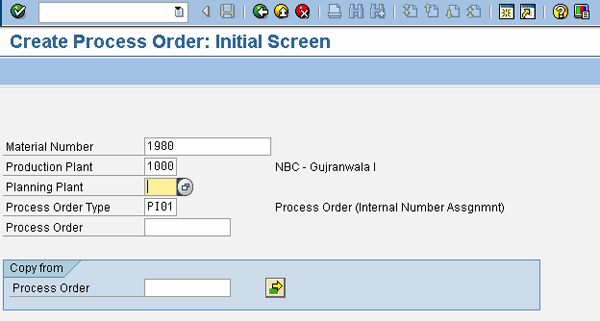
Figure 22
Initial screen for the creation of a process order
After entering this data, press Enter or click the continue icon. This leads to the process order header screen (Figure 23). I entered the process order quantity of 100 and a production start date of 30.09.2011.

Figure 23
General data tab of a process order
Next, release the process order by clicking the release icon  . As soon as the process order is released, an automatically created inspection lot for in-process inspection is generated, as shown in the assignment tab of Figure 24.

Figure 24
Assignment tab of a process order with an in-process inspection lot number generated
Click the Goods receipt tab, which leads to the screen in Figure 25. This screen shows that when the goods receipt against the process order is performed, the stock automatically moves to quality inspection stock and an inspection lot is created.
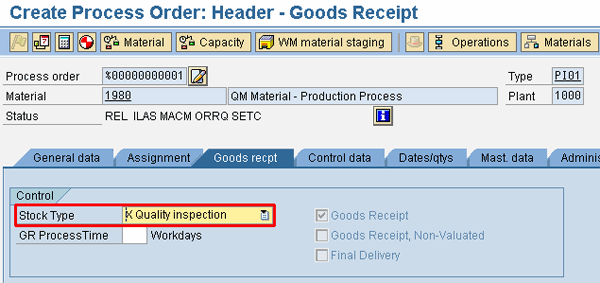
Figure 25
Goods receipt tab of a process order
Save the process order by pressing Ctrl+S or by clicking the save icon. In my example, it generates the process order number 70001062.
2. Record Results for an In-Process Inspection
As soon as the production starts, the results recording for an in-process inspection lot can begin. Follow menu path Logistics > Quality Management > Quality Inspection > Worklist > Inspection > Change Data or use transaction code QA32 (Figure 26).
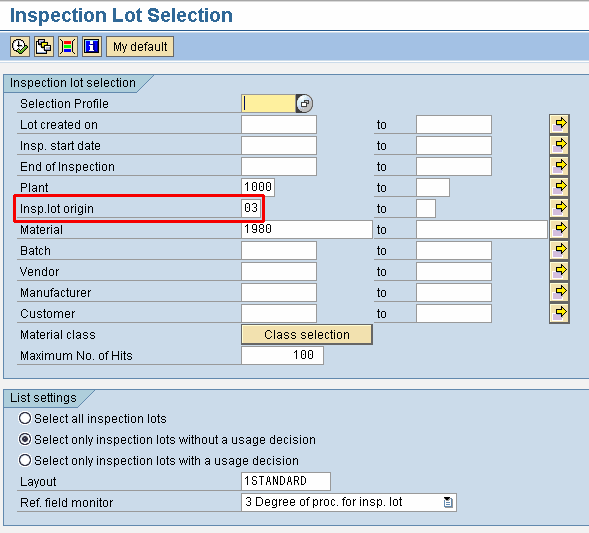
Figure 26
Parameters selection screen for inspection lots
Enter the initial parameters on the selection screen and press F8 or click the execute icon  . This leads to the worklist of all the inspection lots for which the results recording or usage decision has not been taken (Figure 27).

Figure 27
Worklist for inspection lots
Select the inspection lot and click the Results button. This takes you to the results recording screen, in which the individual specifications of a material and its corresponding MICs are available for reference (Figure 28).
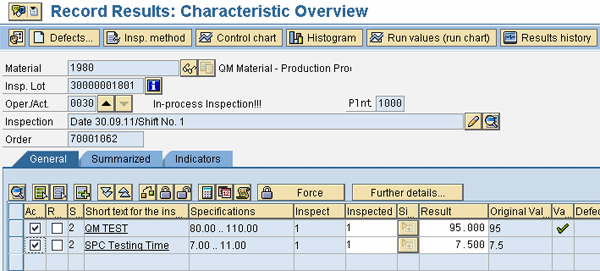
Figure 28
Insert caption here.Results recording for an in-process inspection lot
Enter the results and save by pressing Ctrl+S or clicking the save icon. This leads to Figure 29.

Figure 29
Worklist for an inspection lot in which a usage decision icon is selected
3. Record a Usage Decision for an In-Process Inspection
After saving the results in the last step, you come to Figure 29. Select the inspection lot for which the results recording has already been performed (with system status updated to RREC). Click the Usage decision (UD) button. This takes you to Figure 30. Here the usage decision is made by providing the UD code A for acceptance. Save the UD by pressing Ctrl+S or by clicking the save icon.
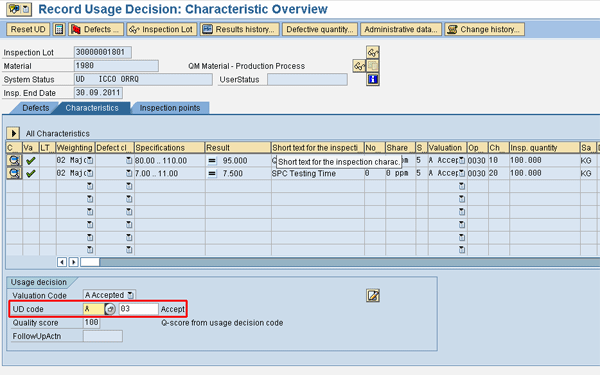
Figure 30
Detailed screen for a usage decision
4. Perform a Goods Receipt Against a Process Order
Once the goods are produced against a process order, you can perform the goods receipt. On goods receipt, an automatic inspection lot is created for which the standard QM processes of results recording, usage decision, and stock posting can be performed.
Follow menu path Logistics > Materials Management > Inventory Management > Goods Movement > Goods Movement or use transaction code MIGO (Figure 31). Enter the process order number and press Enter. In my example, the process order number is 70001062. Notice that on the goods receipt posting, the stock is posted in Quality Inspection and a separate and independent inspection lot is created. Save the goods receipt posting by pressing Ctrl+S or by clicking the save icon.
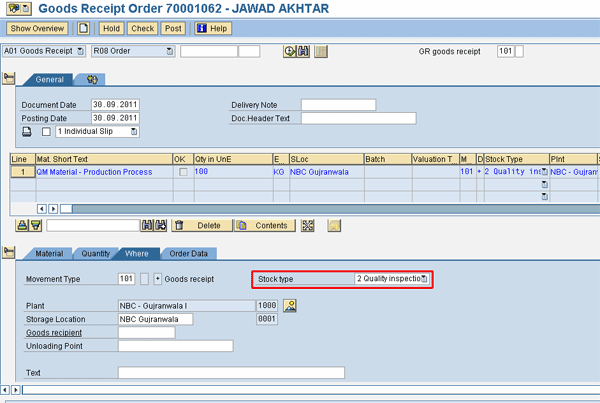
Figure 31
A goods receipt for a process order
5. Record Results for a Finished Goods Inspection
To record results, follow menu path Logistics > Quality Management > Quality Inspection > Worklist > Inspection > Change Data or use transaction code QA32 (Figure 32). Enter the initial parameters on the selection screen, and press F8 or click the execute icon. This leads to Figure 33.

Figure 32
Parameter selection for an inspection lot for a goods receipt against a process order

Figure 33
Inspection worklist containing an inspection lot from a goods receipt for a process order
Figure 33 is the worklist of all the inspection lots for which the results recording or usage decision has not been taken. Select the inspection lot and click the Results button. This leads to the results recording screen, in which the individual specifications of a material and its corresponding MICs are available for reference (Figure 34).
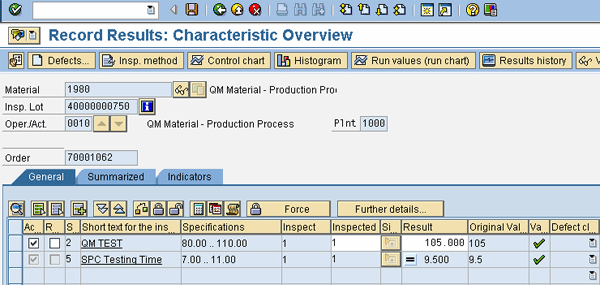
Figure 34
Results recording for an inspection lot
Enter the results and save them by pressing Ctrl+S or by clicking the save icon. This leads to Figure 35. Here select the inspection lot for which the results recording has already been performed (with system status updated to RREC) and click the Usage decision (UD) button.

Figure 35
Worklist for inspection lot in which usage decision is selected
6. Record a Usage Decision and Stock Posting for a Finished Goods Inspection
After clicking the Usage decision (UD) button, Figure 36 appears. The usage decision is made by providing the UD code A for acceptance.
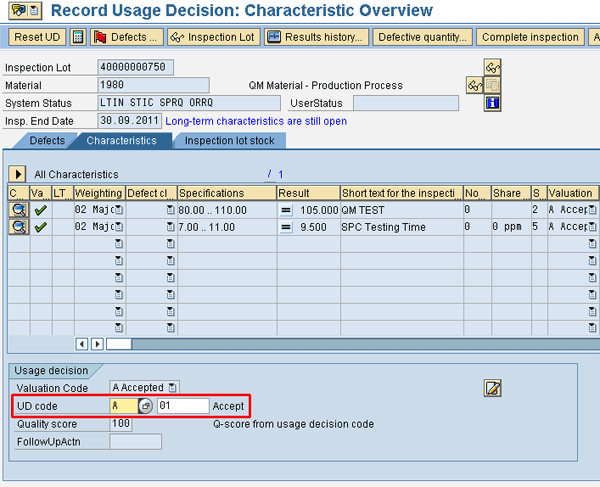
Figure 36
Usage decision of an inspection lot
Click the Inspection lot stock tab. Figure 37 is the inspection stock posting screen in which the quality inspection stock is transferred or moved to unrestricted use stock when saved. The unrestricted stock is the quality cleared stock. Save the UD by pressing Ctrl+S or by clicking the save icon.
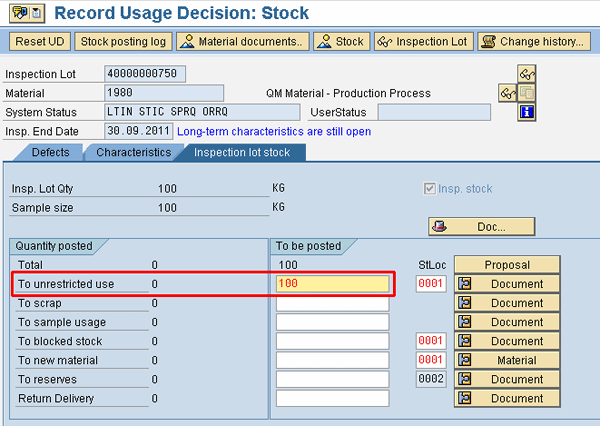
Figure 37
Inspection lot stock posting to unrestricted use during usage decision.

Jawad Akhtar
Jawad Akhtar earned his chemical engineering degree from Missouri University of Science and Technology. He has 17 years of professional experience, of which nine years are in SAP. He has completed eight end-to-end SAP project implementation lifecycles in the areas of PP, QM, MM, PM, and DMS in the steel, automobile, chemical, fertilizer, FMCG, and building products industries. He also has worked as an SAP integration manager and an SAP project manager. He has been proactively involved in a business development and solution architect role for seven years. He is the author of Production Planning and Control with SAP ERP, it's filled with in-depth infomation on discrete, process, and repetitive manufacturing types. His profile on LinkedIn is at https://pk.linkedin.com/in/jawadakhtar. You may follow Jawad on Twitter @jawadahl. Currently, he is associated with AbacusConsulting as Head of SAP Delivery.
You may contact the author at jawad.akhtar@live.com.
If you have comments about this article or publication, or would like to submit an article idea, please contact the editor.