In sales flows in supply chain execution, a sales order may require several outbound delivery documents for the volume (dimensions) of an item. These delivery documents can be delivered in different shipment documents. Learn how to split the invoice automatically for each transport document using invoice documents generated automatically from the shipment document. This process reduces the time in the distribution chain and enables you to determine a price surcharge on the invoice for the shipment documents.
Key Concept
In a distribution center, the picking or preparation of orders can consume up to two-thirds of the operations costs and resource time. You can reduce the time and facilitate product delivery in sales by reducing steps. When you automate the billing procedure at the time of recording the transport documents, the transport document contains the delivery documents that make up the items to invoice. At the end of the transport document, the automatic invoicing of the deliveries that make up the transport document is generated.
In business processes, streamlining the generation of documents without affecting the data can reduce costs and time. The sales invoice represents the result of supply chain execution. In a sales cycle a sales order requires several outbound delivery documents because of the dimensions of the products to be delivered. Each delivery document could generate a separate shipment.
I show how to reduce the time required for the generation of billing documents by creating them automatically when the document is at the transport stage. You also see the transfer of the costs of sending the invoice document. Figure 1 shows the scope of the process I describe.

Figure 1
Automatic generation of an invoice for transport and surcharge per shipping value
Note
You are required to have SAP Logistics Execution Transportation (LE-TRA) active to perform the steps in this article.
To automatically generate an invoice for transport and surcharge per shipping value, you need to complete these steps:
1. Define and assign activity profiles (in the Transportation Management module)
2. Create a price condition for transport costs
3. Modify pricing procedures and enter the new condition
4. Test the cycle: Create a transport document from several deliveries, and when you save the transport document, it automatically generates the billing of the outbound deliveries.
1. Define and Assign Activity Profiles
The activity profile outlines activities to be executed in the shipment document when the shipment has reached a certain status. You can define a separate activity profile for each status. Possible activities include:
- Add to the data in the dialog box
- Post a goods issue for deliveries currently in shipment
- Bill for deliveries currently in shipment
- Print certain outputs
Then you define a selection variant, which may in turn be assigned to a shipment type. In this way, the shipment activities that are to be carried out are defined for the shipment type as soon as the corresponding status is set.
You can instruct the system to display a dialog box as soon as the status is set. In this dialog box you can enter additional data. When you are registering a car, for example, the system could display a dialog box in which you enter the license plate number and the name of the driver.
The first activity is to define profiles for your shipment types for any status at which activities should be carried out.
To configure the activity profiles, choose Define and Assign Activity Profiles in the Implementation Guide (IMG) > Logistics Execution > Transportation > Shipments > Define and Assign Activity Profile. Click the Define and Assign Activity Profile node. This action opens the screen in Figure 2.

Figure 2
Activity profile for shipment type
In Figure 2 the activity profiles are associated with the shipment types created. The shipment types are listed on the left side of the screen, and next to each shipment type is the status of each transport document.
The statuses available in a transport document are for planning, at check-in, at load start, at load finish, at completion, at shipment begin, and at shipment end.
For my example, select the Shipment Type ZNAC (Figure 2).
You create the invoice documents when the completion status of the shipment document is executed. (You manually select the status in the transport document.) Select the line that belongs to the shipment type. Go to the field under the At completion column and enter a name for the activity profile. In my example the name is ZTRA001. Click the Maintain button (Figure 3).
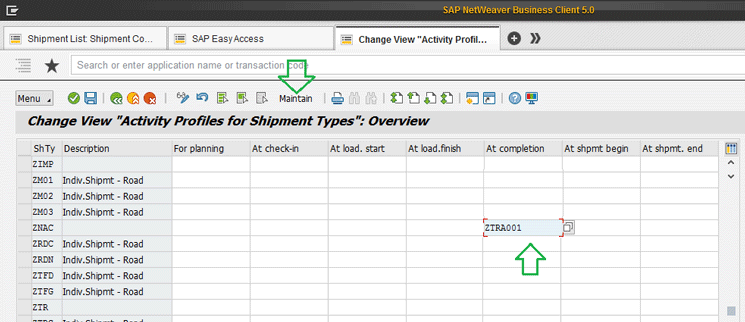
Figure 3
Maintain an activity profile
This action opens the screen in Figure 4.
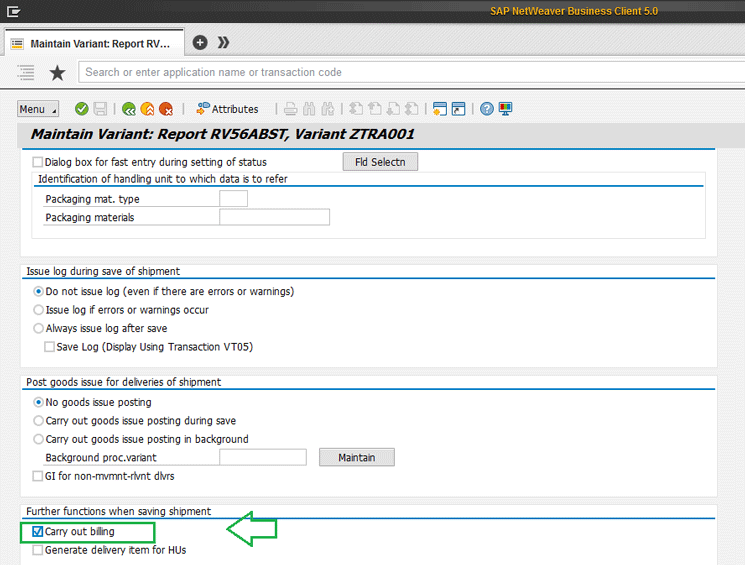
Figure 4
Select the Carry out billing option in the activity profile
In Figure 4 you see the options for the variant of the activity profile. Use the option that allows you to create the invoices belonging to the outbound delivery documents that make up the shipment document. This option is Carry out billing, so check that check box.
Click the back icon  and this activity profile remains with its characteristics linked to the type of transport selected in my example. You see a message asking if you want to save the values (Figure 5). Click the Yes button.

Figure 5
Save the values
2. Create a Price Condition for Transport Costs
Condition Table
First, you create a condition table. In this IMG activity, you define price dependencies. You can make prices, surcharges, and discounts dependent on almost all the fields in a document. You define these dependencies using condition tables. In a condition table, you define the combination of fields for which you can create condition records.
Follow Implementation Guide (IMG) menu path Sales and Distribution > Basic Functions > Pricing > Pricing Control > Define Condition Tables. In the Choose Activity screen (Figure 6) select the option Create condition tables and press Enter.
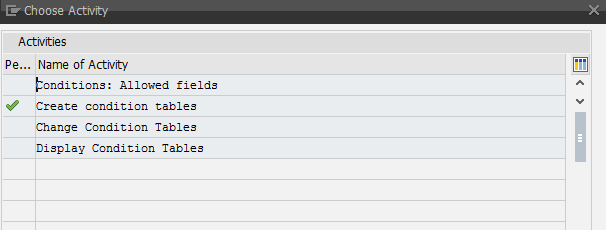
Figure 6
Create condition tables
This action displays the screen in Figure 7.

Figure 7
Create the condition table
In Figure 7 enter the number of the table you are creating. If you leave it blank the system provides a number.
The available fields are listed on the right under the FieldCatlg column. Double-click the ones you want to select. As you select the fields, they are moved to the left in the Selected fields section. For my example select two fields, Plant and Sales district.
After you select the fields you want, click the generate icon  . The next screen (not shown) displays a message asking if you want to generate the condition table. Click the Yes option. The system log then lists the condition table number that was created (Figure 8).
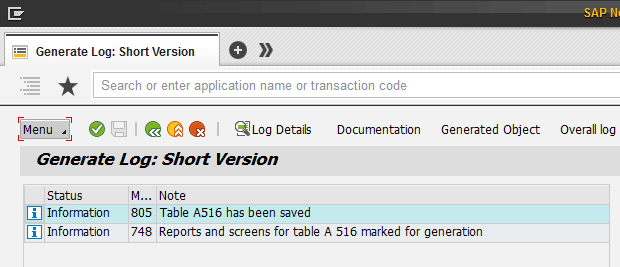
Figure 8
The table is saved
Access Sequences
The access sequence is a search strategy the SAP system uses to search for condition records that are valid for a condition type. For my example create an access sequence with the table created in the previous section.
Follow Implementation Guide (IMG) menu path Sales and Distribution > Basic Function > Pricing > Pricing Control > Define Access Sequences. This path takes you to the Choose Activity screen (not shown) in which you click the Maintain Access Sequences option. In the next screen (Change View “Access sequences”: Overview [not shown]), click the New Entries button. After clicking the New Entries button, enter the code for your access sequence in the AS column (Figure 9). In my example it is ZT01 (Transportation Surcharge).
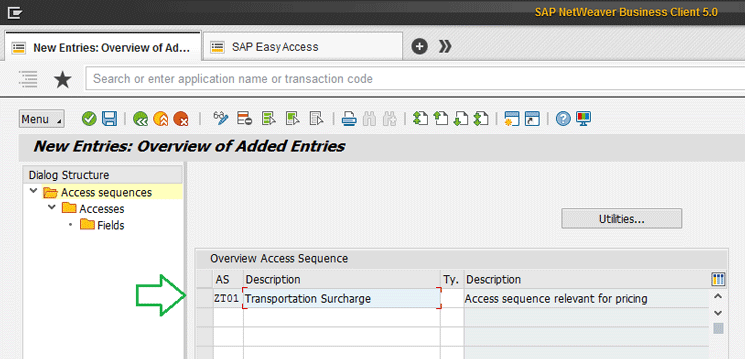
Figure 9
New entries in the access sequence
Select the access sequence that you created (e.g., ZT01) and click the Accesses folder on the left side of the screen (Figure 10). Enter the condition table 516 (created in previous stages) in the Tab column. In the No. (number) column, enter level 10 (the level refers to the number of sequence or order that you want to place in the search of records of the tables. It is necessary in order of sequences with multiple tables).

Figure 10
Enter the level number in the access sequence
Click the Fields folder on the left side of Figure 10. You then see the fields that make up the table displayed in Figure 11. Click the save icon  .
.
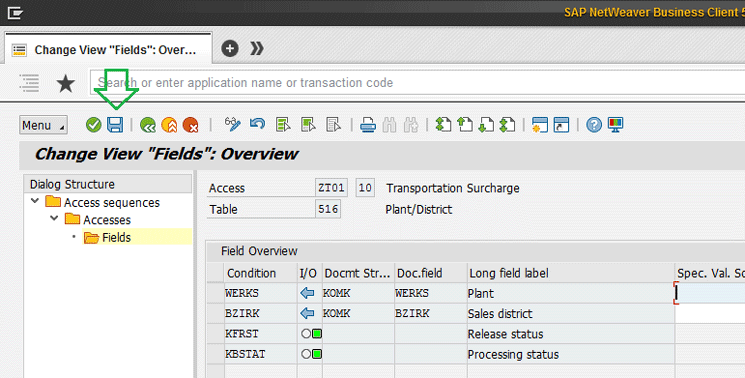
Figure 11
Save the access sequences
Define Condition Types
You define condition types in this step. Price elements are represented in the SAP system by condition types. Price elements can be, for example, prices, surcharges, discounts, taxes or freight. They are stored in the system in condition records.
To define a condidtion type, follow Implementation Guide (IMG) menu path Sales and Distribution > Basic Function > Pricing > Pricing Control > Define Condition Types. This path takes you to the screen in Figure 12.
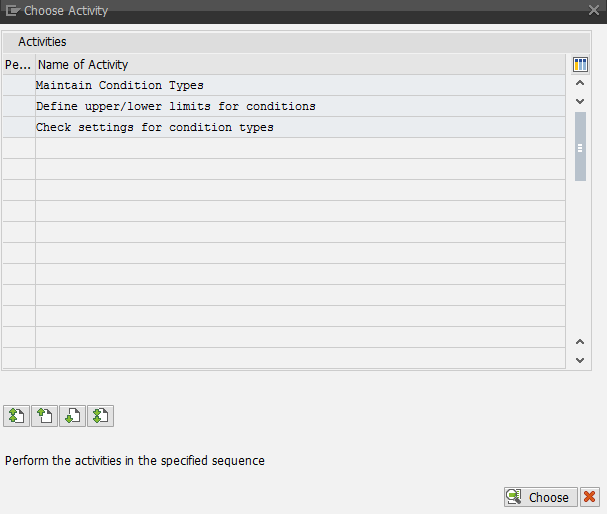
Figure 12
Maintain the condition types
Figure 12 displays three options. Select the Maintain Condition Types option and click the Choose button.
The conditions present in the system are listed. Because for my example, you are creating a surcharge for transportation expenses, use the KF00 surcharge condition. Generate a copy from this condition. Select the indicated condition and click the copy icon (Figure 13).

Figure 13
Copy the condition type
The price condition is created with the following parameters shown in
Figure 14:
- Condition Type: ZT01
- Description: Transp Surchange
- Cond. Class: A - Discount or surcharge
- Calculat. Type: D - Gross weight
- Cond.Category: F - Freight.
- Access seq: ZT01 - Transportation Surcha.
- Plus/minus: A - Positive

Figure 14
New condition types
The access sequence entered is the one created earlier in this article.
Click the save icon to record the condition type.
Create a Condition
To determine the price of the types of conditions created, condition records are required.
Follow SAP menu path Logistics > Sales and Distribution > Master Data > Conditions > Select Using Condition Type > VK11 Create. This action opens the screen in Figure 15. In the Condition type field in Figure 15, enter the value ZT01 and press Enter.
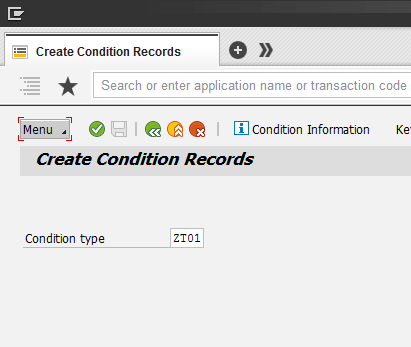
Figure 15
Create a condition record
In the next screen (
Figure 16), enter the price record. Enter key values in the following fields:
- Plant: 5100
- SDst (sales district): A10101
- Amount: 1,00
- Unit: USD
- UoM: KG
- Valid From: 28.06.2017
- Valid To: 31.12.2017

Figure 16
Save the condition record
Click the save icon.
3. Modify Pricing Procedures
To modify pricing procedures, follow menu path Sales and Distribution > Basic Functions > Pricing > Pricing Control > Define and Assign Pricing Procedures.
In the pricing procedure, you define which condition types should be taken into account and in which sequence. During pricing, the SAP system automatically determines which pricing procedure is valid for a business transaction. The system also takes the condition types contained in it into account one after the other.
For my example, modify the standard SAP pricing scheme (each company can have its own pricing scheme). To complete this step, follow menu path menu path Sales and Distribution > Basic Functions > Pricing > Pricing Control > Define and Assign Pricing Procedures. This path takes you to the screen in Figure 17. Select the Maintain pricing procedures option and then click the Choose button.

Figure 17
Choose the Maintain pricing procedures option
In the screen in Figure 18, select the RVAA01 Standard pricing procedure. To observe the details of this scheme, click the Control Data folder.
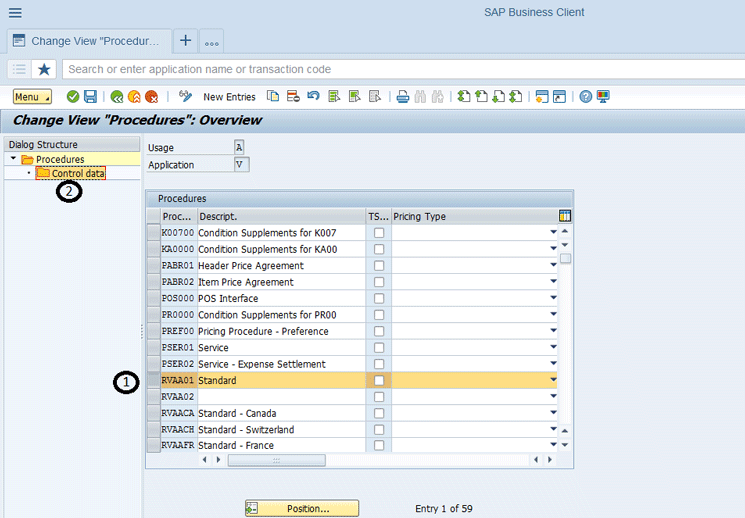
Figure 18
Details of the pricing procedure
For my example you use the standard SAP pricing scheme. (In my example I present the modification of the scheme; the schemes used in various companies are their own. Based on recommendations from SAP, do not alter the standard schemes; instead, create copies of them.) Position the price condition created earlier, ZT01 Transp. Surchange Condition (in the “Create a Condition” section), in the area of ??freight surcharges of the price scheme (Figure 19).
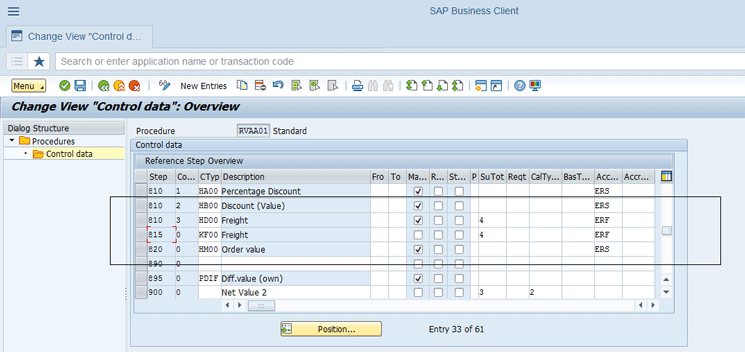
Figure 19
Zone in Pricing Procedure
Click the New Entries button (located in the top menu bar) and enter values in the fields under the following columns in Figure 20:
- Step (step number): 825 (This number determines the sequence of the conditions within a procedure.)
- Co... (condition type): ZT01 (the transportation surchange condition)
- Description: Transp Surcharg
- Acc... (account key): ERF ERF is the freight revenue. (The account key enables the system to post amounts to certain types of revenue accounts. For example, the system can post freight charges [generated by the freight pricing condition] to the relevant freight revenue account.)

Figure 20
New entries in pricing procedures
The above steps allow you to enter the condition to the price scheme. To save your data, click the save icon (not shown).
4. Test the Cycle
In this step you test the system. The objective is to validate the creation of the invoice document when generating the shipment document.
Create a Shipment Document
For my example, create a shipment document with the class ZNAC. To complete this step, follow menu path Logistics > Logistics Execution > Transportation > Transportation Planning > Create > VT01N - Single Documents. This path takes you to the screen in Figure 21 in which you enter values in the following fields:
- TransportPlanningTt (transportation planning test): 5100 (this is the transportation planning point for the test document)
- Shipment type: ZNAC
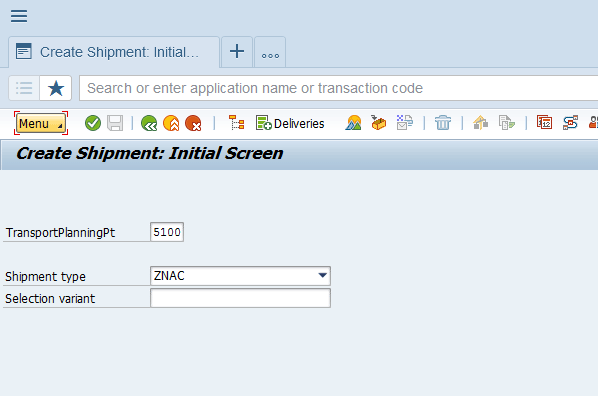
Figure 21
Create a shipment
To select deliveries for the shipment document, click the Deliveries button in the top menu bar. This action opens the screen in Figure 22.

Figure 22
Select outbound deliveries
In
Figure 22, enter values in the following fields:
- Shipping Point/Receiving Pt (shipping point/receiving point): 5100
- Transptn Plang Date (transportation planning date): 01.07.2017
After you enter your data, click the execute icon  .
.
Based on the values you enter in Figure 22, the system then automatically selects deliveries to create the transport document. Click the overview icon in the top menu bar to enter the status of the document (Figure 23).

Figure 23
Overview of the shipment
The header section of a delivery document has many data options. For my example you focus on the status. Previously, you created an activity profile.When you click the Shpmt Completion status button, the system creates invoices for outbound deliveries of the shipment document automatically (
Figure 24).

Figure 24
Document status
Click each of the buttons on the shipment document, based on the culmination of their activities. As you do so, you enter the date and time of your execution (Figure 25).
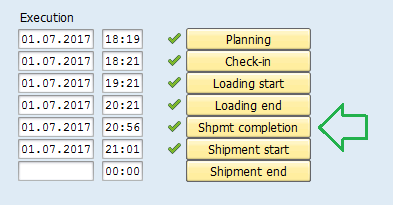
Figure 25
Update the document status
Click the save icon (not shown) to save your data. When the shipment document is generated, you see a message that the shipment is saved (Figure 26). The system automatically generates the invoices of the outbound delivery documents that are included in the transport document.

Figure 26
The shipment document is saved
Note
When you create the activity profile, if you want a log with greater detail, you can select the Always issue log after save radio button from the list of options in the Issue log during save of shipment section (Figure 4) when you create the activity profile.
Now execute transaction code VL03N (Display Outbound Delivery) with the deliveries that make up the transport document. Select the delivery with the number 815579033. Click the document flow icon in the top menu bar (Figure 27).
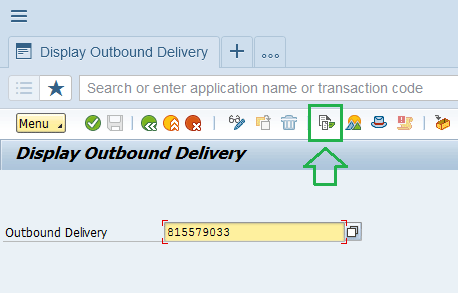
Figure 27
Display the outbound delivery
This action displays the document flow in Figure 28.
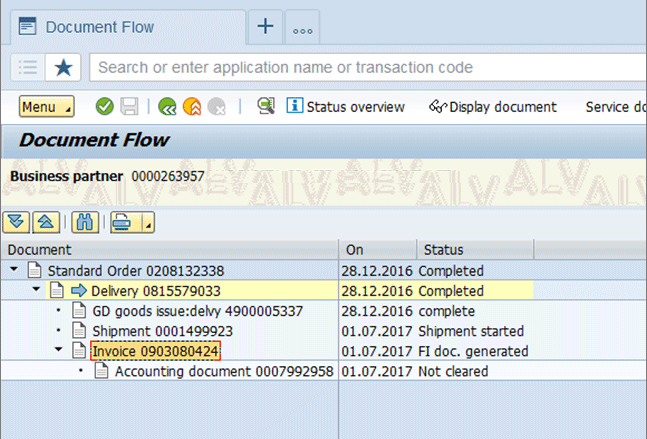
Figure 28
An invoice is created
In the document flow in Figure 28 you can see that invoice number 0903080424 was created. This document was generated automatically when you saved the previous transport document with its configured status.
Diony J. Ruiz R.
Diony J. Ruiz R. is an SAP architect and senior consultant at Group Intellego. He has 12 years’ experience in SAP Sales and Distribution and SCE (Supply Chain Execution), Logistic Execution (LE), transportation, and warehouse management picking. He has additional knowledge in SAP MM (Materials Management).
He has worked in industries such as manufacturing, pharmaceuticals, logistics, third-party logistics distribution, services, public government, chemical, maritime and customs, metallurgy, automotive, and mining industries.
His roles have included SAP Consultant Specialist, Project Leader, and Area Leader.
He is an SAP Certified Professional.
You may contact the author at
dionyruiz@gmail.com.
If you have comments about this article or publication, or would like to submit an article idea, please contact the
editor.