Learn all about the pod feature of the SuccessFactors Performance Management module. Get details about what each does, how to enable them, permissions around them, and troubleshooting tips.
Key Concept
Pods in SuccessFactors Performance Management are small, square-shaped portlets that offer useful performance information to help managers navigate the performance appraisal process more efficiently and accurately. The pod feature is a new functionality that comes with the Performance Management v12 Acceleration upgrade. It is important for SuccessFactors administrators to know about this functionality as it helps solve some potential business needs in the performance management process, thereby adding more value to the system.
SuccessFactors is requiring companies who currently use SuccessFactors to upgrade to the v12 user interface by the 1508 Quarterly Release. Even though the Performance Management v12 Acceleration is not mandatory for this release, it eventually will be; therefore, it is prudent for SuccessFactors administrators to begin planning for this upgrade now.
Performance Management v12 came out a few years ago with major changes and enhancements to the v11 version; however, at the time there were gaps between the two versions. These gaps caused issues, such as breaking current processes to accommodate the new functionality and all its structural changes.
The introduction of SuccessFactors Performance Management v12 Acceleration provides the best of both worlds. It includes all the new technology and functionality of Performance Management v12 along with the majority of the functionality of v11, closing many of the existing gaps.
Pods are a helpful feature that comes with the new SuccessFactors Performance Management v12 Acceleration forms release, and helps to fill in some of these aforementioned gaps. They offer information in a graphical and user-friendly way to help managers complete performance management forms quickly and accurately. Setting them up and managing them is an easy process as well. In order to obtain the desired results, it is important to fully understand the authorizations around the Performance Management form’s General Settings.
In this article, I discuss the pods feature of SuccessFactors Performance Management. This is an important functionality for SuccessFactors administrators as it can help drive value by solving potential issues with the performance process. For example, using pods, managers who are doing reviews get the ability to see employees’ overall score while doing the review. Another key feature is the ability to show managers where employees stand as compared to their peers.
First, a brief overview and some background about the pod functionality.
Pods
When systems are upgraded to v12 Acceleration for Performance Management, a new optional functionality is introduced, called pods. Pods are small tiles that appear at the top of the Performance Management form screen.
There are five pods that can be enabled, disabled, or permissioned based on role and route-step map.
Note
A route-step map is the workflow for, in this case, the Performance
Management form. For example, a form’s initial route map step could be
an employee self-review. After the form is completed by the employee,
it’s sent to the manager. This next step would be called the manager’s
review, and so on. How to manage route maps is outside the scope of this
article.
Figure 1 shows a screenprint of the pods as they appear in the SuccessFactors Performance Management form page.

Figure 1
SuccessFactors Performance Management pods
Here are some more details about pods and how they work.
The Overall Score Pod
The Overall Score pod (on the left of Figure 1) displays information about the overall rating of the performance review form. This pod grabs information directly from the Overall Score section at the bottom of the form. These ratings can be based only on competencies (this is the most common method) or can be a combination of both competencies and goal ratings.
When you click the pod (tile), a new window opens with the details of what has been rated and the actual rating scores (Figure 2). In this new window you cannot change or edit any information. This is simply a display screen with the employee’s current information. If there is a need to change a rating, you have to go down to the specific item (Objectives, Competencies, or Goals) and make changes in each particular section.

Figure 2
Open the Overall Score pod to see employee ratings and competencies
Although this pod can be configured to be viewed by managers and employees, generally only managers are able to see this information.
The Incomplete Items Pod
The Incomplete Items pod (Figure 1) displays information about all the items that are incomplete in the form, but are required. For example, if in the configuration it has been set that all competencies must be rated before moving to the next step in the process, this pod displays all the competencies that have not been rated yet.
The Team-Rank Pod
The team-rank pod (tile #1 in Figure 3) displays a ranking of the reviewer’s direct reports based on overall ranking. This information (ranking) is limited to the same performance form—it does not include ratings from other forms.
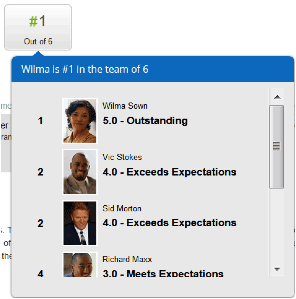
Figure 3
The ranks of all the employees under one manager
When you click the team-rank pod, a screen opens with the ranking details for the entire team. If a form has not yet been completed for any team member, the pod shows a value of N/A for those particular team members’ reports and automatically places those employees at the bottom of the ranking scale. If there is more than one employee without a complete form, they all receive the lowest ranking.
The Supporting Information Pod
The Supporting Information pod (Figure 4) displays feedback received about employees from other members of the team and managers, and any notes about the employee. Each employee has his or her own pod with this information.
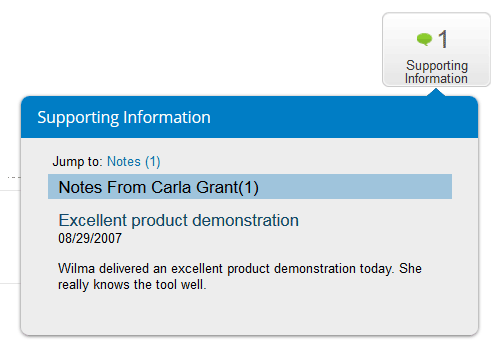
Figure 4
The supporting details for the employee’s ranking
It is important to understand that, in SuccessFactors Performance Management, there is a distinction between getting feedback and asking for feedback. Getting feedback (e.g., Feedback from Others) means that you send a form to someone else requesting feedback about a particular employee for review purposes (Figure 5). In cases in which there has been a change to the reporting structure, resulting in organizational chart changes, this person would be a previous manager. So, the Feedback from Others option would be used when an employee reports to a manager and then at some point moves to report to another manager. In the case of getting feedback, it would be treated as a step in the workflow (route map) of the form.
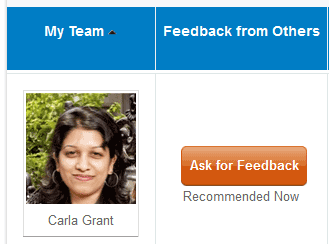
Figure 5
Getting and asking for feedback about employees
The Ask for Feedback functionality, on the other hand, is the source of the supporting details that populate the Supporting Information pod. Organizations usually use this feature to ask for feedback from employees’ peers or second-level managers. To ask for feedback, go to the Team Overview tab, find the direct report about whom you want feedback, and click the employee’s details to open the screen. Once it’s expanded, click the Ask for Feedback button (Figure 5). This opens the screen in Figure 6.

Figure 6
Request feedback about another employee
In this screen you (the reviewer) can select one (or more) employees from whom you would like feedback. In this case, I want feedback about Carla Grant from Wilma Sown. When I select Wilma’s name on the left, a box opens on the right where you can enter the request details. This tool sends an email asking for feedback. The Message box contains templated text that you can edit to add employee-specific details.
All the feedback provided is then displayed in the pod as supporting information once the user clicks on it.
The Gap Analysis Pod
The Gap Analysis pod displays information about any gaps between self-assessment ratings and ratings from the performance reviewer. There must be a self-assessment step in the route map in order for this pod to work properly. Once the manager opens this pod, a screen opens with information about the gap between the employee’s own rating and the manager’s rating of the employee (Figure 7). In cases where there is no gap, instead of a number being displayed here, there would be a dash (–), which essentially represents no value (i.e., no gap).

Figure 7
The gap between the employee’s self-assessment and the manager’s ratings
Note
The self-assessment step is a step in the process workflow (route map)
that allows employees to rate themselves and add comments.
All these pods are independently managed and configured; therefore, there is no need to have all of them enabled. Based on a company’s current practices, there might be situations in which only one pod is required, and others in which two or more are required. Also, there might be situations in which only managers can see the pods in the route map or only second managers are allowed to see them. All permissions and enablement of pods can be configured to meet a company’s specific needs.
How to Enable Pods
As I mentioned earlier, this new functionality comes with the Performance Management v12 version or Performance Management v12 Acceleration. Starting from the SuccessFactors Quarterly Release 1408 (August 2014), Performance Management v12 is no longer available to upgrade. Now, if desired, companies can only upgrade to Performance Management v12 Acceleration.
In addition, Performance Management v12 Acceleration is no longer available in the upgrade center in Administration Tools (Figure 8). Administrators now must involve Professional Services or Customer Success in order to have it turned on in Provisioning.
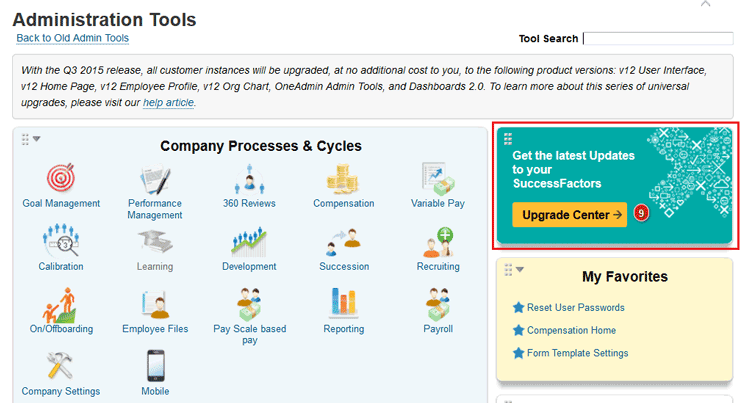
Figure 8
Performance Management v12 Acceleration is not an Administration Tools option
Once in Provisioning, Professional Services or Customer Success needs to follow these steps:
- Go to the company in which the upgrade needs to be done.
- Click Company Settings under Edit Company Settings (Figure 9).

Figure 9
Select the Company Settings link on the PROVISIONING Companies page
In the screen that opens (Figure 10), scroll down to the Profile v12 option and tick the check box next to it. (Warning: Before taking this step, make sure to perform the upgrade within Upgrade Center first. If you use this setting, you cannot easily switch back to Profile v11. If the Upgrade Center is not available, you should back up your scorecard settings in PROVISIONING before proceeding with this upgrade.)
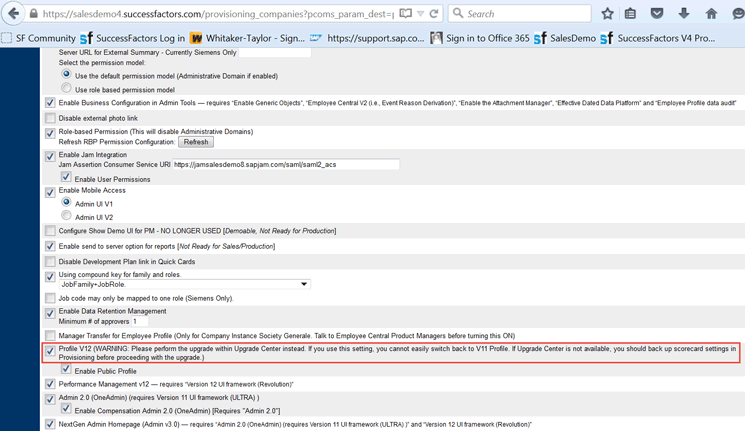
Figure 10
Select the Profile V12 option in PROVISIONING
Then, scroll down further until you find the PM v12 Acceleration – requires “Performance Appraisal Smart Form” option (Figure 11). Select the check box next to this line as well.

Figure 11
Select the performance appraisal option for the PM v12 Acceleration
Then scroll back up and check the Performance Appraisal Smart Form check box and click the Save Feature button (Figure 12). This saves the three check box options you already selected.
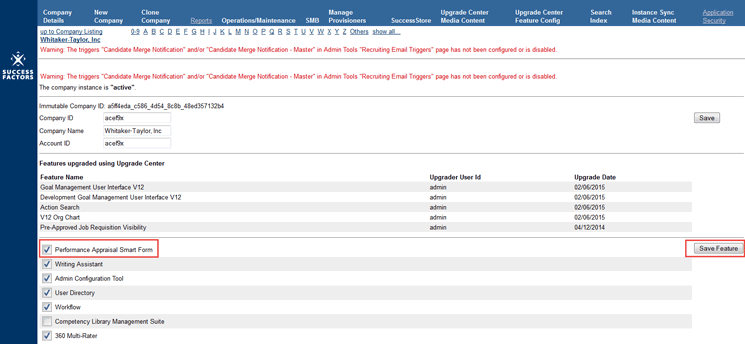
Figure 12
Save the new check box settings in PROVISIONING
Note
By default, in Performance Management v12 Acceleration, all the pods are
automatically enabled after each Performance Management form goes
through the validation process to approve; the details for this are
outside the scope of this article.
Pod Permissions
Each pod can be managed independently; therefore, not all the pods need to be available in the appraisal forms. Each pod is controlled by a set of different permissions in the form, as follows.
The administrator must have Performance Management Administrator rights in order to modify the form. If you have access to modify any part of the form, you have authorization to modify pods.
In order to modify and manage the permissions around pods, you need to be able to modify the Performance Management form. To do this, log into your SuccessFactors Instance, go to Administration Tools, and click the Performance Management option (Figure 13).
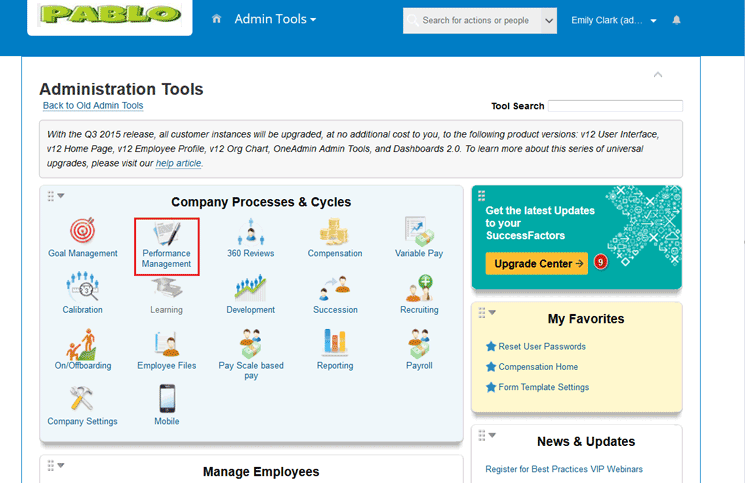
Figure 13
Open Performance Management
In the pop-up screen that opens (Figure 14), click the Manage Templates option. This opens a screen that shows all the Performance Management form template options (Figure 15).

Figure 14
Open Manage Templates
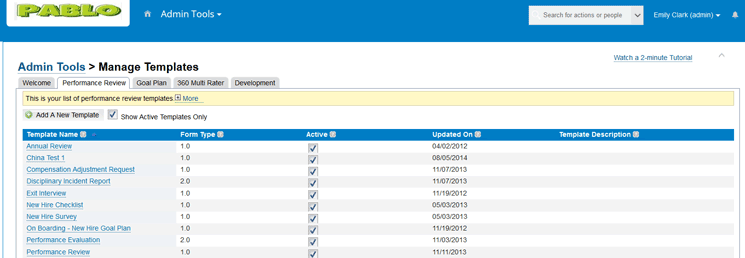
Figure 15
Review all the available Performance Management form templates
Click the form template you want to modify to open it. This opens the Preview section on the left (Figure 16). Click the General Settings option, which opens the screen in Figure 17.
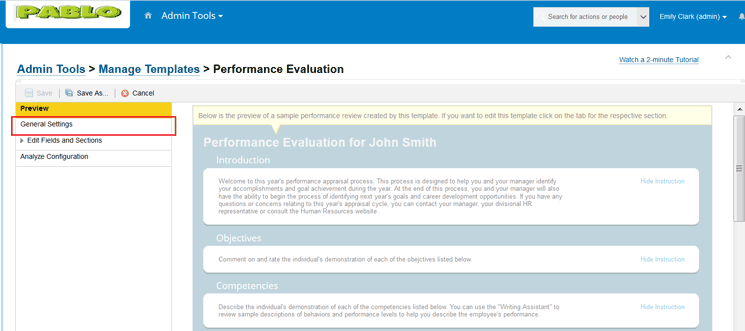
Figure 16
Select General Settings
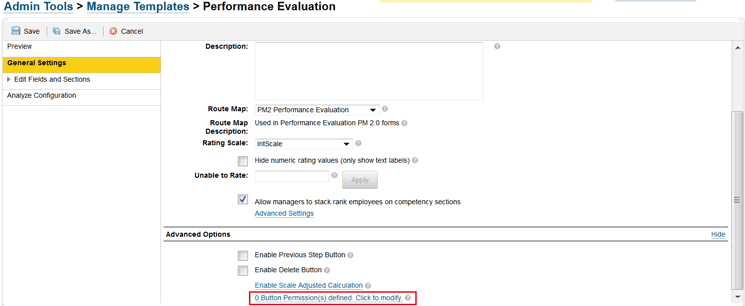
Figure 17
Add a button permission
Go to the bottom of the form in the figure and open up the Advanced Options section. Then click the link to modify the button (e.g., the Button Permission(s) defined. Click to modify. link). Once you click the link, a Button Permissions window opens (Figure 18) that gives you the opportunity to add permissions to buttons. Managing these buttons’ permissions is the only way to enable pods. In this section you not only can control which pods appear in your form, but also other button options such as:
- Reject
- Finalize Form
- Sign
- Send to Previous Step
- Delete Form
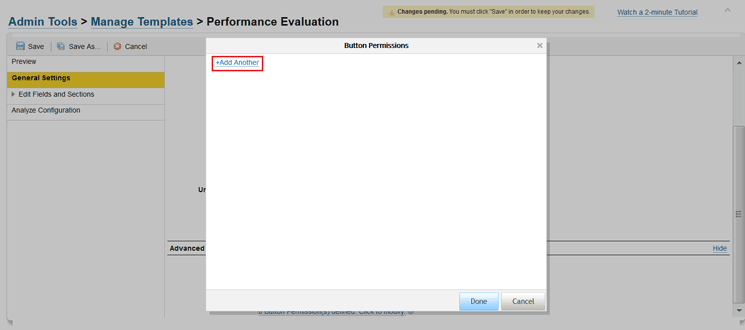
Figure 18
Finish adding a button permission
For the purposes of this article, the buttons I focus on are:
- Overall Score
- Gap Analysis
- Incomplete Items
- Team Ranker
- Supporting Information
These are, essentially, the names of each pod. (When editing the Performance Management forms, pods are referred to as buttons, but once you’re done editing them, the terminology reverts back to pods.)
In the Button Permissions pop-up window in Figure 18, click the +Add Another link. This opens a screen with four options: Type, Buttons, Roles, Route Steps (Figure 19). These are extremely useful in the Performance Review form settings, so it’s important to have a good understanding of each. I discuss each in more detail below.
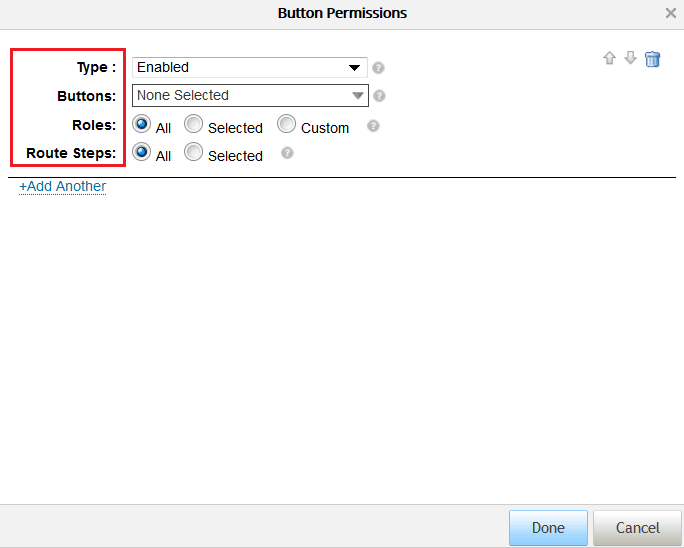
Figure 19
Open the Button Permissions section
Type field (Figure 20): This drop-down field controls the rule for the Buttons field (below). If you select Enabled, the selected button is enabled (e.g., the buttons appear on the form). If you select None, the button does not appear. Make your selection in this field, and then move on to the Buttons field to determine the button.

Figure 20
Set the rules for the button
Buttons field (Figure 21): This field controls which buttons follow the rule determined by the Type field. Click the field to see all the available button options. Each has a check box next to it to make your selections.
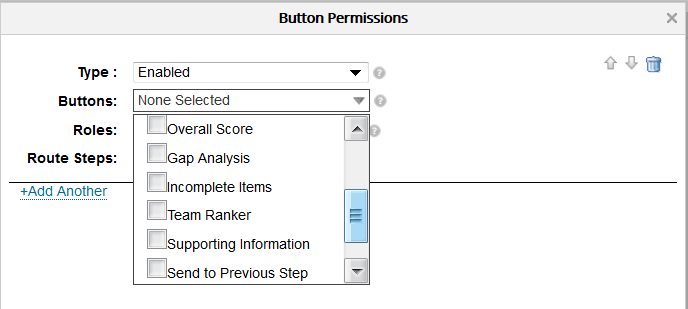
Figure 21
Select the buttons (pods) that will appear on the Performance Management form
Note
In this Button Permissions selection menu, it is important to
understand that this list includes different types of buttons as well as
each pod that appears in the performance management form. The only way
to tell which are pods and which are actual buttons is to know the
names. These are the button names for the five pods available:
- Overall Score
- Gap Analysis
- Incomplete Items
- Team Ranker
- Supporting Information
Roles (Figure 22): These radio-button options control the employee role the previous two fields’ rules will affect. There are three options: All (the rules affect all roles), Selected (the rules affect only the roles you select; for example, Manager or HR Rep.), and Custom (custom roles; this is for roles that might not be on the list, for example, EM+).
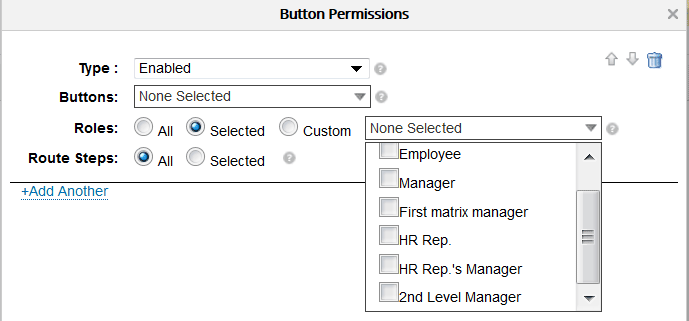
Figure 22
Select the roles for the buttons
Route Steps (Figure 23): These radio-button options control the part of the route map to which the rules will be applied. There are two options: All or Selected. If you select All, all the rules apply to all the performance management route-map steps. If you choose Selected, you see different options that you can tick so that only the selected route-step rules are applied.

Figure 23
Tick the Selected radio button and select the required route steps map options
This is a very powerful tool as are there many combinations of rules to apply to different roles and different route-map steps along the way. In this way you can streamline and customize this process in a way that makes the most sense for your organization.
Use Case
Using the following screenshots, I illustrate how these settings work together. In this scenario, the company wants to show all the pods to only the managers’ roles in all steps of the route map. Using the information provided above, follow the steps shown in Figures 24 through 27 to make the proper settings.
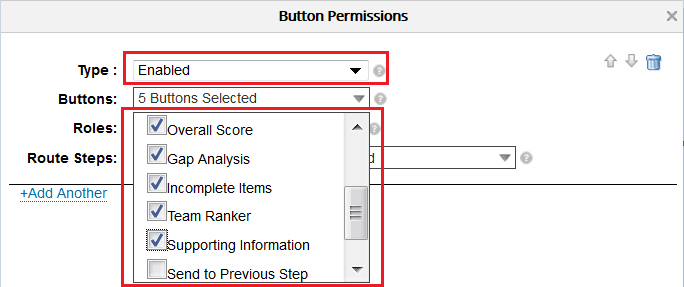
Figure 24
Select the required buttons (pods)
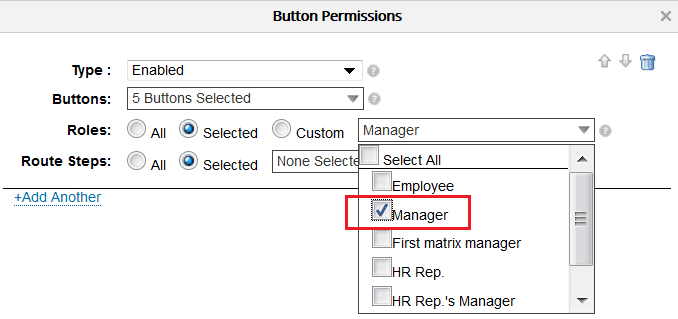
Figure 25
Tick the Roles: Selected radio button and then select the required user role options

Figure 26
Tick the Route Steps: All radio button to select all the route steps
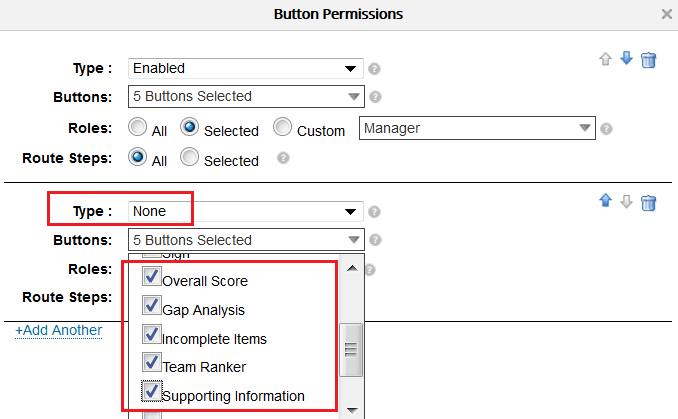
Figure 27
Select the None option for Type and then select the required pod options
Pablo Stuardo
Pablo Stuardo is a SuccessFactors Senior Consultant at Ernst & Young. He focuses on the entire SAP SuccessFactors suite and has supported and implemented a wide variety of projects for different clients at a global level. A native Chilean, Pablo is fluent in Spanish, and graduated from Georgia State University’s Robinson College of Business with a dual degree in Computer Information Systems and Finance.
You may contact the author at pablo.stuardo1@gmail.com.
If you have comments about this article or publication, or would like to submit an article idea, please contact the editor.