Using these steps, you can create a sample status schema for your Solution Manager documents.
Key Concept
Status values on documents help you monitor and manage work in progress for documentation development and review. The status schemas control what values can be assigned by document type. They also help to drive process adherence as the document goes through the project-defined life cycle of authoring and approval.
All documentation goes through a life cycle before it can be called done. For example, a process definition document could go through scope approval (is it OD to even write the document?), assigning a resource to author the document, writing the document (in process), draft complete, team or peer review, business-owner review, and, finally, signoff.
Along the way, it might churn by moving backwards in the life cycle. For example, if the author submits the document for team review and it is rejected, it changes from Draft Complete status to In Process status.
Status values allow you to see the current state or position in the life cycle. The status schema allows you to define the collection of states and the sequence of the life cycle.
Terminology
Following are some key terms:
- Status value: The actual names of the states for a document such as Not Started or In Process
- Status schema: The collection of status values that represents the life cycle for a particular document
- Sequence: A numeric way of representing the order of the states of the document throughout the life cycle
- Lowest sequence number and highest sequence number: Control values that tell the status schema what the valid next state values for a document are. For example, the document can go from Not Started to In Process status, but not from Not Started to Draft Complete status. This is controlled by assigning the sequence number of the lowest sequence and highest sequence numbers to the status code.
- Initial: Defines the state the document is in when it is first created
- Locked: When the document reaches this state, no further edits can be performed unless the document is unlocked by an administrator. (Note: The authorizations for this feature are beyond the scope of this article.)
Building and Assigning the Status Schema
The first step is to create the status values or states the document can pass through in its life cycle. You do this in configuration using transaction code SPRO in Solution Manager (Figure 1). On the main configuration screen, click the SAP Reference IMG button to go to the entire IMG.
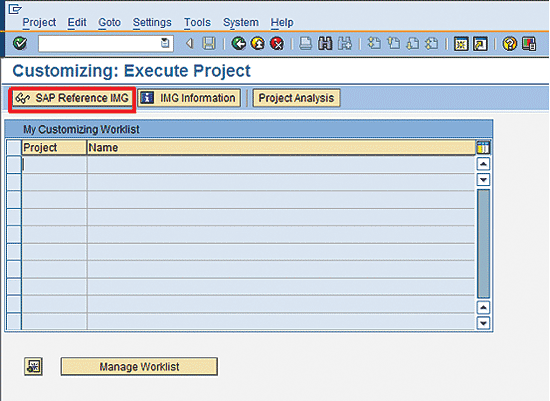
Figure 1
Open the SAP Reference IMG in transaction code SPRO
Follow IMG menu path SAP Solution Manager Implementation Guide > Technical Setting > Document Management > Status for Documents to configure status values and schemas for documents. (Note: This path is for Solution Manager 7.1 Support Package 12.)
In the screen that opens (not shown) click the execute icon  to the right of the Define Status Values for Documents IMG node to open the Status Values for Solution Manager Documents maintenance view (Figure 2).
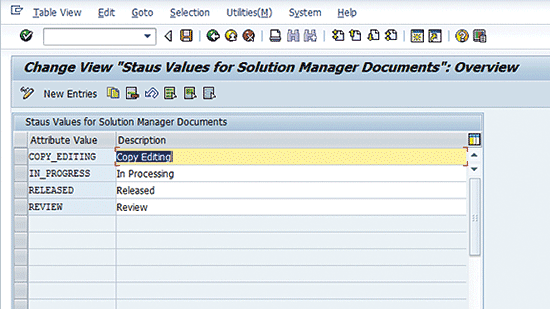
Figure 2
Status values for the Solution Manager documents maintenance view
Figure 2 shows the SAP-delivered status values. For my example, I’ll add In Process, Not Started, Draft Complete, In Business Review, and Complete and Signed Off.
Note
As a general rule, I always add Cancelled, On Hold, and Deferred to all
status schemas as these are common states for all document types. You
need to define the codes you wish to use for each document type in your
project.
Click the New Entries button to add the new status values. The maintenance view shows an empty view where you can enter the Attribute Value and the Description (Figure 3). The term Attribute Value is the code or technical name for the status and the Description is the long text that shows on the drop-down view when users set the statuses of their documents.
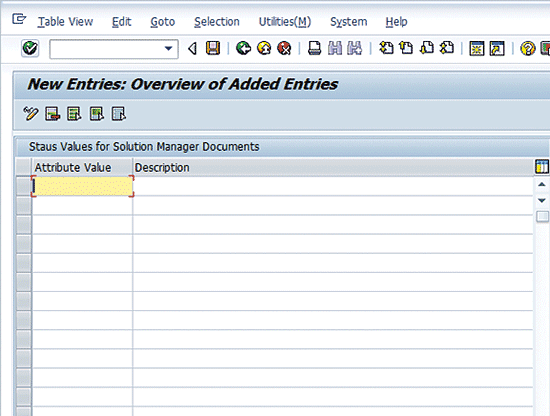
Figure 3
Status values maintenance view in New Entries mode
Simply type in the status code and a description for each of the new entries and click the save icon  . Figure 4 shows the maintenance screen after I entered the new status codes and descriptions.
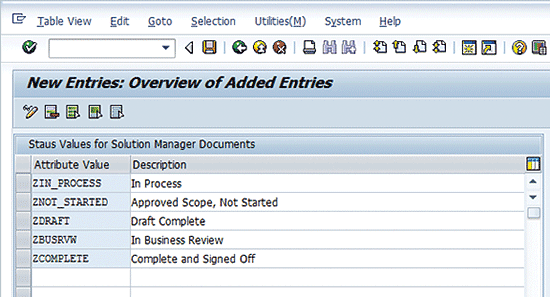
Figure 4
New status codes and long descriptions entered
The next step is to create the status schema. The status schema organizes groups of status codes to represent the document life cycle. Use the back icon until you’re returned to the IMG structure and then double-click the Define Document Status Schemes IMG node.
Start by clicking the execute icon to the right of Define Document Status Schemes to open the Status Schema for Solution Manager Documents maintenance view shown in Figure 5.
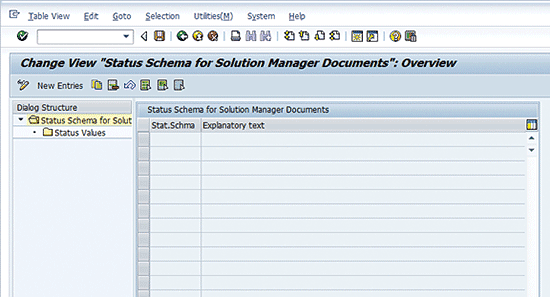
Figure 5
The status schema for Solution Manager Documents overview screen
Click the New Entries button to create a new, empty status schema. Figure 6 shows the maintenance view in New Entries mode with my new schema name and explanatory text. Status codes are contained within a status schema.
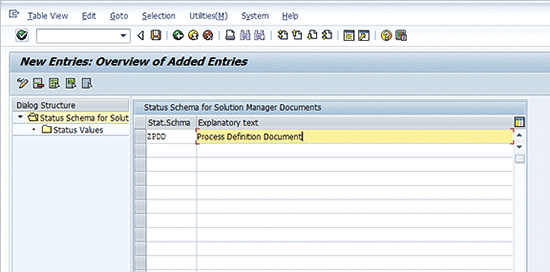
Figure 6
New status schema name and explanatory text
Click the save icon to save the entry and prepare to add the status values to the schema. Figure 7 shows the maintenance screen still in New Entries mode after it was saved. Note that the schema name is now grayed out.
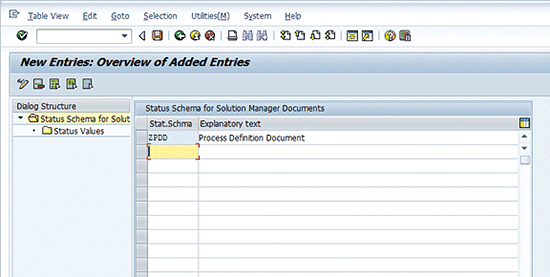
Figure 7
Maintenance view in the New Entries mode after saving
Click the back icon once to return to the schema maintenance mode.
Next, select the row of the newly created schema (e.g., ZPDD Process Definition Document) and double-click the Status Values folder on the left side of the maintenance view. Figure 8 shows the status schema selected and the Status Values folder highlighted.
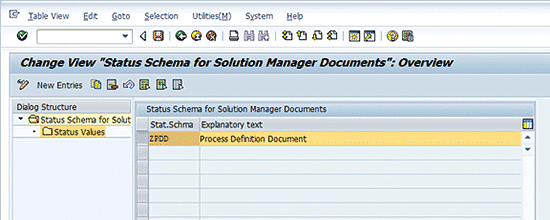
Figure 8
New schema selected and Status Values folder highlighted
Double-clicking the Status Values folder opens the Status Values maintenance view shown in Figure 9.
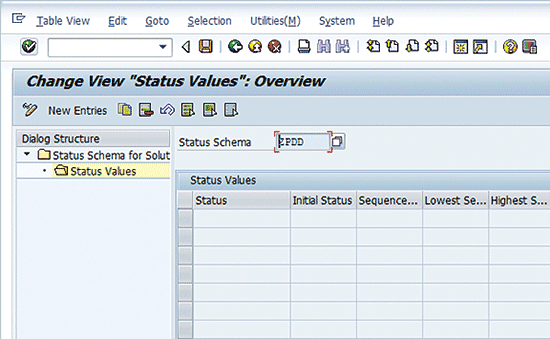
Figure 9
Status Values maintenance view for the new schema
Click the New Entries button to assign status codes to the schema (Figure 10).
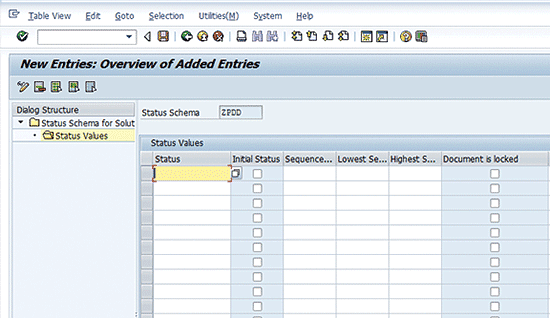
Figure 10
New entries for the status schema
You can use the drop-down view (F4) to display a list of the available document status codes, or simply type them in if you know the code names well enough. Figure 11 shows the maintenance view with the list of available document status codes.
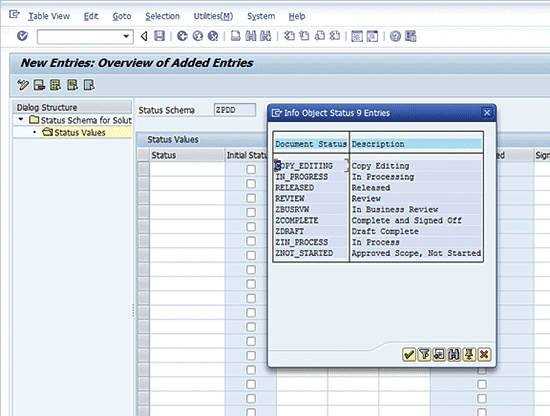
Figure 11
Available status codes for the schema
Double-click the row of the Document Status you wish to add to the schema (pop-up closes). Repeat this process until you have added all the desired codes to the schema.
Figure 12 shows the view after selecting the desired codes. By default, they sort alphabetically in the view.
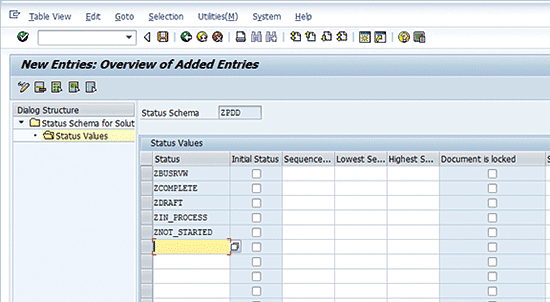
Figure 12
Status schema maintenance view with status codes assigned
The next step is to put the codes into the proper sequence based on the document life cycle. The Sequence… column fields in each row allow you to assign a sequence number to each code. As a general rule, I increment the sequence numbers by 10 to allow for easy insertion of new sequences if changes arise. Figure 13 shows the status codes with sequence numbers assigned.
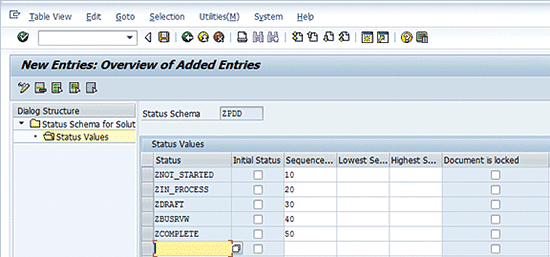
Figure 13
Schema with codes and sequence numbers assigned
Next, set the Initial Status and the Document is locked status check boxes. Identify which status should be the initial or default status when a document is created and tick the check box for that status in the Initial Status column.
Identify which status is the last in the document life cycle and tick the check box in the Document is locked column.
Neither of these settings are required but they help maintain the consistency of the process throughout the project by making all documents start with the same initial status as well as helping to ensure documents aren’t changed after they have been signed off. Figure 14 shows the schema with the Initial Status and Document is locked status codes marked.
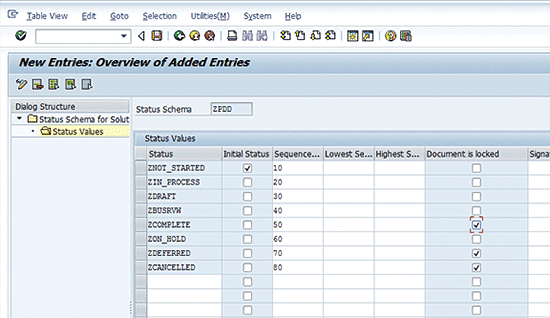
Figure 14
Schema with Initial Status and Documentis locked status codes marked
Note in Figure 14 that I’ve added the on hold, deferred, and cancelled status values that I mentioned earlier. I added these here to illustrate the fact that you can have multiple Document is locked status codes. I typically make the deferred and cancelled as locked statuses because they represent changes to the scope for the current project release, and should only be unlocked with approval from project leadership.
Note
While Solution Manager does not prevent you from choosing multiple
initial status values, it really doesn’t make any sense to do so. If you
have multiple initial status codes marked, Solution Manager uses the
one with the lowest sequence number assignment.
For example, if a document goes On Hold, you would probably want to only allow its next status to be In Process. To accomplish this using the schema in Figure 14, you would assign the value 20 to both the Lowest Sequence Number and Highest Sequence Number columns. This would tell Solution Manager that the only valid status after an On Hold status is In Process as shown in Figure 15.
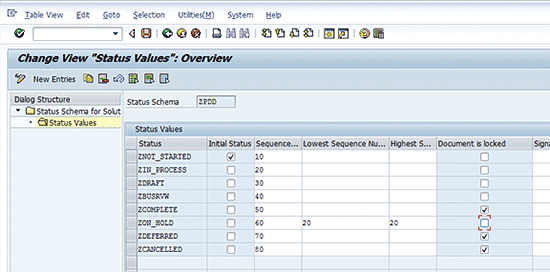
Figure 15
Using the Lowest Sequnece Number and the Highest Sequence Number to control the next status a document can be in when it is On Hold
A note of caution. I recommend using this function sparingly for two reasons.
- It is very difficult to anticipate all the possible exceptions that can occur on your project in advance, so defining the next status can be tricky.
- Since the Lowest and Highest Sequence Numbers are lower and upper limits, it is a real possibility that some status code sequence assignments could be in between the low and the high even if you didn’t want them used. For example, if you wanted to have documents to be able to go from Deferred to Not Started or Draft Complete, you would set the lowest sequence to 10 and the highest to 30. However, what if you did not want a document to go from Deferred to In Process? You would not be able to restrict that with this configuration.
The remaining three columns in the schema definition (not shown) are used to assign a Digital Signature Strategy, the setting the End Status of Digital Signature processing, and Cancellation Status. These functions are beyond the scope of this article.
Assigning the Schema to the Document Type
The last step is to assign the status schema to the document type. There are two ways to do this. You can go through the IMG using the Assign Status Scheme to Documentation Type IMG node or you can use transaction code SOLAR_PROJECT_ADMIN.
I prefer using transaction code SOLAR_PROJECT_ADMIN since assigning through the IMG simply launches transaction code SOLAR_PROJECT_ADMIN anyway, and you must use SOLAR_PROJECT_ADMIN to create the document types in the first place.
Enter transaction code SOLAR_PROJECT_ADMIN to see the list of projects defined in your Solution Manager system. Figure 16 shows the list of projects in my example system.
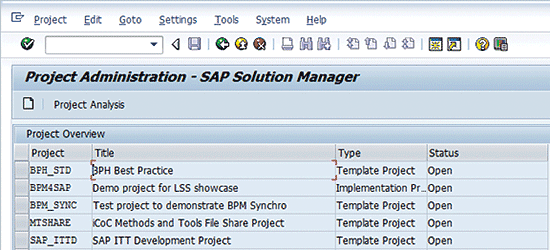
Figure 16
Project Overview in transaction SOLAR_PROJECT_ADMIN
Double-click your project to open the project header and select the Project Standards tab (Figure 17).
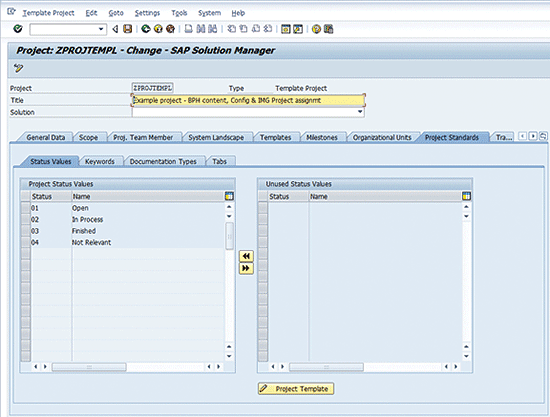
Figure 17
Project header maintenance with the Project Standards tab selected
Next click the Documentation Types sub-tab to open the Documentation Types maintenance and assignment sub-screen (Figure 18).
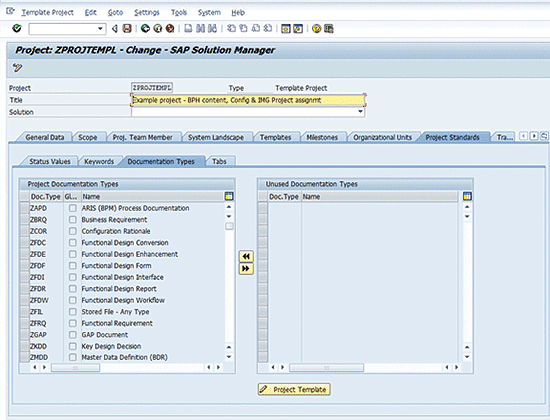
Figure 18
Documentation Types maintenance and assignment sub-screen
Next click the Project Template button at the bottom right of the sub-screen to open the document type and template maintenance pop-up. It is labeled Change Template Project Templates (Figure 19).
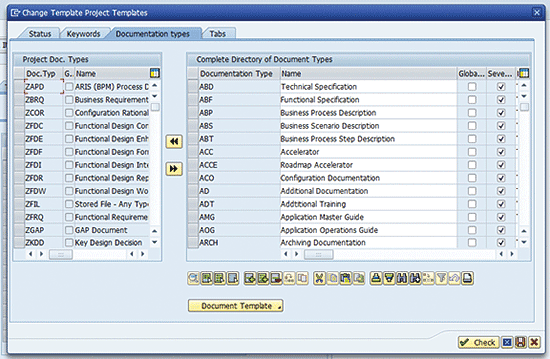
Figure 19
Change Template Project Templates pop-up
This pop-up allows you to define all the document types to be used for all projects in the Solution Manager system.
The left side of the pop-up shows the document types available to the current project. The right side is the list of all document types defined in Solution Manager for all projects.
To create a new document type, click the insert icon  at the bottom of the right pane. It’s the fifth icon from the left in the row of icons just above the Document Template button.
This inserts a new blank line in the right pane for adding document types (Figure 20).
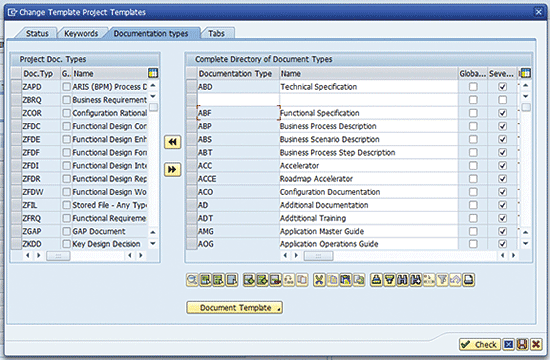
Figure 20
New line for creating a new document type
Simply key in a code for the document type beginning with a Z or Y to identify it as a customer-created document type. Then add the Name of the document type that will be seen by the end users and in reports. Next, tab across the row to the Status Schema column to assign the newly created status schema. Enter the name of the schema in the Status Schema column and click the save icon.
Note
The Global, Several, File Extension, and Blueprint Relevant columns are beyond the scope of this article.
Figure 21
Figure 21
New document type ZPD1 created with status schema ZPDD assigned
Select the new document type and click the page left icon  to make it available for use in your project. This makes the ZPD1 document type visible on the left pane of the maintenance window. Click the exit/cancel icon
  to close the maintenance window.
The new document type appears in the Unused Documentation Types pane in the Documentation Types sub-screen. This means that the document type is available for use by the project, but is not actually in use (Figure 22).
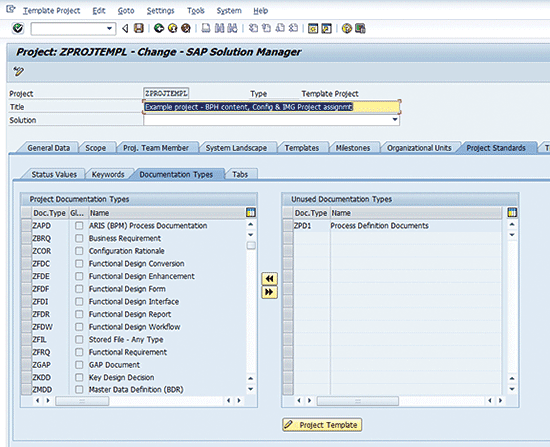
Figure 22
Document type ZPD1 is assigned to the project, but not yet in use
Select the document type and again click the page left icon to move the new document type to the Project Documentation Types pane (Figure 23).
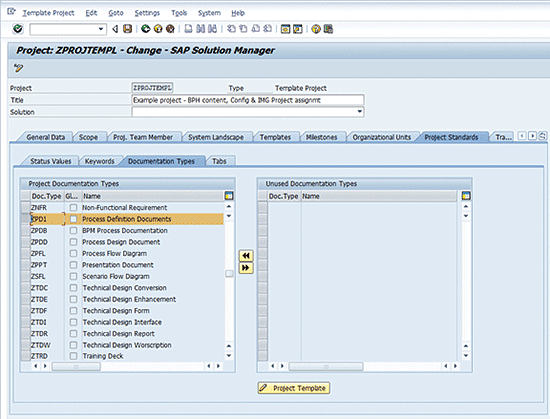
Figure 23
Document type ZPD1 is now ready for use by project team members
Now your new document type and status schema are ready for use in your project. When a new document is created of this type, the status schema is invoked to set the Initial Status for the document before it is saved. On subsequent edits of the document, the schema controls which status values may be set, the sequence in which they are to be used, and when the document will be locked.
As always, set this up in a sandbox or development Solution Manager and experiment a bit to get a good understanding of how this functionality works before implementing into your production Solution Manager system.
D. Russell Sloan
D. Russell Sloan is a specialist in project and program governance for IBM. He focuses on the use of SAP Solution Manager for global rollout projects for IBM’s largest customers, having worked with SAP software since 1996. Russell has degrees in accounting and information systems and has been a team and project leader for SAP projects for more than 14 years. He has been developing and deploying software systems for over 30 years.
You may contact the author at solmanruss@gmail.com.
If you have comments about this article or publication, or would like to submit an article idea, please contact the editor.