5 minute read

by Karl Kessler, Vice President of Product Management ABAP Platform, SAP SE
Explore related questions
Ask SAPi
SAP Cloud Platform ABAP environment was released in September 2018 as a platform-as-a-service offering for the ABAP developer community. It enables developers to build cloud applications with an SAP Fiori user interface optimized for SAP HANA, with a primary purpose of creating extensions to SAP S/4HANA Cloud and SAP S/4HANA, and provides a path for moving existing ABAP skillsets and assets to the cloud while taking advantage of the latest SAP HANA-based innovations. Since its initial release, SAP has delivered two additional innovations that provide important capabilities for ABAP developers:
-
- Connectivity to on-premise back-end systems (including SAP S/4HANA, SAP Business Suite, and SAP NetWeaver 7.x), which was delivered with version 1902 in February 2019
- A simplified setup for SAP Web IDE development and deployment of SAP Fiori applications, which was delivered with version 1905 in May 2019
With more than 100,000 productive ABAP-based systems running SAP Business Suite, SAP NetWeaver, and SAP S/4HANA on premise, robust connectivity from SAP Cloud Platform ABAP environment to on-premise instances based on standard protocols such as HTTP and Remote Function Call (RFC) was a pressing need. In addition, prior to version 1905, the SAP Web IDE process for developing and deploying SAP Fiori applications involved several manual steps. Simplifying this process was a priority — SAP Fiori is the only user interface technology supported by SAP Cloud Platform ABAP environment, which means a significant increase in SAP Fiori application development.
This article examines both the new connectivity to on-premise systems (which requires proper administration setup) and the newly simplified setup for SAP Web IDE development and deployment for SAP Fiori applications (which uses a different type of project template). For each, it first provides an overview of the feature and then walks step by step through an end-to-end example of using it to help you start taking advantage of the functionality in your own organization.
Enabling On-Premise Connectivity
From an ABAP programmer’s point of view, calling an RFC module from SAP Cloud Platform ABAP environment should not be more complex than calling it from a traditional on-premise connection — using the ABAP keyword CALL FUNCTION DESTINATION — where all the system customization is done up front by an administrator. With the RFC and HTTP connectivity support included with release 1902, the call is now nearly as straightforward.
Architecture and Connectivity Setup
Figure 1 shows the overall connectivity architecture and setup. On-premise ABAP back ends — such as SAP S/4HANA based on SAP HANA and SAP Business Suite based on SAP NetWeaver and AnyDB — reside behind secure firewalls and cannot be contacted directly from the outside world. To open connections to authorized SAP Cloud Platform users, an instance of the Cloud Connector, which serves as a link between SAP Cloud Platform and an on-premise system, runs closely with the back-end instances. The customization of the Cloud Connector describes which protocols (RFC and HTTP) are enabled and which resources can be accessed by users of SAP Cloud Platform.

To configure a Cloud Connector instance, you must create a Neo subaccount in SAP Cloud Platform, since the Cloud Connector is currently only supported for the Neo environment. The enabled protocols — RFC and HTTP — will become visible in the SAP Cloud Platform cockpit of the specified subaccount. However, SAP Cloud Platform ABAP environment is a Cloud Foundry-based service,1 so the ABAP program that wants to access an on-premise back end through RFC or HTTP must first contact the Cloud Foundry destination service instance, which points to an RFC or HTTP connection to the on-premise back end exposed by the Cloud Connector. Lastly, two communication arrangements must be configured for the ABAP cloud instance: one for the Cloud Connector integration, which is based on the standard SAP communication scenario SAP_COM_0200, and another for the Cloud Foundry destination service integration, which is based on the standard SAP communication scenario SAP_COM_0276.
Once the configuration is complete, the flow of control for the connection executes as follows: 1) the ABAP program contacts the destination service; 2) a request to open a tunnel is sent to the Neo subaccount enabled for the Cloud Connector; 3) the request is forwarded to the Cloud Connector; and 4) the Cloud Connector establishes a secure tunnel for bidirectional communication between the ABAP cloud tenant and the on-premise back end.
End-to-End Example: Configuring Back-End Connectivity
To fully understand the setup and flow of control for the connection to the back end, let’s walk through an end-to-end example, where we will enable the function module RFC_SYSTEM_INFO for cloud access. Before we configure the connection, let’s take a closer look at the function module to understand its signature (that is, its import and export parameters and type definitions).
In the back-end system (SAP Business Suite or SAP S/4HANA), start transaction SE37 (ABAP Function Modules) to examine RFC_SYSTEM_INFO. This function module exports a structure of type RFCSI (Figure 2). The fields of this structure, shown in transaction SE11 (ABAP Dictionary) in Figure 3, hold technical status information such as protocol version, code page information, integer format, floating point format, database host, and SAP release — basically everything that is needed to establish a proper communication channel.


To see the actual results from the back-end system that you want to access, you can also test run the function module by pressing F8, which displays the results in the form of a long string (see Figure 4). You can view the structure in a more readable format using the ABAP Dictionary structure editor (Figure 5).


Let’s now walk through the configuration steps for back-end connectivity.
Step 1: Set Up the Cloud Connector
To enable access to this function module from the cloud, start the Cloud Connector administration user interface (Figure 6) and add an existing Neo subaccount, specifying the region, the subaccount key, the subaccount user and password, and a display name (PM2019_CC in the example). The subaccount can be viewed in the Cloud Connector administration screen with its basic status information, including the newly created tunnel that connects the on-premise back end with authenticated users of the added subaccount (see Figure 7).


Next, under the added subaccount, customize the access to the back-end resources. Select Cloud To On-Premise and add the HTTP and RFC protocols (Figure 8). To add the protocols, click on the plus (+) icon and select the type of back-end system (ABAP System); the protocol for communicating with the back-end system (HTTP and RFC); the on-premise host and port; and a virtual host and port. In this example, to hide internal names from the outside world, a virtual host called m31 points to the physical host where the back end runs. For the HTTP connection, which is used for communication with non-ABAP-based services and OData client calls, all URLs starting with the root are accessible. Figure 9 shows the configuration information for the RFC connection for ABAP-to-ABAP communication.


Adding a new RFC function module to the HTTP and RFC connections is easy — simply add a resource to the connection, and in the pop-up box, specify the function module’s name, which is RFC_SYSTEM_INFO in the example (see Figure 10). You can also enable a set of function modules that share the same prefix — for example, RFC_READ*.

The Cloud Connector setup can also be viewed in the SAP Cloud Platform cockpit of the corresponding Neo subaccount (see Figure 11). With this setup, you can now run an SAP Web IDE session in SAP Cloud Platform for the Neo environment and consume any available HTTP services (for example, you can consume the available OData services of the connected ABAP on-premise back end). However, in this scenario, we want to access the back-end resources from within SAP Cloud Platform ABAP environment, which requires the configuration of communication arrangements.

Step 2: Configure the Communication Arrangements
To configure the required communication arrangements — one for the Cloud Connector integration and one for the Cloud Foundry destination service integration — select Communication Arrangements in the administrator launchpad of the ABAP tenant (see Figure 12), which takes you to the list of available communication arrangements (Figure 13).


For the example Cloud Connector integration, select the arrangement that is based on the standard SAP communication scenario SAP_COM_0200: SAP_COM_0200_KK in the example. Figure 14 shows the details for this arrangement, which references the subaccount that was enabled for Cloud Connector access. For the example Cloud Foundry destination service, select the arrangement that is based on the standard SAP communication scenario SAP_COM_0276 (see Figure 15) — this arrangement is configured with the service key of the ABAP tenant.


Step 3: Create the RFC Program
With the connections configured and available, developers can get to work using the connections in their programs, which is a fairly straightforward and familiar undertaking. First, create an RFC program that will call the function module. In the SAP Cloud Platform cockpit, create an RFC destination (ACBTESTRFC) that contains the virtual host (m31), the user and password for the access to the ABAP back-end system, the ABAP client (400), and the system number (10), as shown in Figure 16.
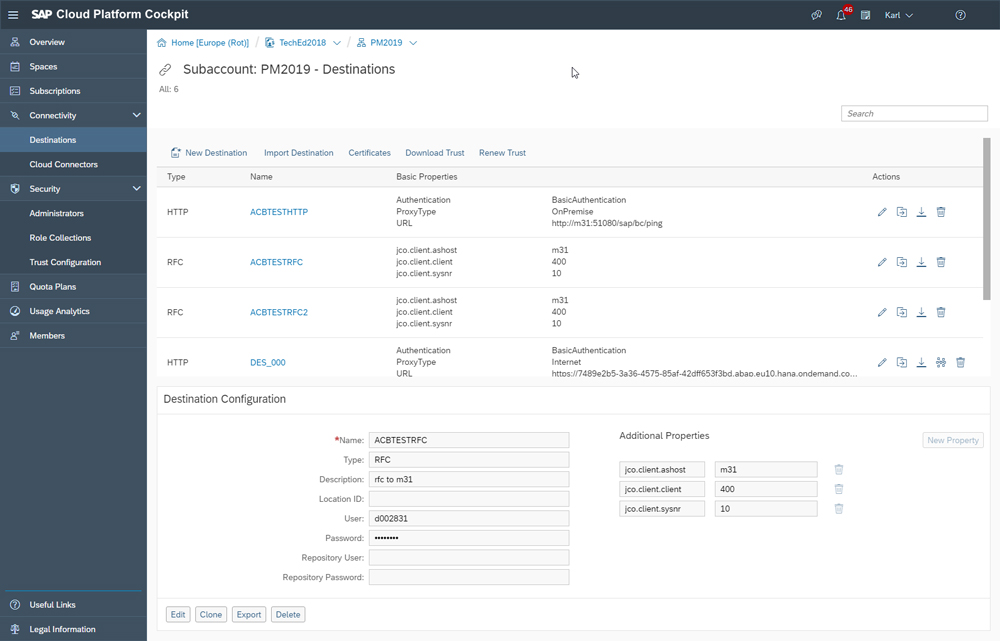
Figure 17 shows the actual coding of the RFC program that accesses the function module in the back-end system, which is displayed in the Eclipse-based workspace of SAP Cloud Platform ABAP environment. First, the RFC destination (ACBTESTRFC) is obtained and then the logical destination is passed to the CALL FUNCTION keyword. The function module (RFC_SYSTEM_INFO) then sends the export parameter to the ABAP console display, which is located in the lower portion of the workspace (see Figure 18).


Step 4: Create the HTTP Program
The process of creating the HTTP program, which will retrieve an HTML or XML document, is similar to creating the RFC program. In the SAP Cloud Platform cockpit, create an HTTP destination (ACBTESTHTTP) with the virtual host requesting the URL /sap/bc/ping, the proxy and authentication type, and the user and password for the ABAP back-end system (see Figure 19).

The coding that accesses the HTTP handler (the ABAP class representing the HTTP protocol) in the back-end system is shown in Figure 20 — the logical destination is fetched and the HTTP request is built. Upon receiving the HTTP response and HTTP status code, the function module then sends the output to the ABAP console (see Figure 21), which represents a simple HTML success page with status code 200.


Simplified Setup for SAP Web IDE Development and Deployment
In addition to the on-premise connectivity features delivered with version 1902, the simplified setup for SAP Web IDE development and deployment of SAP Fiori applications delivered with version 1905 also provides important new capabilities for developers. To better understand the benefits of this new feature, let’s revisit how the development and deployment process worked in the initial offering of the SAP Web IDE service. Developing an SAP Fiori user interface that consumes an OData service is probably the most common scenario.
Creating an OData service in ABAP is straightforward: You create a core data service and expose it as a business service using the OData protocol. To consume it from an SAP Fiori user interface developed with SAP Web IDE, however, you must create a communication arrangement with the ABAP cloud instance, which involves a few steps. First, you create a communication scenario with the Eclipse-based ABAP development tools. Then, you use the SAP Fiori launchpad to create a communication system (essentially an ABAP cloud instance); a communication user and password that is used for authentication; and finally, a communication arrangement based on the previously defined communication scenario. The end result is the URL that identifies the service. On the client side, you create a destination inside a Neo subaccount within SAP Cloud Platform that points to that service, and you use SAP Web IDE to browse the OData collections offered by the service, which are typically displayed in a list report with built-in sorting and searching capabilities.
As you can see, there are several manual steps required to create all the artifacts and link them together. In addition, the SAP Web IDE service was initially offered only for the Neo environment, and developers wanted to see a deployment option for Cloud Foundry — to simplify user administration and authorizations, for instance. With release 1905 of SAP Cloud Platform ABAP environment, which is a Cloud Foundry-based service, this is now possible.
End-to-End Example: SAP Web IDE Development and Deployment
Let’s look at an end-to-end example of SAP Web IDE development and deployment to give you a feel for how the simplified approach works. In this example, we will develop an SAP Fiori application and then deploy that application into the Cloud Foundry subaccount within SAP Cloud Platform where the ABAP cloud instance is running.
Step 1: Create an SAP Web IDE Project
The first step is to launch SAP Web IDE from the Neo environment within SAP Cloud Platform (Figure 22). Traditionally, you would begin by starting the List Report Application template wizard (see Figure 23) — note that in this case, the environment in the template screen is set to Neo, since SAP Web IDE was initially offered only for the Neo environment.


As of version 1905 of SAP Cloud Platform ABAP environment, you can use the SAP Web IDE Multi-Target Application (MTA) template for the Cloud Foundry environment to easily develop and deploy SAP Fiori-based user interface applications that access an ABAP cloud instance (see Figure 24). The project structure represented by an MTA template consists of modules that are the building blocks of the user interface application, and can consist of HTML5 modules, Java and node.js (JavaScript) modules, and SAP HANA database modules. For ABAP development, we are only interested in the HTML5 modules to implement the user interface (Java and node.js are irrelevant in this context, and the database modules are not needed since ABAP runs on the SAP HANA service directly).

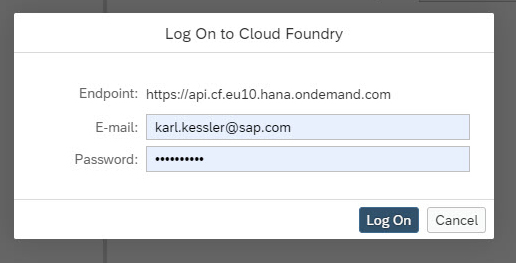
Create a new MTA project (see Figure 25) and define the project properties (see Figure 26) by right-clicking on the project ID (mta01 in the example) and selecting Project > Project Settings. Define the logical connection to the Cloud Foundry environment by selecting Cloud Foundry and logging on to the Cloud Foundry endpoint (the public URL https://api.cf.eu10.hana.ondemand.com), as shown in Figure 27.


After a successful logon, select the Cloud Foundry organization and space (Dev in this case) in which to deploy the application (see Figure 28). The organization — in the example, TechEd2019_CAA362-TechEd2019 — corresponds to the Cloud Foundry subaccount in which the application will run.

Step 2: Create a New SAP Cloud Platform
Service to Access the Data Source Now that the connection to Cloud Foundry is established, create a new SAP Cloud Platform service by selecting New > SAP Cloud Platform Service (see Figure 29). Choose the ABAP type for the new service (see Figure 30).


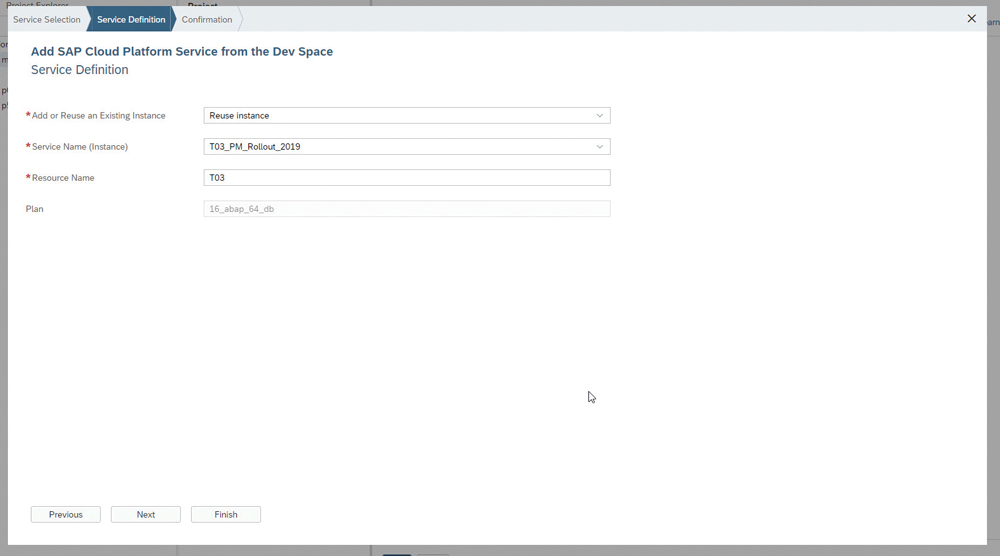
The connection to Cloud Foundry provides access to all of the ABAP instances offered by the corresponding Cloud Foundry subaccount — in the example, we connect to an ABAP cloud instance named T03, which contains the data source we will use for the SAP Fiori user interface (Figure 31).
Step 3: Create an HTML5 Module to Build the SAP Fiori Application
SAP Cloud Platform ABAP environment offers both SAP HANA persistence and an ABAP design time and runtime. For our example, however, we need to create an SAP Fiori application that accesses SAP Cloud Platform ABAP environment and consumes the exposed services. To build this application, create an HTML5 module by right-clicking on the MTA project in SAP Web IDE and selecting New > HTML5 Module (see Figure 32).

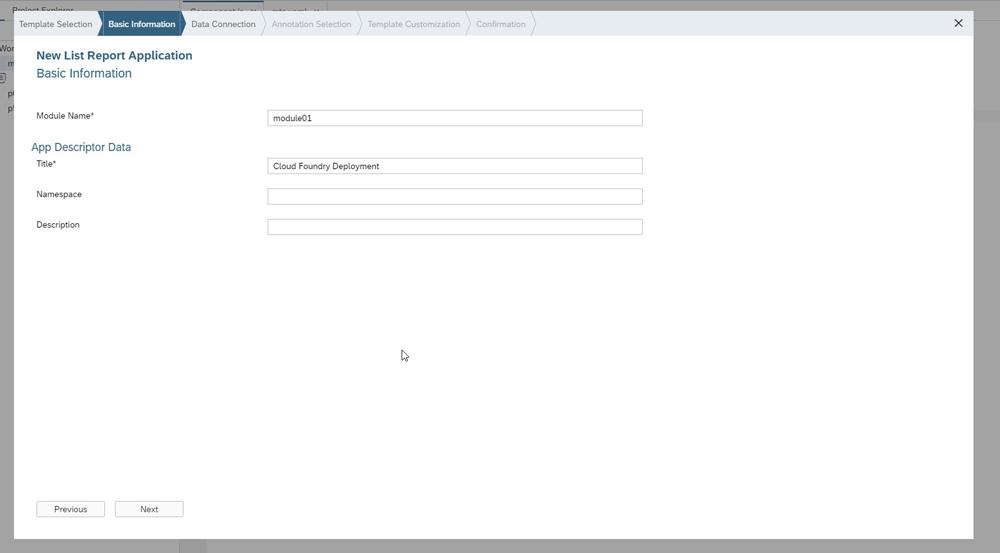
Choose the List Report Application template (see Figure 33) and then specify basic information for the module, including name (module01 in this case) and title (Cloud Foundry Deployment in the example), as shown in Figure 34.

Next, use the previously defined SAP Cloud Platform service that accesses the ABAP cloud instance T03 (see Figure 35). The system responds with a list of services available from the instance (see Figure 36) — select the service you want to use for the connection.


You can also drill down to the OData level to inspect the service — in the example, we drill down into a service related to a travel agency, which includes OData collections such as Agency, Carrier, Customer, Flight, and Booking. The system also downloads the metadata and annotations related to the selected service (see Figure 37).

Choose one of the OData collections (Booking in the example) exposed by the selected service to serve as the data source for the application (see Figure 38). For the example, we also choose an association to the flight carrier (to_Carrier) to navigate to the master data entry of the given airline. Finally, test drive the application, which displays flight information (see Figure 39).


Step 4: Run the Configuration, Build the Project, and Deploy the Application
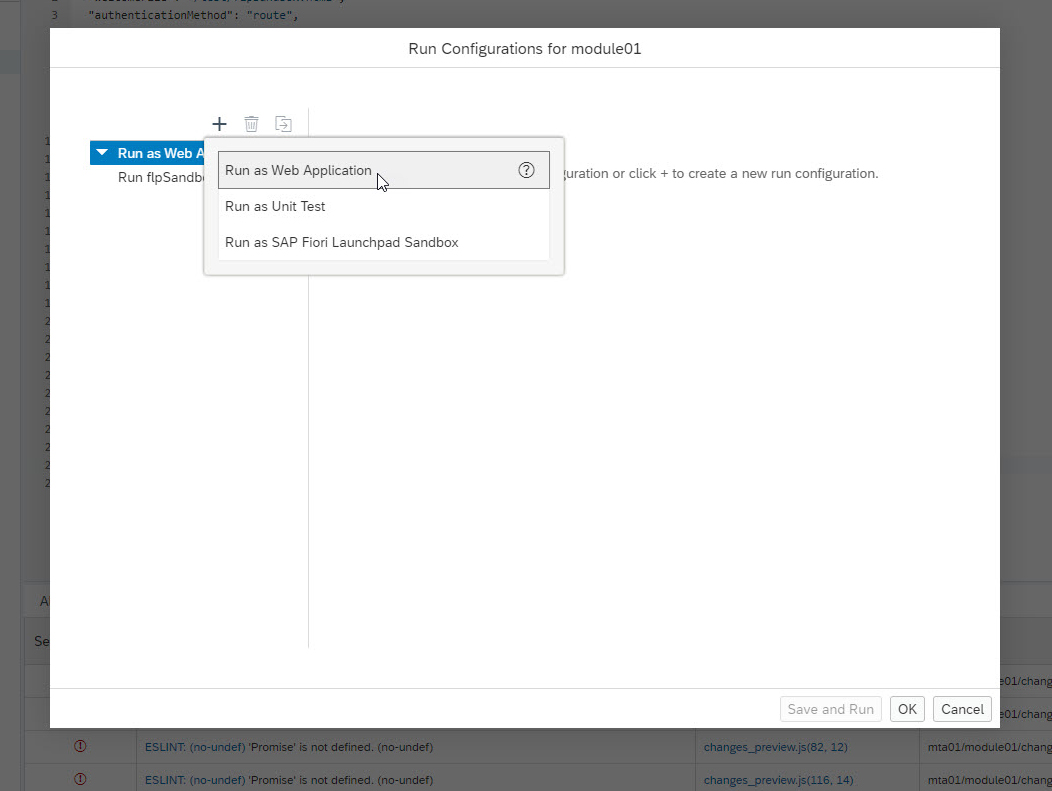
Now that the application is up and running, it is time to deploy it to the Cloud Foundry environment. In SAP Web IDE, create a run configuration by right-clicking on the HTML5 module and selecting Run > Run Configurations (see Figure 40). Then choose whether to run the application as a separate web application or contained in an SAP Fiori launchpad sandbox (see Figure 41) — for the example, we choose Run as Web Application, since we want to run it directly as a full-screen application (see Figure 42).


Next, specify the defaults for the run configuration, including the name (Run index.html on Cloud Foundry); the target environment (Run on Cloud Foundry); and the preview mode (see Figure 43). Then build the entire MTA project — by right-clicking on the project name and selecting Build > Build (see Figure 44) — and check the build results (see Figure 45).


Once there are no errors, deploy the application to the Cloud Foundry environment by right-clicking on the generated build archive (file extension .mtar) and selecting Deploy > Deploy to SAP Cloud Platform (see Figure 46).

Summary
The initial release of SAP Cloud Platform ABAP environment brought ABAP into the world of cloud innovation, and subsequent releases have continued to build on this with additional features for ABAP developers, including connectivity to on-premise systems and a simplified setup for SAP Web IDE development and deployment. With on-premise connectivity, a range of opportunities opens up for building cloud extensions for your existing back-end instances and bringing your on-premise-based SAP landscapes into the cloud. In addition, the new approach to SAP Web IDE development and deployment of SAP Fiori applications simplifies these tasks significantly, making your ABAP environment a strong foundation for easy-to-consume SAP Fiori cloud-based applications.
Learn more at https://cloudplatform.sap.com/business-platform/abap.html.
1 Note that since SAP Cloud Platform ABAP environment runs only in the Cloud Foundry environment, a Cloud Foundry global account is automatically created for the customer. For each ABAP instance, the customer can then create subaccounts and assign users to these subaccounts to enable logon to the instance. [back]

Karl Kessler (karl.kessler@sap.com) joined SAP SE in 1992. He is the Vice President of Product Management ABAP Platform — which includes SAP NetWeaver Application Server, the ABAP Workbench, the Eclipse-based ABAP development tools, and SAP Cloud Platform ABAP environment — and is responsible for all rollout activities.
More Resources
See All Related Content
SAP SDLC Automation Case studyDespite potential improvements, companies hesitate to initiate SAP projects due to high costs, manual tools reliance, and fear of disruptions, while the innovative Cerebro SAP AI Code Assistant promises to reduce development time and costs by automating coding processes.
8 minute read

Liberate Your SAP Data With A No-Code Bridge to AI InnovationBoomi's no-code integration platform for SAP empowers professionals to quickly extract relevant data, significantly enhancing AI initiatives and operational efficiency by enabling real-time data access without traditional ABAP dependencies.
3 minute read

SAP AI SDLC Assist (SASA): AI-Driven SAP DeliverySAP AI SDLC Assist (SASA) is an AI-powered platform that automates and accelerates the SAP Software Development Lifecycle by learning from organizational systems to generate technical documentation, code, and test cases, ultimately enhancing delivery speed, code quality, and governance.
1 minute read