If you use contractors for some of your manufacturing operations, new functionality for managing them is designed to save you some time. See how to configure SAP Outsourced Manufacturing, what master data needs to be maintained, and the functional steps required to implement six new features.
Key Concept
Outsourced Manufacturing is a new SAP capability that provides the capability to manage outsourced manufacturing from a new cockpit and to have non-delay consumption posting, tracking of in-transit components, product costing, and consumption reporting.
Outsourced manufacturing is used when a company focuses on core manufacturing capabilities and decides to outsource some of its operations. There could be a number of reasons why outsourced manufacturing is used:
- When you don’t have enough capacity to assemble the products
- When these outsourced activities are not your core capabilities
- The outsourced manufacturer can do it cheaper and faster
The outsourced manufacturing functionality enables the following end-to-end business process:
- Identify the need for finished products assemblies that would be handled by an outsourced manufacturer
- Initiate planning for these finished products by entering the demand for these items
- Run material requirements planning (MRP) to create subcontracting purchase requisitions
- Convert the requisitions to outsourced manufacturing purchase orders (POs)
- Ship components needed to assemble the finished product to the outsourced manufacturer
- Track in-transit inventory of components provided by the outsourced manufacturer
- Receive components at the outsourced manufacturer
- Complete assembly of finished products at the outsourced manufacturer and consume components
- Report on component consumption
- Receive value-added assembled product at your company
New outsourced manufacturing functionality was introduced with SAP ERP 6.0 enhancement package 4, with the following features:
- Subcontracting cockpit
- Inbound delivery with component overview
- Non-delay consumption posting
- In-transit tracking for component inventory
- Direct provisioning from another plant
- Consumption reporting
Prior to this functionality SAP didn’t provide in-transit component inventory, inbound delivery with component overview, non-delay consumption posting, or consumption reporting. Basic inventory movements were used to issue components to suppliers
Variations of this end-to-end process involve the components being drop-shipped by another supplier to the outsourced manufacturer or having a specific operation carried out by a contract manufacturer. When the activity is completed, the outsourced manufacturer ships the product back, the remaining manufacturing operations are completed, and the finished product is received into inventory.
The following steps describe the configuration activities for SAP Outsourced Manufacturing, the master data that needs to be maintained, and the functional steps for shipping the raw materials to the outsourced manufacturer, tracking inventory in-transit, reporting consumption, and receiving the finished product from the outsourced manufacturer.
Configuration Activities
Following are the configuration activities you need to complete.
Step 1. Define item categories for shipping. Follow SPRO menu path Logistics Execution > Shipping > Deliveries > Define Item Category Determination in Deliveries (
Figure 1). This step enables shipping of the components to the outsourced manufacturer and delivery creation for the components provision to the outsourced manufacturer. Enter the item category LBN for the Delivery Type LB, Usage V, and Item Category Group NORM.
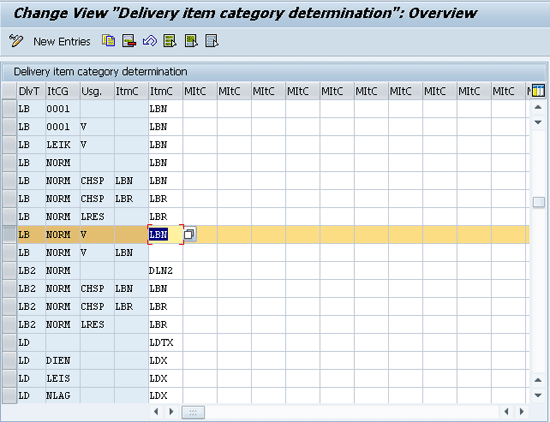
Figure 1
Define item categories
Step 2. Enable maintenance of timely consumption for purchase info records. Define the screen layout for purchasing info records. Follow menu path Materials Management > Purchasing > Purchasing Info Record > Define Screen Layout (
Figure 2).

Figure 2
Double-click ME11
Timely consumption refers to the consumption of the components as soon as the outsourced manufacturer completes assembly of the product. In previous SAP versions, consumption of components could be done only when the finished product was received. Therefore, there was a delay in reporting component consumption.
Double-click ME11 to go to
Figure 3. ME11 is the selection screen for the purchase info record.
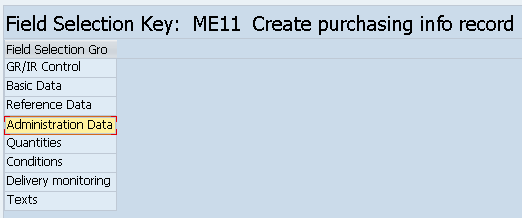
Figure 3
Select Administration Data
Keep the cursor on Administration Data and double-click it to go to
Figure 4. In
Figure 4 mark the Timely Consumption check box as optional. Selecting it as optional provides the option to report timely consumption for components. You do not set it as Required as there may be situations in which you may choose to report delayed consumption of components.

Figure 4
Select the timely consumption indicator as optional
Step 3. Assign a serialization profile to the subcontracting item category. This provides the capability to receive the assembled products with serial numbers. Note that I am using document type NB and item category L to represent subcontracting process. This following series of steps shows how you can activate serialization for the subcontracted assembled product. Follow menu path Materials Management > Purchasing > Purchase Order > Define Document Types (
Figure 5).
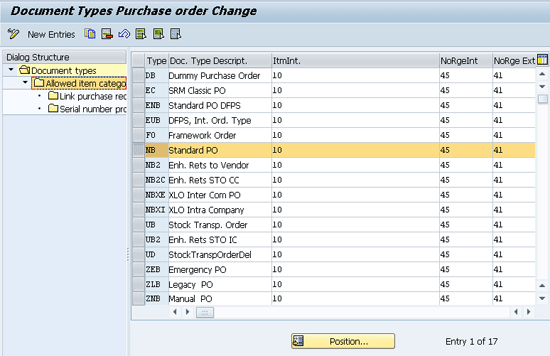
Figure 5
Choose the Allowed item categories button
Keep the cursor on NB document type and double-click the Allowed Item categories to go to
Figure 6.

Figure 6
Serialization profile for ITCat. L (Subcontracting)
Keep the cursor on L Subcontracting and double-click Serial number profiles to go to
Figure 7.
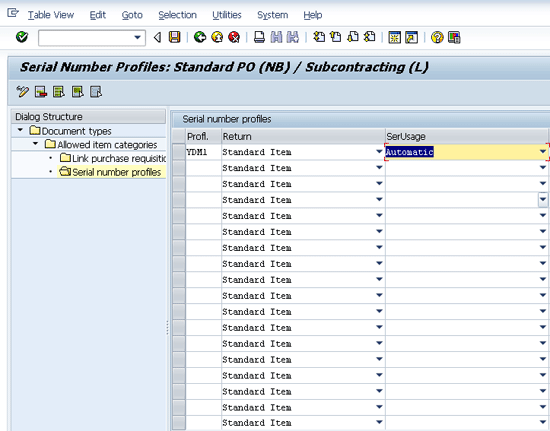
Figure 7
Assign serialization profile YDM1 to PO type NB
YDM1 is the serialization profile that is assigned to document type NB and item category L. I selected PO document type NB and item category L in previous steps. Assign serialization profile YDM1 as shown in
Figure 7. Assigning YDM1 allows the receipt of the subcontracted items with serial numbers. Also enter Automatic in the SerUsage field so that serial numbers are determined automatically.
Set Up Master Data
Take these steps to set up the needed master data.
The following materials are used in my outsourced manufacturing scenario. The setup of these materials is not described in the master data as it is straightforward:
- S23- High performance sealed assembly (Assembled Product)
- R14- A/C adapter 110/240V, 3A (Component for assembled product)
- R13- Wire Harness - a/c adapter 110/240V, 3A (Component for assembled product)
Step 4. Set up the material with the subcontracting indicator. Follow menu path Logistics > Materials Management > Material Master > Material > Change Material Master or use transaction code MM02 (
Figure 8).

Figure 8
Enter the material number and select the MRP2 and Work Scheduling views
Enter the Material number in input field and select the MRP2 and Work scheduling views. You now have to maintain the subcontracting indicator and the serialization profile in these views. Press Enter to go to
Figure 9, which is the MRP2 view.
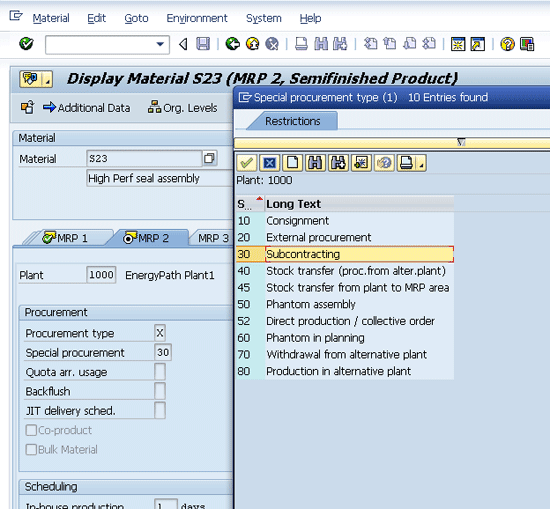
Figure 9
Assign the subcontracting indicator 30 to assembled product S23
The 30 in
Figure 9 represents the outsourced subcontract indicator, which enables the subcontracting functionality. Press Enter to go to the Work Scheduling view. Here you assign serialization profile YBP1 as shown in
Figure 10.

Figure 10
Serialization profile assigned to assembled product S23
Step 5. Create a purchase info record. Follow menu path Logistics > Materials Management > Purchasing > Master Data > Info Record > Create or use transaction ME11 (
Figure 11).
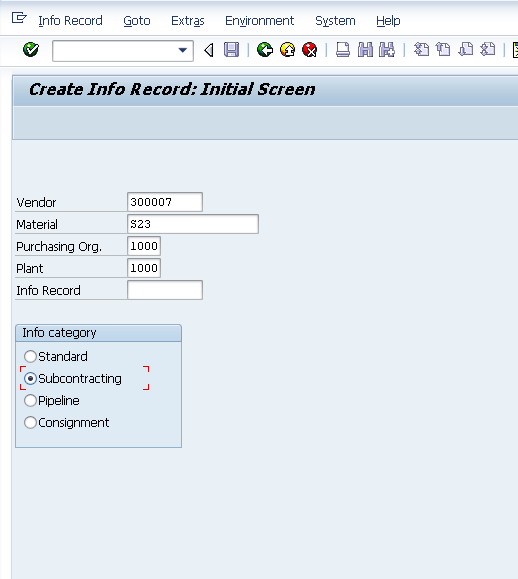
Figure 11
Set up the subcontracting indicator for assembly product S23
Select the Info category Subcontracting radio button. Enter the material, purchase organization, vendor, and plant. Press Enter to go to
Figure 12.
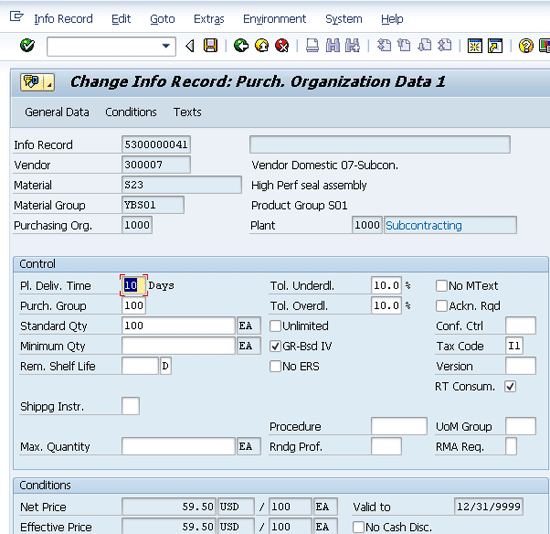
Figure 12
Enable Timely Consumption for assembly prodcut S23 by checking the RT Consum. check box
Set up the various parameters. Enter the delivery time in the Pl. Deliv. Time field and the price in the Net Price field. Check the RT Consum. check box. This indicator helps separate consumption of components and receipt of the finished product into separate steps.
Step 6. Set up the bill of materials (BOM) for assembled product S23 as shown in
Figure 13. Follow menu path Logistics > Production > Master Data > Bill of Material > Material BOM > Create or use transaction code CS01. Enter components R14 and R13 that will be shipped to the outsourced manufacturer.
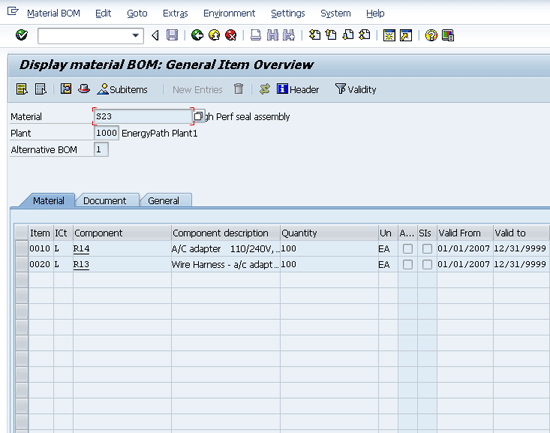
Figure 13
Set up the BOM for assembly product S23
Now that the configuration and master data setup is complete, let’s review the end-to-end process.
Overall Process
The end-to-end process includes the following: Running material requirements planning (MRP), creating a subcontracting purchase requisition, PO, delivery, issue of components, goods receipt of subcontracting components at the contractor location, consumption, and finally receipt of finished product.
Step 7. Follow menu path Logistics > Production > MRP > Planning Multi Level Single Item Planning or use transaction code MD02. Run MRP with the indicators shown in
Figure 14 by pressing Enter. Running MRP results in exploding the requirements to dependent materials.
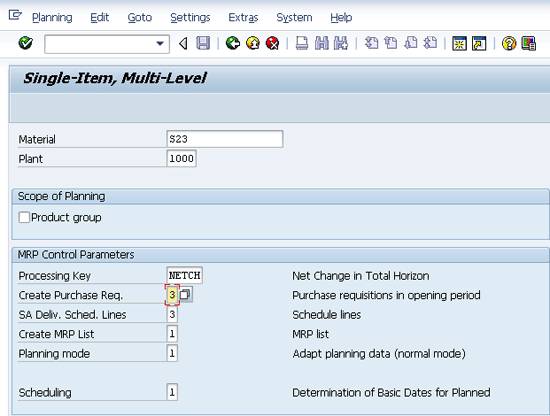
Figure 14
Run MRP for the assembled product to create dependent requirements
Step 8. Review the MRP results. Running MRP results in the creation of a subcontracting purchase requisition for the assembled product. As shown in
Figure 15, a subcontracting purchase requisition is created. Follow menu path Logistics > Production > MRP > Evaluations > Stock requirements List or use transaction code MD04 to review the results.
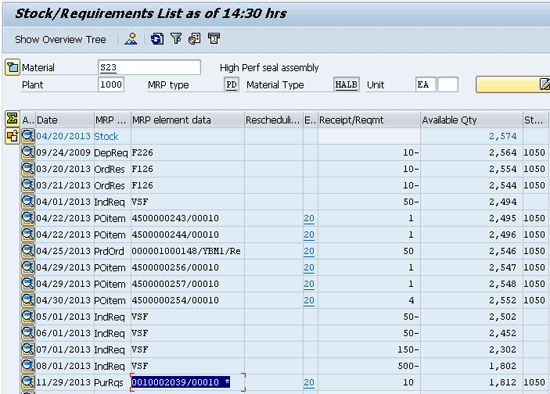
Figure 15
Review MRP results for S23
Step 9. Release the purchase requisition 10002039. The purchase requisition has been set up with an approval strategy. Therefore the purchase requisition has to be released. Double-click purchase requisition 10002039 to go to
Figure 16.
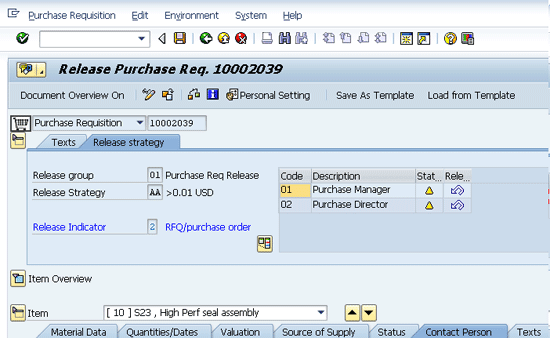
Figure 16
Requisition can be released
Figure 16 shows that the requisition can be released by the Purchase Manager and Purchase Director. Do so by clicking the release icon
![]()
(Release possible).
Next you need to approve the purchase requisition. Follow menu path Logistics > Materials Management > Purchasing > Purchase Requisitions > Release > Individual Release or use transaction code ME54N. Set the indicator Release effected by changing the status from release possible

to release effected

for the purchasing manager and director. Do that by double-clicking the release possible icon. This takes you to
Figure 17.
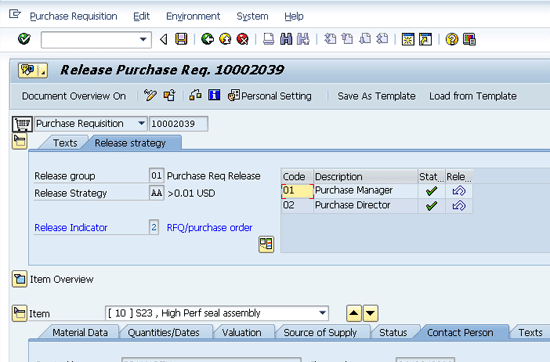
Figure 17
Set the indicator for Release Possible by changing the status
Step 10. Assign and process the purchase requisition by following menu path Logistics > Materials Management > Purchase Requisition > Follow on Function > Assign and Process or use transaction code ME57 (
Figure 18).
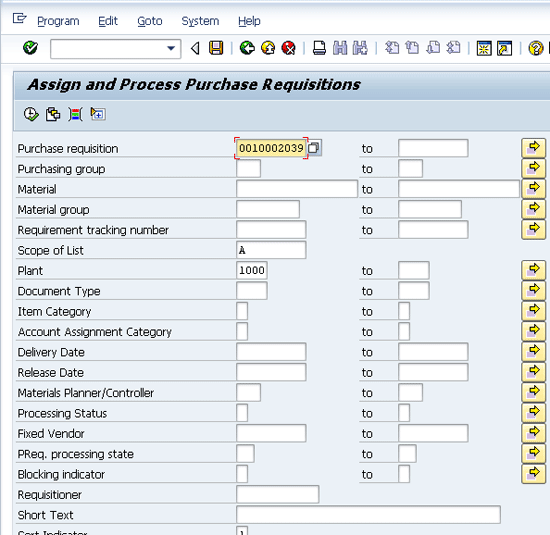
Figure 18
Input the purchase requisition in the purchase requisition field
Input the purchase requisition in the Purchase requisition field and click the execute icon

. This takes you to
Figure 19. Check the S23 check box. Click the Assign Automatically button and then the Assignments button.
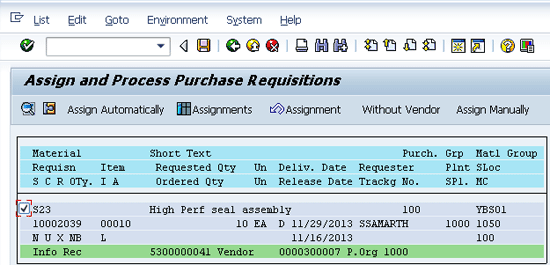
Figure 19
Select the Assignments button
That takes you to
Figure 20.

Figure 20
Select the process assignment
Keep the cursor on the Vendor field and click the Process Assignment button, which takes you to
Figure 21. Here you convert the purchase requisition to a PO by entering the Order Type as NB.
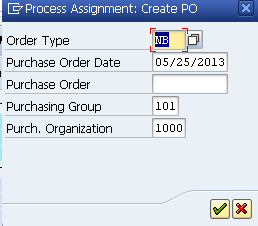
Figure 21
Change the requisition to a PO
Click the green checkmark to go to
Figure 22.
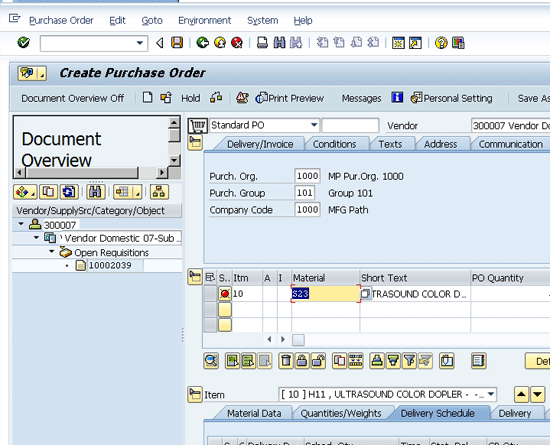
Figure 22
Drag the purchase requisition 10002039 and drop it in the shopping cart
Now you convert the subcontract purchase requisition to a PO. Drag and drop the purchase requisition 10002039 button into the standard PO shopping cart

. Click the save icon

to create the PO.
Step 11. Display the subcontracting purchase order shown in
Figure 23. Follow menu path Logistics > Materials Management > Purchase Order > Display or use transaction code ME23N.

Figure 23
Display subcontracting PO
The PO is communicated to the supplier via fax or email.
Step 12. Select the components that are to be shipped to the outsourced manufacturer. The raw materials needed to assemble the product are shipped to the outsourced manufacturer as shown in
Figure 24. Follow menu path Logistics > Materials Management > Purchasing > Purchase Order > Reporting > Subcontracting Cockpit or use transaction code ME2ON.

Figure 24
Input the vendor
Input the outsourced manufacturer (Vendor 300007), Assembly, and Plant and click the execute icon
. This takes you to
Figure 25.
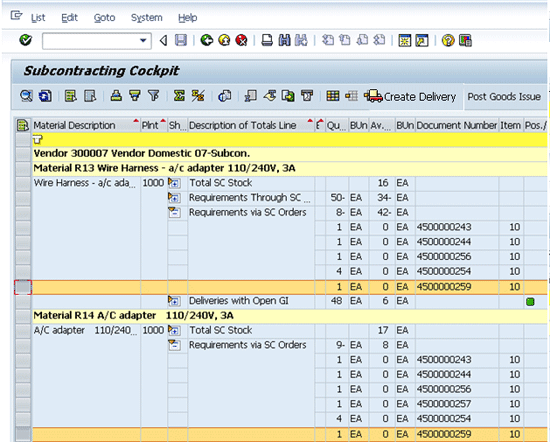
Figure 25
Select the PO for the components to be shipped to the outsourced manufacturer
Step 13. Select the components to be shipped to supplier
. Figure 25 shows the PO and the corresponding components that need to be shipped to the outsourced manufacturer. Ensure that the Requirements via SC Orders item is expanded to list the PO. Select all the line items using the select all icon

and then click the Create Delivery button.
Step 14. When you click the Create Delivery button, you go to
Figure 26. Select both the line items. Change the movement type to 30A for both the line items. Changing the movement type to 30A provides the capability to ship the components as subcontracting stock to the vendor. Click the Create Document button at the bottom of the screen.
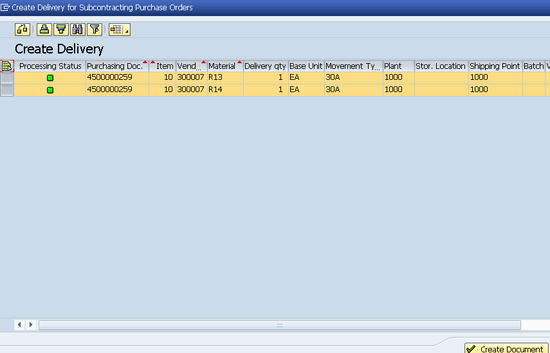
Figure 26
Select the PO for the components to be shipped to the outsourced manufacturer
Step 15. When you click the Create Document button, the system creates a delivery document as shown in
Figure 27.
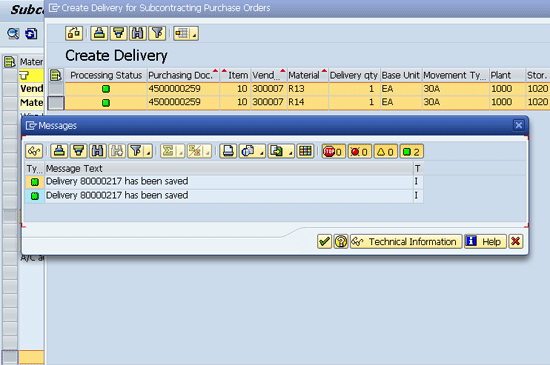
Figure 27
Delivery document 80000217 is created
Step 16. Perform picking and issuing of components to the outsourced manufacturer. Next select the delivery document you created and perform picking and issuing of components to the outsourced manufacturer. Upon shipment of components to the outsourced manufacturer, the system shows the stock available as ST Stock for SC. To perform the picking and post goods issue follow menu path Logistics > Logistics Execution > Outbound process > Goods Issue for Outbound Delivery > Change > Single Document or use transaction code VL02N. Input the pick quantity and click the Post Goods Issue button in
Figure 28.
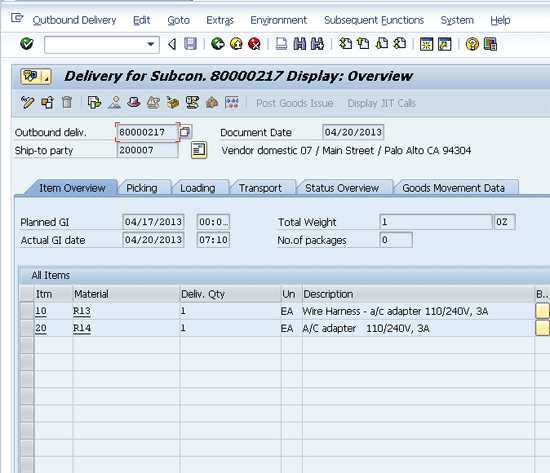
Figure 28
Picking and posting goods issue for delivery document 80000217
Step 17. Review the document flow using menu path Logistics > Logistics Execution > Outbound process > Goods Issue for Outbound Delivery > Change > Single Document or transaction code VL02N (
Figure 29). Input the delivery document in the delivery number field. Click the Environment item on the toolbar and then click Document flow.
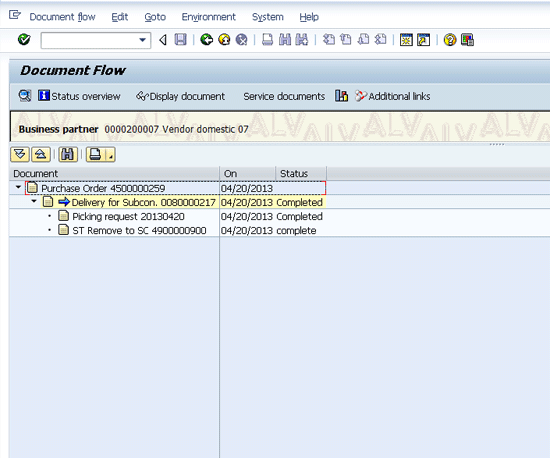
Figure 29
Review document flow to show activities completed including picking and issuing of components to subcontractor
Step 18. Review the subcontracting (SC) stock issued to outsourced manufacturer as In-Transit Inventory by following menu path Logistics > Materials Management > Environment > Stock > Stock Overview or transaction code MMBE. The subcontracting stock is identified by ST Stock for SC as shown in
Figure 30.
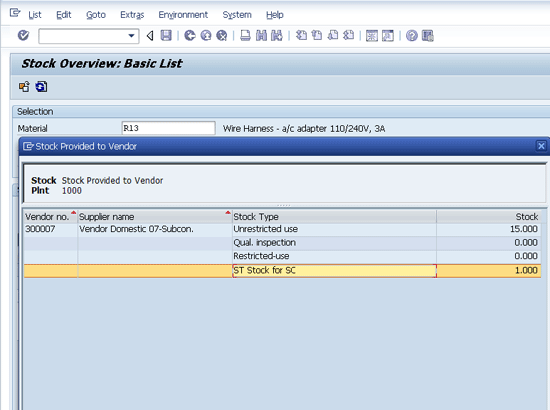
Figure 30
Stock in transit for the subcontractor
Step 19. Perform receipt of components at the outsourced manufacturer. Now that the components have been shipped, the next step is to receive the components at the outsourced manufacturer. This is done by using movement type 30C (
Figure 31). Enter the Movement Type as 30C.

Figure 31
Receive components at outsourced manufacturer
Select the Detail data button in
Figure 31 and enter the SC vendor in the Vendor Domestic 07-Subcon field shown in
Figure 32. Then click the Post button and a material document is posted.
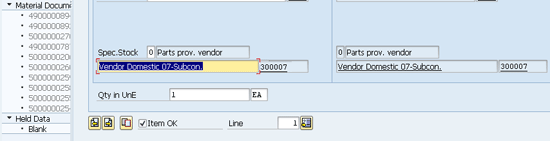
Figure 32
Enter Vendor 300007
Step 20. Confirm that the SC stock at the vendor is now available for consumption components at the outsourced manufacturer. Use menu path Logistics > Materials Management > Environment > Stock > Stock Overview or transaction code MMBE. The subcontracting component R13 stock is identified as Unrestricted use stock (
Figure 33).
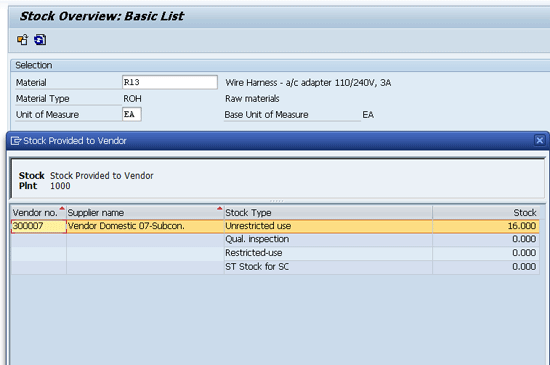
Figure 33
The subcontracting stock is now available as unrestricted stock at the supplier
Step 21. Consume the subcontracting stock and post the consumption. Enter movement type 543 and subcontracting stock indicator O (
Figure 34). This shows the capability that you can post real-time consumption of subcontracting stock. To display the component inventory at the outsourced manufacturer follow menu path Logistics > Materials Management > Inventory Management > Goods Movement or use transaction MIGO.
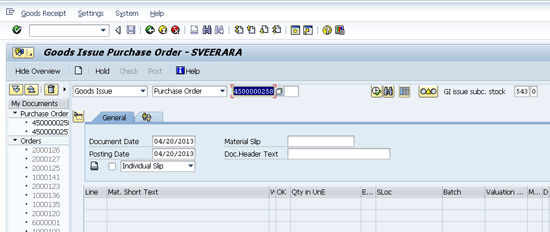
Figure 34
Consuming component stock at outsourced manufacturer location
Step 22. Review the consumption of stock by using menu path Logistics > Materials Management > Environment > Stock > Stock Overview or transaction code MMBE (
Figure 35).
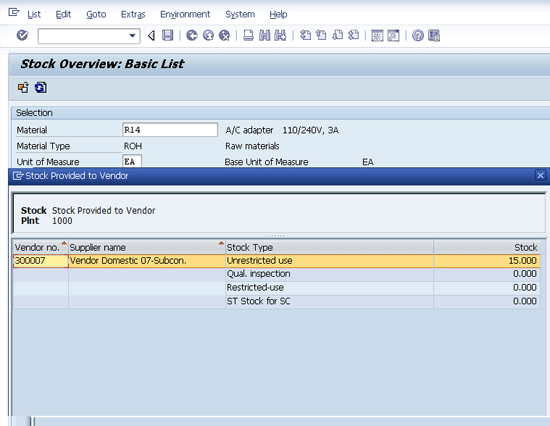
Figure 35
Subcontracting stock in unrestricted usage has been reduced by 1 unit, from 16 to 15
Step 23. Run a subcontracting consumption report that shows the actual consumption of the component inventory (
Figure 36). Use menu path Logistics > Materials Management > Purchasing > Purchase Order > Reporting > Component Consumption Inventory or transaction code ME2COMP.
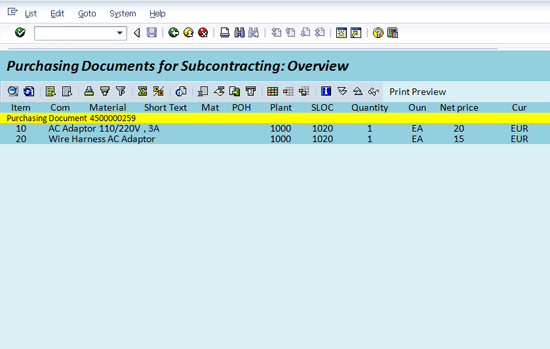
Figure 36
Component inventory consumption for PO 4500000259 created in step 10
Step 24. Perform a goods receipt of the assembled product from the outsourced manufacturer (
Figure 37). The material document is posted for the subcontracted product and increases inventory for the assembled product. To perform receipt of the assembly product from the outsourced manufacturer, use menu path Logistics > Materials Management > Inventory Management > Goods Movement or use transaction code MIGO.

Figure 37
Goods receipt for assembled product for PO 4500000259
Step 25. Review the serial number of the assembled product. As serialization was activated for the assembled product, review the serial number (
Figure 38). The menu path for reviewing the serial number is Logistics > Materials Management > Inventory Management > Materials Document Display.
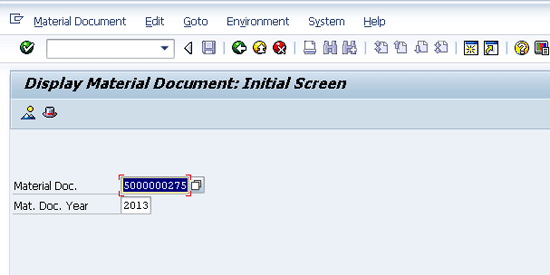
Figure 38
Review the material document for the assembled product for PO 4500000259
Press Enter to go
Figure 39.
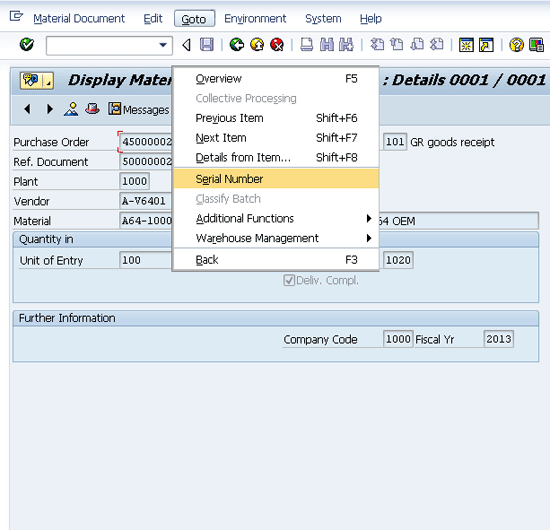
Figure 39
Select Serial Number
Select the serial number and you go to
Figure 40.
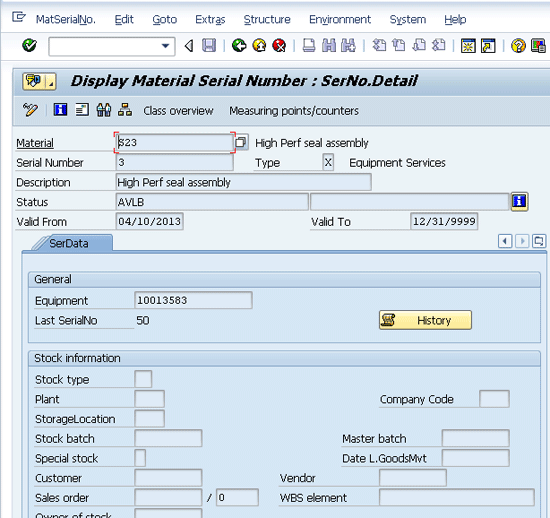
Figure 40
Serializaton number for assembled product S23
Thus, the assembled product is received into inventory as unrestricted stock by using outsourced manufacturer functionality to perform the operation.
Suresh Veeraraghavan
Suresh Veeraraghavan is a senior manager with Capgemini, a leading management and IT consulting firm. He works in the technology service group. He has 14 years of experience delivering SAP implementations in various capacities. Prior to joining Capgemini, he worked with Hewlett-Packard as a supply chain architect, managing and implementing SAP supply chain projects on a $26 billion platform. His expertise is in implementing best practices in supply chain management, specifically procure-to-pay and order-to-cash. He is a certified project management professional (PMP) and CPIM certified.
If you have comments about this article or publication, or would like to submit an article idea, please contact the
editor.