When the standard SAP GUI interface becomes too bland or difficult to follow, you can augment it so that it is more user friendly. Engage executives, management, and end users with SAP ERP data visualizations within SAP GUI by using SAP Crystal Dashboard Design.
Key Concept
SAP Crystal Dashboard Design allows you to enhance analytical applications’ user interfaces and create dashboards. Usually users can browse dashboards within portals and desktop applications, but not in a transactional system. SAP Crystal Dashboard Design was formerly known as Xcelsius.
You can perform data analysis on almost anything in the SAP ERP system, but sometimes the SAP GUI makes the data hard to understand. Rather than spending too much time sifting through it, or, for higher-level management, ignoring it due to a lack of user friendliness, you can adjust it by performing a few simple steps.
This involves using SAP Crystal Dashboard Design (formerly Xcelsius) and Web services in conjunction with SAP ERP. We’ll show you how to create an example SAP transaction that allows business users to analyze monthly sales by customer, connect it to SAP Crystal Dashboard Design, and then create a user-friendly report that you can present to higher-level management. This article is intended for technical users.
In our example we create a simple function module to display data from tables VBAK and VBAP with two input parameters (date and company code). To do this, follow these steps:
Step 1. Create a function module to operate with the SAP ERP data
Step 2. Create a Web service from the function module
Step 3. Create a connection in SAP Crystal Dashboard Design (Web service connection) and implement the logic
Step 4. Create a report in SAP ERP to integrate the dashboard
Step 1. Create a Function Module
Use transaction SE37 to create a remote-enabled function module with the necessary logic for displaying data from tables VBAK and VBAP with two input parameters: date and company code (Figure 1). For more information on how to create a function module in transaction SE37, see this SAP Help link.

Figure 1
Implement a function module
Then check if it works correctly. To do this, click the test/execute (F8) icon or follow menu path Function module > Test > Test function module. As the import parameter for the date, we entered 02.2010 and for company code we entered 1000. Leave the Remote Function Call (RFC) target system line empty. Then click the execute icon or follow menu path Function module > Execute. The system displays the export parameters in an additional table. For a detailed display of the data select the value in the line Result.
Step 2. Create a Web Service from the Function Module
To create a Web Service from the function module follow menu path Utilities(M) > More Utilities > Create Web Service > From the Function Module in transaction SE37 (Figure 1). This takes you to the Create Service wizard. Enter the name of the service you want to create (e.g., ZIK_WEB_SERVICE_TEST) and select the Endpoint Type as Function Module (Figure 2). Click the Continue button at the bottom of the screen.

Figure 2
Complete the Create Service step
In the next screen enter the name of the function module for the Web service, in this example ZIK_WEBSERVICE_XCELSIUS (Figure 3). If the Name Mapping check box is selected, the existing labels for the endpoint are copied, but only the beginning letters are uppercase letters and the underscores are removed. Click the Continue button at the bottom of the screen.

Figure 3
Perform the Choose Endpoint step
In the next screen, choose a profile for the Web service security settings (Figure 4). We selected the Release Service for Runtime check box so we wouldn’t have to make additional operations in transaction WSCONFIG to release the service. We chose a predefined feature set (Basic Authorizations: SOAP Profile) from the profiles available because the communication type is Stateless and the called authentication is a user ID and password. Click the Continue button at the bottom of the screen.

Figure 4
Perform the Configure Service step
In the next screen (not pictured) you receive confirmation that the Web service ZIK_WEB_SERVICE_TEST was created. Click the Complete button at the bottom of the screen. Then use transaction SOAMANAGER (WSADMIN is obsolete) to view the Web Services Description Language (WDSL) document for the Web service. Click the Business Administration tab and select Web Service Administration (Figure 5).

Figure 5
Select Web Service Administration from transaction SOAMANAGER
In the Web Service Administration screen that opens (Figure 6), search your Web service and select it. Click the Apply Selection button. This brings up Figure 7. You can see that the Services and Endpoints are zero for the Web service definition we selected. It means the service endpoint hasn’t yet been created; you have to create it first.

Figure 6
Go to the Web Service Administration tab

Figure 7
Details of the service definition
Click the Configurations tab and then click the Create Service button (Figure 8). This produces a pop-up screen asking for a service name, description, and new binding name (Figure 9). Enter the appropriate values (the binding name is arbitrary and is not necessarily the same as the service name). Click the Apply Settings button.

Figure 8
Configurations tab

Figure 9
Enter service information
Then you return to screen where you save the configuration (Figure 10). Before saving, you need to perform two operations. Select the Signature & Encryption (asymmetric binding) radio button in the Transport Guarantee box. Select the User ID/Password check box in the Authentication Method box and click the Save button.

Figure 10
Save the configuration
Then you can see the entry in the Configurations tab (Figure 11). The state of service automatically comes up as Active.

Figure 11
The state is now Active
Now click the Overview tab and you can see that the Services and Endpoints are one (Figure 12). Click the Open WSDL document for selected binding link to see the WSDL of the Web service in XML format. The test was successful if the WSDL document opened without error (Figure 13).

Figure 12
Overview tab with updated Services and Endpoints values

Figure 13
WSDL documents for our Web service
Step 3. Create a Connection in SAP Crystal Dashboard Design and Implement the Logic
Now we’ll design a dashboard in SAP Crystal Dashboard Design based on the data from the Web service, which we have as the WSDL URL. For data connectivity, open Connection Manager in SAP Crystal Dashboard Design by following menu path Data > Connections > Add the Web Service Connection (Figure 14). Copy the WSDL URL from the previous screen and paste it in the WSDL URL field in the Definition tab. Click the Import button. This imports data from the function module through the Web service.

Figure 14
Add Web service connection in SAP Crystal Dashboard Design
Once the WSDL URL is imported, the system defines the Method, Web Service URL, Input Values, and Output Values based on how you derived the function module. In the example above, Zbe and Zperiod are the input parameters and Itab contains values (e.g., customer ID, customer name, sales amount) that we’ll display in the dashboard.
A pie chart, panel container, combo boxes, list view, radio buttons, ticker, push buttons, and background are used as components for the SAP Crystal Dashboard Design file in our example. The dashboard logic displays the monthly sales analysis by customer on a selected company code (Zbe) and date in format mm.yyyy (Zperiod). The OK button refreshes the data and sends the selected parameters as the input to the Web service. Map the input and output values appropriately to the cells. Configure all elements in editor mode for the dashboard (Figure 15).

Figure 15
Dashboard in editor mode
When the configuration is complete, save the file. Then test the SAP Crystal Dashboard Design application by previewing the file (Figure 16). For this, follow menu path File > Preview. Note that the system asks you for SAP logon credentials. Enter your credentials and click the OK button.
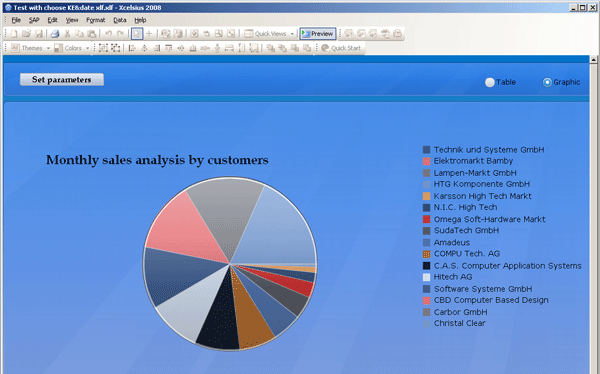
If dashboard display data from tables VBAK and VBAP meets your needs, the dashboard is working correctly. The developed SAP Crystal Dashboard Design application is in .XLF format. Export this file to .SWF format so you can use it with the Web user interface. To do this, follow menu path File > Export > Flash (SWF).
Note
If you need to change the .SWF file, you should update it in the MIME Repository by right-clicking the appropriate file in the Icons folder and selecting Upload/Download > Upload and Replace from the context menu.
Step 4. Create a Report in SAP ERP to Integrate the Dashboard
First, you need to import the .SWF file into the MIME Repository. In transaction SE80, choose MIME Repository. Follow menu path SAP > PUBLIC > BC > Icons. Right-click the Icons folder and select Import MIME Objects from the context menu.
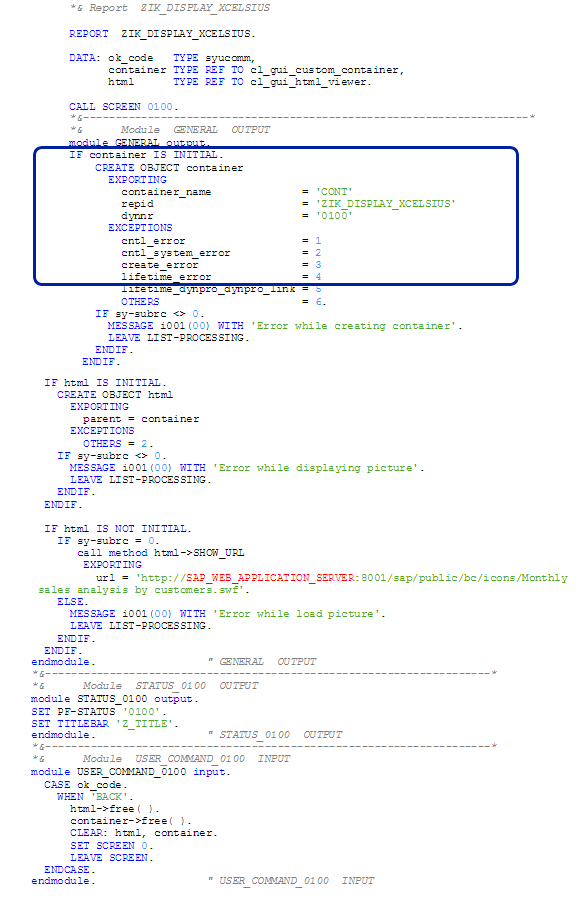
Then create a simple report by using the code in Figure 17. This report shows our dashboard within SAP GUI. The URL is composed as follows:
https://SAP_WEB_APPLICATION_SERVER:port/sap/public/bc/icons/<SWF_name_in_MIME_repository.>
Note
The text within the box is mandatory, because it’s the path to our .SWF file in MIME Repository. Otherwise, the .SWF file will not be available in the report.
Next, execute your report by pressing F8. You can create a transaction using this report.
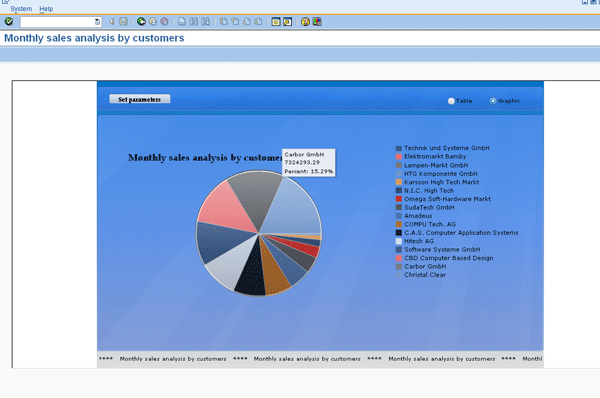
With all four steps complete, you can see the dashboard designed by SAP Crystal Dashboard Design in SAP GUI (Figure 18).
Iryna Krauchanka
Iryna Krauchanka is a senior consultant for the SAP Solutions Organization at EPAM Systems. She has more than four years of experience in IT technologies, including about three years of experience in development, implementation, customizing system settings, and support of SAP products. Her main focus is reporting, SAP NetWeaver Business Warehouse, and SAP BusinessObjects BI solutions. Her area of expertise includes three years of experience in ABAP/4 programming in BI solutions.
You may contact the author at iryna_krauchanka@epam.com.
If you have comments about this article or publication, or would like to submit an article idea, please contact the editor.

Syargei Rassadzin
Syargei Rassadzin is a consulting team leader for the SAP Solutions Organization at EPAM Systems. He has more than 10 years of experience implementing SAP BI products and more than 14 years of experience implementing SAP Business Objects products. In addition, he has more than 17 years of experience in consulting, software development, and testing. An SAP-certified application associate and certified project manager at the International Project Management Association (IPMA) level C, his main area of expertise is data warehouse design and reporting with multiple back-end systems (e.g., SQL Server, SAP NetWeaver BW, and Oracle).
You may contact the author at syargei_rassadzin@epam.com.
If you have comments about this article or publication, or would like to submit an article idea, please contact the editor.