Manager
Learn how to install and configure SAP Test Acceleration and Optimization (SAP TAO) and set up HP QuickTest Professional. See how to transfer preconfigured components from SAP TAO to SAP Quality Center.
Key Concept
SAP Test Acceleration and Optimization (SAP TAO) provides preconfigured, automated, functional test components for SAP GUI-based transactions. It helps significantly reduce the time, cost, and risk associated with business process testing and provides tight integration with SAP Solution Manager, SAP Quality Center, and HP QuickTest Professional.
Any set of systems requires testing to ensure they are running correctly. The best approach to testing is to set up an automated system using multiple functionalities that reduce human error, alert you to issues that your systems may have, and avoid the cost it would take to fix such issues.
In my previous article, “Connect SAP Solution Manager to SAP Quality Center as Part of Your Automated Testing Solution,” I showed you step by step how to create a project in SAP Solution Manager and SAP Quality Center by HP. I also walked through connecting projects to both applications. In this article, I’ll show you how to install and configure SAP Test Acceleration and Optimization (SAP TAO) on your client. Then I’ll explain how to transfer preconfigured components from SAP TAO to SAP Quality Center. Finally, I’ll explain how to set up HP QuickTest Professional.
Using the described steps in this article requires the following system prerequisites:
- SAP Solution Manager with enhancement package 1 and Support Package 25 or later
- SAP TAO 2.0 or later
- HP QuickTest Professional, including SAP Add-In
- SAP Quality Center 10 or later
In my previous article, I covered three steps:
- Step 1. Create a project in SAP Solution Manager
- Step 2. Create a project in SAP Quality Center
- Step 3. Connect the SAP Solution Manager project to SAP Quality Center
In this article, I’ll explain the next four steps of the process, which lead you up to the point where you can define, transfer, create, and execute test cases:
- Step 4. Install and configure SAP TAO on your client
- Step 5. Configure SAP TAO settings
- Step 6. Transfer preconfigured components from SAP TAO to SAP Quality Center
- Step 7. Create an application area in HP QuickTest Professional
Step 4. Install and Configure SAP TAO on Your Client
The following steps are required to install SAP TAO, assuming that all prerequisites are installed on the system, including SAP GUI, HP QuickTest Professional, and the SAP Quality Center by HP Web access plug-in.
To install the SAP TAO client on your computer, first download the complete installer package for the SAP TAO client 2.0 from SAP Service Marketplace. Go to https://service.sap.com/swdc and navigate to Support Packages and Patches > Browse Download Catalog > SAP Technology Components > SAP TAO > SAP TAO 2.0 > Installation > Select to add to the Download Basket and download. Now that the required installer package is downloaded, double-click the Setup.exe file, and the installation wizard process starts. Accept all default options and click the Next button (Figure 1).
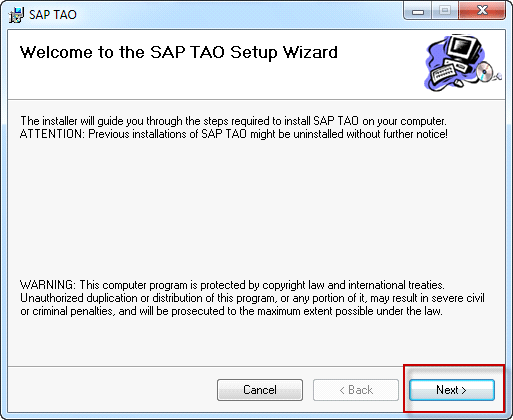
Figure 1
Set up SAP TAO
Select the folder where SAP TAO will be installed and click the Next button (Figure 2). Confirm the installation by clicking the Next button (Figure 3).

Figure 2
Select the path for SAP TAO

Figure 3
Confirm the installation
After confirming the installation, the Root Path window appears to specify the SAP TAO RTLibraries path. Click OK through this and then click the Close button in the screen in Figure 4.

Figure 4
The SAP TAO installation is complete
Step 5. Configure SAP TAO Settings
In this step, I’ll show you how to configure SAP TAO client functions.
SAP TAO License
Once the SAP TAO installation is complete, configure SAP TAO by double-clicking the SAP TAO desktop icon. In the top-right corner, choose the Configuration tab and the configuration screen opens. Click the License tab and select SAP Solution Manager from the SAP systems list under the Description column (Figure 5). Enter the SAP Solution Manager required user login and click the Test SAP Connection button. To request a license, click the Check for License button. The SAP TAO license is now enabled; click the Save button.
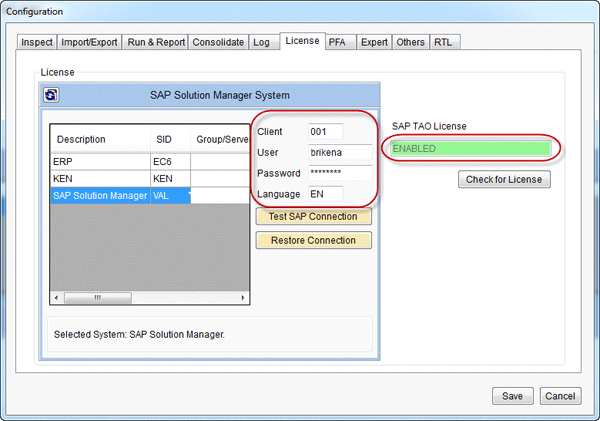
Figure 5
Enable a license
Inspect
In the Inspect tab, specify the actions you want SAP TAO to execute throughout inspection and creation of components (Figure 6). Select the Keep copy of components on local path and Upload components to SAP Quality Center check boxes. Specify the Component path in your local location, and at Execute Libraries line specify the location of library files. In the Component type selection, specify what data table the data is obtained from. In my example, I chose Set, which represents user interaction (such as entering a value into a field), but you might choose Get, which enables you to retrieve information (such as field values).

Figure 6
Select Inspect settings
Import/Export
On the Import/Export tab, select the actions to be executed when transferring components between SAP TAO and SAP Quality Center (Figure 7). Specify the paths for Import from SAP Quality Center and Export to SAP Quality Center.

Figure 7
Set the Import/Export settings
Run & Report
On the Run & Report tab, specify the Name of the test set folder in QC and the Prefix of the test set name in QC values, and activate the technical bill of materials (TBOM) functionality by selecting the appropriate check box (Figure 8). This allows you to use SAP TAO scripts to create TBOMs in SAP Solution Manager from SAP TAO. TBOMs are used for Business Process Change Analyzer.

Figure 8
Select the Run & Report settings
Consolidate
On the Consolidate tab, classify the actions to be executed when consolidating test components (Figure 9). Specify the Location of Consolidated Components. Then select the following check boxes:
- Overwrite consolidated component in QC (to overwrite a consolidated component to update the existing tests, which is recommended)
- Add component name to consolidated script (to give clues in a test script to identify the component)
- Prompt for confirmation before consolidating (to produce a confirmation window before consolidating)
- Create “EMPTY” Parameters (which represents all parameters that have no value)

Figure 9
Select the Consolidation settings
Log
On the Log tab, specify the log levels and select the Display Information Box check box (Figure 10). The Log Level should be set to ERROR because this ensures that information is available for a sufficient time period. To help debug potential issues, the logs are written at runtime by the application. The log’s level can be changed for more detailed analysis. You should select the Display Information Box check box for debugging and error tracking purposes.

Figure 10
Set the Log settings
PFA
On the PFA tab, specify the Test Folder Path and Path to Default Components values (Figure 11). Then select the Overwrite Test With Same Name check box. In Maximum Number of Tests, specify how many tests you want to be stored in the Repository. I chose 80 in my example, but the number differs depending on the situation. Specify where the Data Folder will be located and select the Enable Check Picker check box. Specify the On Failure value and don’t select the Do Not Use Screen Components check box. The Enable Check Picker option inserts check points in a generated test that are evaluated during the execution of the test. Selecting the Do Not Use Screen Components option causes the system to only use default components. The On Failure option allows you to define when a component fails during a test to exit or continue, which is a behavior of SAP Quality Center.

Figure 11
Select the PFA settings
Expert
On the Expert tab, select the Use an alternate path to look for the saplogon.ini file check box as well as the Communication Check Active and Enable Automatic User Interface Scaling check boxes (Figure 12). These selections start the SAP GUI and enable you to ping the SAP back-end servers at regular intervals.

Figure 12
Select the Expert settings
Others
On the Others tab, the link is set to the online documentation by default (Figure 13). Select the Ask to stop QTP process on exit. check box if you want HP QuickTest Professional to be stopped when SAP TAO is stopped.

Figure 13
Select the Others settings
RTL
On the RTL tab, define the location for the SAP TAO runtime libraries, which support the SAP GUI scripting that is used to access the SAP GUI components (Figure 14). The Configuration wizard opens (Figure 15). Select New RTL installation and then click Next. Choose the location and continue with the required steps by clicking the Next button through the wizard steps. When you are done, click the Finish button and then close the RTL tab by clicking the Save button.

Figure 14
Select the RTL settings

Figure 15
Select New RTL installation and click Next
Step 6. Transfer Preconfigured Components from SAP TAO to SAP Quality Center
Go to Import/Export in the navigation menu, and in the Export test components to SAP Quality Center screen, select the check box of the COMPONENTS folder (Figure 16). Then click the Export to SAP QC button. The SAP TAO window opens to confirm the export of the components. Click Yes to continue.

Figure 16
Exporting components to SAP Quality Center
Wait until all the components are exported. In the Import test components to SAP Quality Center screen, click the refresh icon and expand the Components tree to check if all the business components have been transferred to SAP Quality Center (Figure 17).

Figure 17
Preconfigured components transferred to SAP Quality Center
Once all the business components are transferred, go to the Business Components section of the SAP Quality Center by HP home page (Figure 18). Click the refresh icon and then expand the SAP Front End and SAP R3 folders to see preconfigured components that are transferred from SAP TAO to SAP Quality Center.

Figure 18
Exported components in the SAP Quality Center
Step 7. Create an Application Area in HP QuickTest Professional
Click the HP QuickTest Professional desktop icon to start the program and then click File > Quality Center Connection > Connect to SAP QC Server (Figure 19). Fill out the ID, Password, and project to log in, and then click the Close button.

Figure 19
Connect to the SAP Quality Center server and project
Create an application area by going to File > New > Application Area and clicking the save icon (Figure 20). A new screen opens. Under the Name enter _SAP_Doc and click OK. Then click the save icon again to save the settings.

Figure 20
Create an application area
Brikena Berisha
Brikena Berisha graduated with a degree in finance and international business from California State University of San Bernardino in 2006. She has more than five years of consulting experience in project management, including project implementations and upgrades, testing with SAP Solution Manager 7.0 and 7.1, SAP Quality Center by HP, QTP by HP, and SAP TAO. Brikena is a consultant at CoreALM Consulting Company, specializing in SAP consulting, in particular application lifecycle management, SAP solutions, and third-party solutions that are integrated with SAP Solution Manager.
To contact the editor, click here.
You may contact the author at brikena.berisha@corealm.com.
If you have comments about this article or publication, or would like to submit an article idea, please contact the editor.