Learn how to use the three options in the SAP General Ledger in FI in SAP ERP HCM to post employees’ liabilities to finance. See step-by-step instructions on using the IMG to configure this new feature without having to write complex schemas.
Key Concept
Payroll liabilities are deductions, such as taxes, payments to 401(k) accounts, or garnishments of pay, that are deducted from employee paychecks. These deductions should be posted to the respective general ledger accounts on the finance side at the end of every payroll run so that accounts payable can transfer the proper funds to the respective vendor.
Some companies may have the requirement to post an employee’s liabilities according to the employee’s expense account or want to see the account assignment (i.e., profit center) information about liabilities’ postings within the posting document. Prior to the release of SAP ERP Central Component (ECC) 5.0, you could not achieve these business requirements with SAP’s standard posting configuration. Now these business requirements can be met using the standard configuration under the SAP General Ledger (G/L) section in the IMG. This configuration simplifies implementation procedures and minimizes execution time. I show readers how to configure the G/L section using one of three available options.
Note
This same functionality exists for public-sector implementations as well, with the extra posting objects of fund, functional area, and grant (in addition to profit center).
Note
This article is about using functionality provided by the SAP General Ledger (formerly known as the new G/L). The previous version of G/L is referred to as the classic G/L.
Options for Posting Employees’ Liabilities in SAP Payroll
To illustrate my points I use example scenarios.
Figure 1 shows the posting document of the liabilities section that is created by using SAP’s traditional posting configuration.
Figure 2 shows the posting document of the liabilities section, which is created by using the G/L configuration.

Figure 1
Traditional configuration of the posting of liability document

Figure 2
Configuration of the posting of liability document section
The new G/L functionality offered by SAP ERP HCM provides businesses with three options for posting payroll liabilities to finance:
- Posting liabilities according to an employee’s Organizational Assignment (infotype 0001).
- Distributing liabilities according to an employee’s expenses.
- Distributing liabilities according to an employee’s expenses taking into account the inflow principle.
Note
The inflow principle is used when making payroll retroactive to previous pay periods. For example, the SAP system uses inflow wage types (i.e., wage types that start with /Z**) to move the difference in dollar amounts from the previous pay period to the current pay period.
Option 1: Posting Liabilities According to Organizational Assignment (Infotype 0001)
By using this option companies can post employee’s payroll liabilities according to the master cost center maintained on infotype 0001 (Organizational Assignment). During distribution of payroll liabilities the SAP ERP HCM system only considers the account assignment information, such as profit center and business area, that are assigned to a master cost center. The system does not take information from other account infotypes, such as infotype 0015 (additional payment) or infotype 0014 (recurring payments or deductions).
In the SAP system, the traditional posting program does not read the account assignment information that is assigned to the employee’s master cost (on infotype 0001).
How to Post Liabilities Based on Employee’s Organization Assignment Infotype (0001)
You must follow these configuration steps to see the profit center information on the posting document for liabilities postings. This information is assigned to the employee's home cost center on infotype 0001.
Note
For users running SAP ERP HCM on a system other than ERP, the profit center information needs to be stored in SAP ERP HCM in which SAP payroll is executed.
To complete this configuration, activate the switch to determine what distribution mode the SAP system needs to use while posting employee's liabilities. Follow IMG path Payroll > Payroll USA > posting to financial accounting > New General-Ledger: Distribution of liabilities according to expenses > Central settings > Define type of distribution.
In the screen that appears (
Figure 3), select the cost distribution type and enter the start and end dates. In this cost distribution scenario, you do not need to make any changes in wage type in the symbolic account configuration step.

Figure 3
Table entries for distribution mode
How to Post Liabilities to a Profit Center That Is Assigned to a Master Cost Center
In this example I show you how expenses are posted to a profit center that is assigned to an employee’s master cost center. In my example, the cost center is 1000002 and the profit center is 9999999999.
Note
In each of the three options I discuss, the account assignment information is not stored at the employee’s master data level, but you can see master cost center information on infotype 0001. The account assignment information is linked to employee’s master cost center through back-end tables.
You access the master data cost center via transaction code PA20. The screen that appears (
Figure 4) shows that the employee is assigned to cost center 1000002.
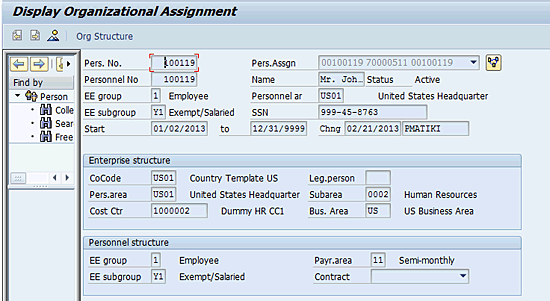
Figure 4
Assign the employee to a cost center
Use transaction code PC00_M99_CWTR to get payroll results (
Figure 5).

Figure 5
Wage type report for the 02.2013 pay period
Note
The wage type report provides the employee’s payroll results information for a selected period, but does not provide any finance information such as a G/L number.
Use transaction code PCP0 to get to the posting document (
Figure 6). The posting document shows to which G/L accounts the payroll results are posted.
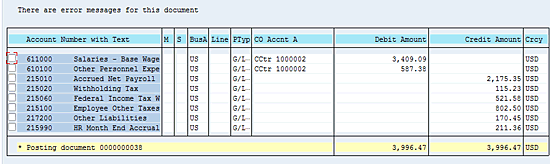
Figure 6
Posting document
To get the details (e.g., wage type, employee number, payment amount, and profit center) for a particular G/L account, double-click the corresponding account number under the Account Number with Text column in
Figure 6. In my example I want to see the details for G/L account number 215020 (
Figure 7), so I double-click line 215020. You can validate the amounts shown in
Figure 5 with the numbers shown in
Figure 7.

Figure 7
Detail view of the posting document for G/L account 215020
You can view the account assignment information for the expenses and liabilities on the posting document only by accessing the detail view of the posting document.
Note
The SAP system, by default, does not display the account assignment columns on the posting document. If you want to see these columns, click the display icon

(
Figure 7).
Option 2: Distributing Liabilities According to Expense
By using this option a company can post an employee’s payroll liabilities according to the personnel expenses (i.e., earnings) account. During distribution of payroll liabilities the SAP system considers the account assignment information, such as profit center and business area, from all payroll infotypes (e.g., infotype 0015 [additional payment] and infotype 0014 [recurring payments/deductions]).
How to Distribute Liabilities According to Expenses
Follow these steps to configure SAP ERP HCM to post employee’s liabilities according to employee’s expenses and to also see the account assignment information for liabilities and expenses on the posting document.
Step 1. Determine what distribution mode the SAP system should use when posting the employee’s liabilities. Follow IMG path Payroll > Payroll USA > posting to financial accounting > New General-Ledger: Distribution of liabilities according to expenses > Central settings > Define type of distribution.
In the screen that appears (
Figure 8) select the cost distribution type and enter the start and end dates.
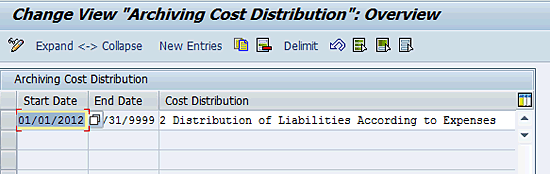
Figure 8
Table entries for distribution mode
Step 2. Assign a custom liability wage type (that needs to be posted according to an employee’s expenses) to a wage group table. By assigning a liability wage type to a wage type grouping, the SAP system distributes that liability wage type in the same manner as the wage type grouping (for example, a split in the employee’s pay). Follow IMG path Payroll > Payroll USA > posting to financial accounting > New General-Ledger: Distribution of liabilities according to expenses > Payroll > Maintain wage type grouping for cost distribution.
In the screen that appears (
Figure 9) enter the custom wage type and the respective wage type grouping wage type.

Figure 9
Table entry for wage type grouping
Note
The SAP system prepopulates the table for wage type grouping with standard liability wage types (e.g., 401, 402, and 403). Therefore, for ease of use, I recommend that you copy the existing entries and make changes to the copied lines so that you don’t have to rekey all the entries. This process saves time and effort and also is more accurate.
Step 3. Assign account assignment type FC (FC is the balance sheet account indicator) to the liability wage types. Follow IMG path menu Payroll > Payroll USA > posting to financial accounting > New General-Ledger: Distribution of liabilities according to expenses > Posting transfer to Financial account > Modify account assignment types for symbolic account. In the screen that appears (
Figure 10) select the Create Symbolic Accounts with Account Assignment Type FC option by double-clicking it.
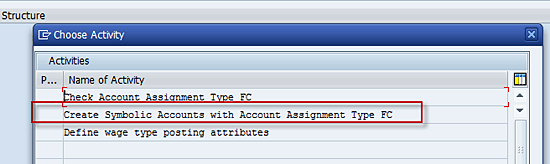
Figure 10
Create the symbolic account
In the screen that appears (
Figure 11) make sure that the symbolic accounts that are attached to liability wage types show account type FC (in the AATyp column). A symbolic account is the media through which payroll wage types are linked to G/L accounts on the finance side.

Figure 11
Table entry for the symbolic account
Step 4. Assign the symbolic account to a wage type. Follow IMG path menu Payroll > Payroll USA > posting to financial accounting > New General-Ledger: Distribution of liabilities according to expenses > Posting transfer to Financial account > Modify account assignment types for symbolic account. If you do not assign a symbolic account to a wage type, the results are not posted to FI.
In the screen that appears (
Figure 12) select the third option: Define wage type posting attributes by double-clicking it.

Figure 12
Assign a wage type to a symbolic account
To post payroll results successfully to finance G/L accounts, you need to complete this next step, where you assign a symbolic account to the payroll wage types.
In the next screen (
Figure 13), select a wage type and double-click the Posting a Wage Type folder.
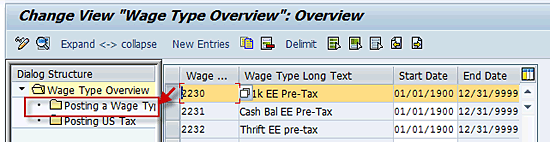
Figure 13
Table entries of all finance posting relevant wage types
To add a symbolic account to a wage type, select the appropriate wage type in
Figure 13, double-click the Posting a Wage Type folder, and double-click the appropriate line under the SymAcc… column (
Figure 14). Select the symbolic account code from the drop-down options that appear.
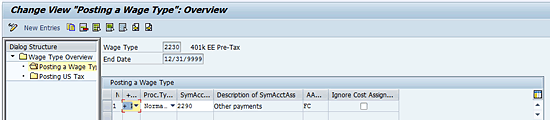
Figure 14
Table entry for mapping wage type and symbolic account
Step 5. Activate a payroll sub-schema and function in the payroll schema. You do this so that the payroll schema can read the entire configuration related to a posting of an employee’s liabilities according to an employee’s expenses. This step is critical to complete the configuration. The SAP system does not display an error message if this step is not taken; however, if it’s not, the results in the posting document will be incomplete.
Enter transaction code PE01 to call your custom payroll schema. In the screen that appears, enter your payroll schema code (in my example, it’s ZEXA). Click the Change button (
Figure 15).
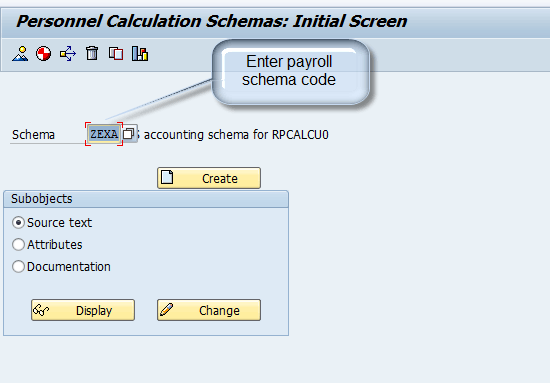
Figure 15
Change schema ZEXA
Note
Payroll schema code ZEXA is the copy of the SAP-delivered payroll schema (i.e., U000). This payroll schema code has all of the customer specific payroll calculation rules to derive the employee’s net amount.
Scroll all the way down to the bottom of the schema (
Figure 16) and double-click sub-schema UEND.
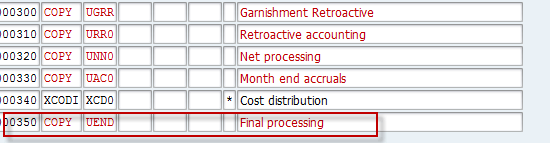
Figure 16
Customize the payroll sub-schema
Note
UEND is the SAP system’s standard payroll sub-schema. If you have a custom sub-schema, then double-click it instead, make a copy, and then make changes to it and rename it. Do not make any changes to the SAP-delivered sub-schema, as it not an SAP best practice.
In the screen that appears (
Figure 17), activate the line that has payroll function XCODI. You do this by removing the asterisk in the D column. Note that the default in the SAP system is for the asterisk to appear in the D column for this payroll function.

Figure 17
Payroll function XCODI details
Note
If you are using the regular posting program (RPCIPE00) to do payroll to FI posting, then you need to activate payroll operation XCDOI in the payroll schema. If you are using the new posting program (RPCIPE01) to do payroll to FI posting, then you need to activate payroll operation XLIDI in the payroll schema.
Here are some more details about these payroll operations.
For operation XCODI, if you activate this function in the payroll schema then you only can use the old posting program (RPCIPE00). This function only supports distribution number 2 (posting employee’s liabilities based on expenses).
For operation XLIDI, if you activate this function in the payroll scheme then you only can use new the posting program (RPCIPE01).
This function supports distribution option 2 (posting employee’s liabilities based on expenses) and option 3 (posting liabilities based on the expenses inflow principle), but not option 1. If you activate this function in the payroll schema, then you have to assign account assignment type FC to a liability symbolic account.
Example: How to Distribute Liabilities According to Expenses
In this example, I show you how an employee’s total pay period tax liability (federal withholdings) amounts are distributed to finance according to employee’s payroll expenses.
In this scenario an employee is moved to a different position in the middle of the pay period. The pay period is a semimonthly pay period, and the pay period is 02/01/2013 to 02/15/2013 (04.2013).
Execute transaction code PA20. In the screen that appears (
Figure 18) you can move the employee from cost center 1000002 to cost center 1000003 on 02/10/2013 using transaction code PA40. (
Table 1 shows a different view of this information.)
Figure 18 shows the date ranges and the respective cost center and profit center combinations. Use position change PA (personal action) to move the employee between cost centers.

Figure 18
Organizational assignment infotype (0001)

Table 1
Table view of organizational assignment information
Execute transaction code PC00_M10_REC. In the screen that appears (
Figure 19) you see the payroll reconciliation report for the 04/2013 pay period (this is the pay period when the employee changed cost centers). The payroll reconciliation report is the standard SAP system payroll report that displays the employee’s payroll results for the selected pay period.
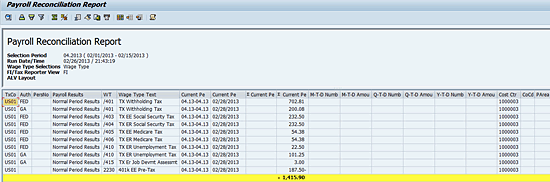
Figure 19
Payroll reconciliation report for payroll period 04/2013
After running payroll, execute transaction code PC00_M99_CIPE to generate the posting document. To view the generated posting document, execute transaction code PCP0 (
Figure 20). The posting document is the one single document in which you can see which payroll results are getting posted to which G/L account on the FI side. On the posting document you also see the account assignment information, such as the profit center (
Figures 21 and
22).
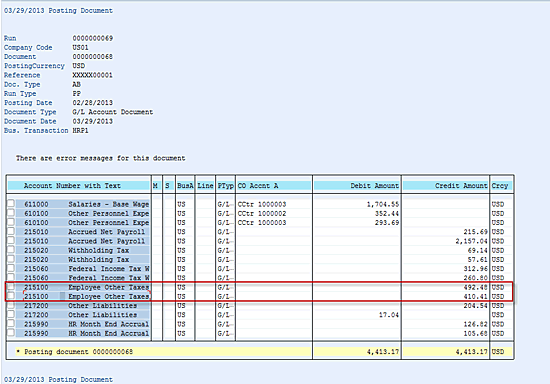
Figure 20
Posting document
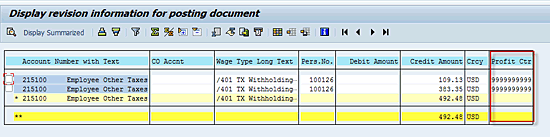
Figure 21
G/L account 215100 posting document details
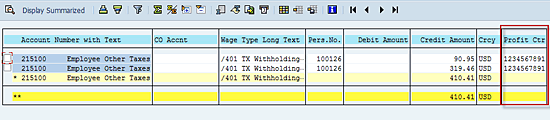
Figure 22
G/L account 215100 posting document details with new profit center
In the posting document (
Figure 20), double-click the appropriate G/L account number (in the Account Number with Text column) to display the details for the G/L account (number 215100 in my example), shown in
Figure 21.
The partial amount of the tax withholding amount is posted to profit center 99999999999 (
Figure 21). This is the tax withholding amount for the earnings that the employee earned during the period from 02/01/2013 to 02/09/2013, when he was assigned to cost center 10000002. If you want to see how the SAP system distributed the federal withholding amounts according to the employee’s expenses, double-click the line that you want to see more details about (
Figure 21).
The remaining tax withholding amount is posted to profit center 1234567891 (
Figure 22). This is the tax withholding amount for the earnings that the employee earned during the pay period 02/10/2013 to 02/15/2013 when he was assigned to cost center 10000003.
Option 3: Distributing Liabilities According to Expenses Taking the Inflow Principle into Account
By using this option companies can post employee payroll liabilities according to the personnel expenses (i.e., earnings) account. During distribution of payroll liabilities, the SAP ERP HCM system considers the account assignment information (i.e., profit center and business area) from all account infotypes, such as infotype 0015 (additional payment) and infotype 0014 (recurring payments/deductions).
In this case, inflow liabilities are postponed to the relevant outflow periods, and liabilities are distributed based on the period of origin. By using this distribution method companies can see the detailed breakdown of the retroactive period amounts on the posting document.
In the standard SAP ERP HCM system posting program, companies cannot post employee’s payroll liabilities according to the employee’s personal expenses account. In addition, the traditional posting program does not read the account assignment information from the employee’s master cost center.
How to Distribute Liabilities According to Expenses Taking the Inflow Principle into Account
Follow these steps to configure the SAP ERP HCM system to implement this option.
Step 1. Determine what distribution mode the SAP system needs to use while posting an employee’s liabilities. Follow IMG path menu Payroll > Payroll USA > posting to financial accounting > New General-Ledger: Distribution of liabilities according to expenses > Central settings> Define type of distribution.
In the screen that appears (
Figure 23), select the cost distribution type and enter the start and end dates.
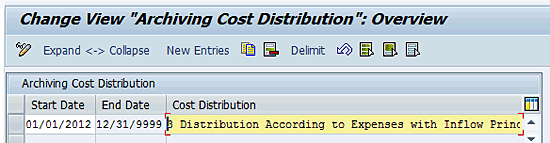
Figure 23
Table entries for cost distribution
Step 2. Assign the custom liability wage types (that need to be posted according to employee’s expenses) to a wage group. By assigning a liability wage type to wage type grouping, the SAP system distributes that liability wage type in the same manner as the wage type grouping (e.g., a split in the employee’s pay). Follow IMG path menu Payroll > Payroll USA > posting to financial accounting > New General-Ledger: Distribution of liabilities according to expenses > Payroll > Maintain wage type grouping for cost distribution. In the screen that appears (
Figure 24), enter the custom wage type and the respective wage type grouping wage type.

Figure 24
Table entries for wage type grouping
Note
The SAP system comes with the standard liability wage types (e.g., 401, 401, 403 etc.) prepopulated in these tables (Figure 24).
Step 3. Populate the retroactive accounting table with the custom liability wage types. In this step you specify what liability wage types are to be used and how they are to be handled in the retroactive payroll accounting run. The SAP system determines how to handle the liability wage types during payroll to FI posting when payroll is run retroactively, based on the data in this table. Follow IMG path menu Payroll > Payroll USA > posting to financial accounting > New General-Ledger: Distribution of liabilities according to expenses > Payroll > Maintain relevant wage types for retroactive accounting differences (
Figure 25).

Figure 25
Populate the retroactive accounting table
For specified wage types (i.e., a customer-specific wage type) you also specify whether the SAP system needs to consider the gross or new retroactive difference amount while distributing liability amounts to FI.
Note
As in the table entries shown in Figure 24, the SAP system comes with standard liability wage types (e.g., 401, 402, and 403) pre-populated in this table (Figure 25).
Step 4. Assign account assignment type FC to the liability wage types. Follow IMG path menu Payroll > Payroll USA > posting to financial accounting > New General-Ledger: Distribution of liabilities according to expenses > Posting transfer to Financial account > Modify account assignment types for symbolic account (
Figure 26).

Figure 26
Create a symbolic account
Note
You must implement step 4 and can only use new posting program RPCIPE01to do payroll to FI postings.
Once you get to the screen in
Figure 26, select the second option: Create Symbolic Accounts with Account Assignment Type FC. In the next screen (
Figure 27) make sure that the symbolic accounts that are attached to the liability wage types have account type FC (this information appears in the AATyp column).

Figure 27
Symbolic accounts with the FC account assignment
Step 5. Assign the symbolic account to a wage type. Follow IMG path menu Payroll > Payroll USA > posting to financial accounting > New General-Ledger: Distribution of liabilities according to expenses > Posting transfer to Financial account > Modify account assignment types for symbolic account (
Figure 28).

Figure 28
Assign a wage type to the symbolic account
To post payroll results successfully to finance G/L accounts, you need to complete this step. In this step you assign a symbolic account to the payroll wage types.
Once you get to the screen in
Figure 28, select the third option: Define wage type posting attributes and double-click it. In the next screen (
Figure 29) select the appropriate wage type and double-click the Posting a Wage Type folder, on the left.
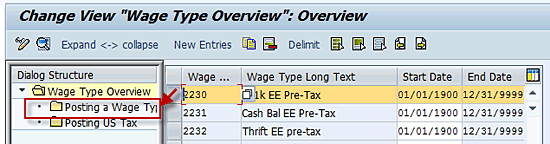
Figure 29
Table containing all FI posting relevant wage types
To add a symbolic account to a wage type, select the symbolic account code from the drop-down options in the SymAcc… column (
Figure 30).

Figure 30
Mapping between the wage type and the symbolic account
Step 6. Activate a payroll operation in the payroll schema so that the payroll schema can read all configuration related to posting employee’s liabilities according to the employee’s expenses. This step is critical to complete the configuration. The SAP system does not display an error message if this step is not implemented; however, if it is not done, users do not get the expected results on the posting document.
Enter transaction code PE01 to call your custom payroll schema, which is ZEXA in my example (
Figure 31).

Figure 31
Change schema ZEXA
Press the change button (
Figure 31), scroll all the way down to the bottom of the schema (
Figure 32), and double-click sub-schema UEND.
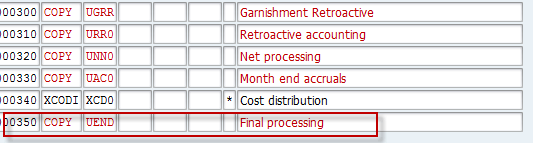
Figure 32
Customize the payroll sub-schema
In the next screen (
Figure 33) you can edit your custom sub-schema.

Figure 33
Edit the customized payroll sub-schema
Activate the line that has payroll function XLIDI by removing the asterisk in column D (
Figure 33). In the standard SAP system, the asterisk is pre-populated in this column for this payroll function.
Example: Distributing Liabilities According to Expenses Taking the Inflow Principle into Account
Now I show you how an employee’s total pay period’s federal withholding tax amount, including the retroactive federal withholding tax amounts, are distributed to FI according to the employee’s payroll expenses.
In this example, the employee had a retroactive date pay increase in pay period 08/2013; the retroactive pay increase date is 03/01/2013. The pay period is a semimonthly pay period, and the pay period is 04/01/2013 to 04/15/2013 (08/2013).
Execute transaction code PA20 to go to infotype 0008 (basic pay), shown in
Figure 34. On this screen you can see that the employee’s pay is increased to $4,166.67 for the pay period with the effective date of 03/01/2013. By using the pay increase PA (personal action) you can change the employee’s pay by executing transaction code PA40.

Figure 34
Basic pay infotype (0008)
Using transaction code PC_PAYRESULT, run payroll, which opens the screen shown in
Figure 35.

Figure 35
The payroll results screen
After running payroll, run program RPCIPE01 using transaction code PCP0. The next screen (
Figure 36) shows the posting document for the pay period 08/2013.
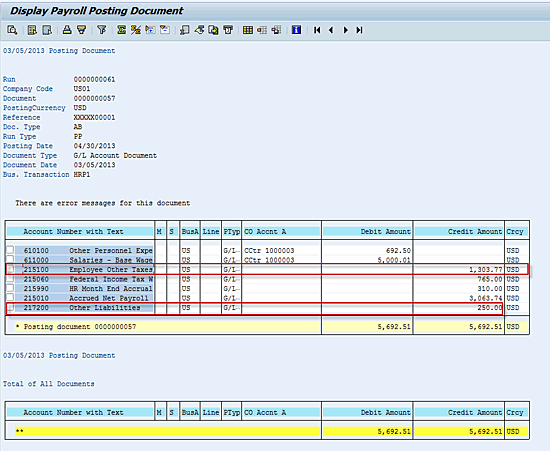
Figure 36
The posting document for payroll period 08.2013
To get the details for your posting documents, double-click the appropriate G/L account number in the Account Number with Text column (
Figure 36).
Figures 37 and
38 show how the SAP payroll system distributed the employees’ withholding liability amounts for the current and retroactive payroll periods for G/L accounts 215100 and 217200, respectively.

Figure 37
The posting document for G/L account 215100
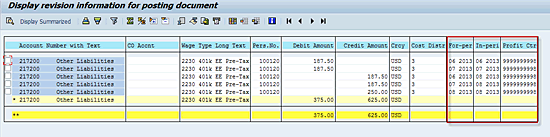
Figure 38
The posting document for G/L account 217200
Pramod Matiki
Pramod Matiki is currently working at Exaserv, Inc., as a senior functional consultant. For more than nine years, he has been an SAP consultant with knowledge of various SAP HR modules, including Time Management, Payroll, Benefits, Personnel Administration, Organizational Management, and ESS/MSS. Pramod's implementation responsibilities include design, configuration, testing, conversion, and production support of the system.
You may contact the author at
pramodmatiki@exaserv.com.
If you have comments about this article or publication, or would like to submit an article idea, please contact the
editor.