Learn how to put together a quick proof of concept for Interaction Center (IC) WebClient and how you configure it based on configuration profiles. Then, discover how to tweak these configuration profiles to fulfill your business requirements.
Key Concept
Interaction Center (IC) WebClient is the framework that links various applications available in mySAP CRM (and mySAP ERP Central Component), such as sales orders, contracts, complaints, and knowledge search. It groups functionality together for quick access. It also enables shared information (e.g., the account and contact name) among these applications.
Perhaps your company wants to explore how Interaction Center (IC) WebClient would fit its business needs. Did you know that you can put together a quick demo of IC WebClient to try it out? This way you can avoid going through a full implementation just to see if it meets your business requirements.
SAP provides extensive information about how to configure and implement IC WebClient, but it’s difficult to get up to speed with this technology without spending significant time sifting through the available information. Here’s a shortcut that allows you to develop a quick proof of concept version of IC WebClient, albeit with somewhat limited functionality.
For my process, you need access to a mySAP CRM 2005 sandbox. You also should have SAPGUI 6.40. I used Internet Explorer (IE) 6 with Windows XP SP2 to document the process, but you can use any operating system and Web browser that SAP supports.
Set Up the IC WebClient Demo
You can deploy IC WebClient in a standalone fashion, accessible by the call center agents inside the corporate intranet through a URL address. Most companies, however, implement IC WebClient as a component launched from SAP NetWeaver Portal, because this approach gives them unified access to other areas of functionality with a single sign-on. The only difference between the two methods is the way you launch IC WebClient.
To keep the example simple, create the demo IC WebClient as a standalone application. If, after you complete the demo, your company decides to implement IC WebClient, you can choose to deploy it either with SAP NetWeaver Portal or as a standalone version. Refer to the sidebar “Important References to Consult Before You Start” for important IC WebClient information.
For this example, I’ll explain how to set up a demo IC WebClient for a service environment. The requirements include access to Case Management, service orders, and knowledge search as examples of functionality to launch within IC WebClient.
First, make sure the CRM_IC Business Server Page (BSP) service is active for IC WebClient. Go to transaction SICF (maintain services) and leave the default entries. Click on the execute icon. In the screen that appears, follow menu path default_host>sap>bc>bsp>sap.
Right-click on crm_ic in the menu tree and select Activate Service. If the Activate Service option is not enabled, this means the service is already active. (Your Basis administrator may have completed this task.) You can deactivate and reactivate the services globally by right-clicking on the sap node just under default_host in the hierarchy.
Note
You can implement one of two versions of IC in mySAP CRM: IC WinClient and IC WebClient. IC WinClient is based on the traditional SAPGUI infrastructure. The user interface is quite different from IC WebClient. Most SAP users evaluate and implement the Web-based version, hence this article addresses the IC WebClient exclusively. For more information about how the two versions compare, refer to Gil Magana’s article, “
IC WinClient or IC WebClient? How to Choose a Call Center Interface.”
Next, test IC WebClient and see if it’s ready to use. Sometimes you need to apply SAP notes or patches before you can use the system fully. Go to transaction SE80, click on the Repository Browser button, and select BSP Application from the first drop-down list (Figure 1). In the second empty field under this drop-down menu, enter the name of the BSP — in my example, I entered CRM_IC. Press Enter. Under Object Name, go to CRM_IC>Pages with Flow Logic. Right-click on default.htm and select Test. This spawns an IE browser session with a navigation bar on the left (Figure 2).
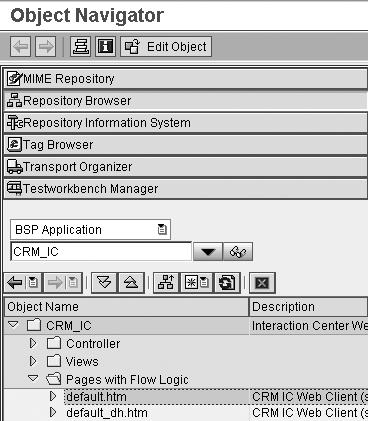
Figure 1
Select and access the IC WebClient application in Object Navigator
If your IC WebClient screen looks empty — without a navigation bar on the left — apply SAP note 927567 (this is true for a mySAP CRM 2005 Support Release [SR] 1 test environment). If you still have the same issue and you’re on a slightly older, pre-SR1 release, you should also apply SAP note 927566.
Figure 2 shows a default configuration profile, which is a collection of configuration settings that tie a particular area of functionality together (e.g., the Navigation Bar profile defines the functionality available on the navigation bar). The main IC profile ties together all the configuration profiles. Sample configuration profiles provided by SAP get you up and running quickly. The standard CRM system includes several main IC profiles specially created for industry verticals, such as telecommunications, financial services, automotive, and utilities.

Figure 2
Default configuration profile for IC WebClient
To configure a demo IC WebClient according to your requirements, you first must configure a couple of configuration profiles. Log on to your mySAP CRM 2005 sandbox system, then access the IMG via transaction SPRO. Click on the SAP Reference IMG button.
Note
All the information in this article refers to the standard IC WebClient as it comes with mySAP CRM 2005 SR 1. If you want to test the automotive, telecommunications, or financial industry versions of IC WebClient, you must select the relevant BSPs. Also, you must make slight adjustments for other versions of mySAP CRM 2005 (non-SR1). This document is still relevant, even for SAP CRM 4.0 systems.
To change the configuration, verify that your sandbox client is open for changes. Your Basis team can check this in transaction SCC4. Alternatively, you can use transaction SCC1 to move the transports that originate from your development client to the sandbox client.
Follow menu path SAP Implementation Guide>Customer Relationship Management>Interaction Center WebClient for all the configuration tasks for this process. Going forward, all the configuration tasks I mention refer to this path. Before configuring your demo IC WebClient, you should copy an existing object (such as a profile) instead of creating a new one — as always in SAP. This approach gives you a sound foundation on which to build your new profile.
Recall that in the main IC profile, you indicate all the other configuration profiles you want to use. You must define the configuration profiles before you can assign them to the main profile. Let’s look at two example configuration profiles: the Account Identification profile and the Navigation Bar profile. These two configuration profiles show how you can influence the look and behavior of the system with minimal configuration.
Create the ZDEMO Account Identification Profile
First, create a new profile. I suggest you copy the Account Identification profile to ZDEMO and leave the default entries. Click on the copy icon, circled in Figure 3. Copy all the entries when prompted.
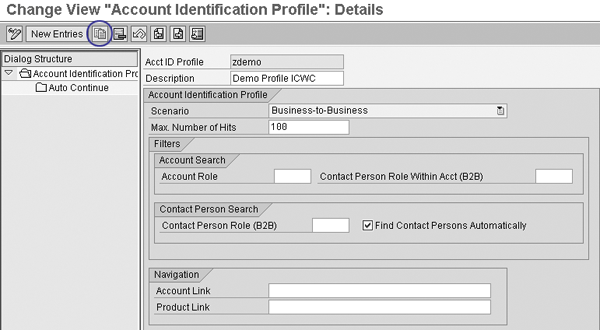
Figure 3
Create a new profile by copying an existing one (Account Identification Profile)
In Figure 3 you specify the scenario to use (Business-to-Business [B2B] in this example) and the Account Search parameters. If your call center agents always perform the same tasks, then after the system identifies the account you can use the Account Link field to point to frequently used transactions.
Create the ZDEMO Navigation Bar Profile
Next, create a second new profile using the same menu path as in the previous example. You should use the same name for all your configuration profiles, so it’ll be easier to assign them to the main IC profile later on. Copy the default Navigation Bar profile to ZDEMO and leave the default entries as they are. Copy all the entries when prompted.
Since my demo call center is service-oriented, I removed the following marketing-oriented areas from the navigation bar: Campaigns, Fax, Letter, and Call Lists. To do so, delete these entries from the ZDEMO profile for the navigation bar. Select the entries and then click on the delete icon  (Figure 4). When you return to IC WebClient, the navigation bar now looks like the one shown in Figure 5.

Figure 4
Delete the entries that are not required in your profile and save

Figure 5
Compare this navigation bar to Figure 2
Now that I have removed the unwanted navigation bar entries, I will show you how to add an entry to the navigation bar. Recall that I’m setting up a demo for a service agent who needs access to Case Management. To enable this option, go to the ZDEMO configuration profile for your navigation bar (use the same menu path as before). Click on the New Entries button, add the new entry Cases, and select Standard Area. Figure 6 shows the updated IC WebClient screen.
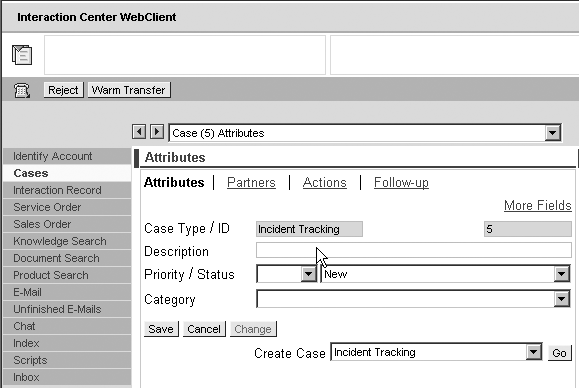
Figure 6
IC WebClient with the embedded version of Case Management
SAP offers two different implementations for Case Management. The one in Figure 6 is the IC WebClient embedded version of Case Management. You also can use a standalone Case Management BSP through a portal-based role (CRMD_CASE). The latter offers significantly more functionality and you can bring it inside IC WebClient. For more information about this, see my article, “Case Study: Improve Customer Communication with Case Management,” in the January/February 2006 issue of CRM Expert.
Now, as you’ve probably noticed, the ZDEMO navigation bar profile contains more entries than are visible on the screen. SAP keeps the missing entries under the Index area. For instance, if I selected Personalized Area instead of Standard Area when I added Case Management to the ZDEMO navigation bar profile, I would find the Case Management functionality under Index instead of the main IC WebClient screen.
Configure the ZDEMO Main IC WebClient Profile
As stated previously, the main IC WebClient profile ties together all the available profiles for configuration. Select the one you just created, ZDEMO. Double-click on the Assign Function Profiles node. Figure 7 shows the content of the ZDEMO IC WebClient main profile. The examples are only a small cross-section of the configuration choices available within IC WebClient, but they show the basic idea of how to configure the system.

Figure 7
Assign Function Profiles for ZDEMO
Another important task that you must perform outside of the IMG configuration is to create the organizational structure for your call center. The system structures call centers hierarchically based on their organizational structure. You can base the organizational structure on geography (e.g., North America, Europe, Asia), by skills (e.g., customer service, technical support, collections, help desk), or by any other grouping factor that requires a different list of accessible functionality on the navigation bar. Map this structure to the IC WebClient main profile.
To create your call center’s organizational structure, enter transaction PPOCW or from the root menu follow menu path SAP Menu>Interaction Center>Supporting Processes>IC Structure>Create Organization and Staffing and press Enter. Validate your entry by clicking on the green check mark icon. This creates your root organizational structure (Figure 8). You can set the validity period to anything, as long as you set the Valid from date to today’s date (or an earlier date) and you set the To date to a future date. For the demo, keep the default values.

Figure 8
Create the root organizational structure for your call center
I’ll describe the minimum definitions required to activate your demo call center settings for one user. First, you must create a position for a call center agent. Go to transaction PP01 and click on the create icon  . Make sure that Object is selected under Infotype Name (Figure 9). For Object type, select Position from the drop-down menu. Fill in the relevant data and save the new agent position.

Figure 9
Maintain the Current plan for positions in the call center
Next, assign the created position to your demo call center. Go to transaction PPOMW and search for Demo Call Center Org.Unit. Click on the assignment icon  . Then click on the Incorporates Position line. Leave the pop-up position search window empty and click on the enter icon. Search through the available positions and select the agent position you just created.
Note
Organizational structures must have at least one level, the root level. In an actual implementation, having only one level is unrealistic, but if your organizational structures become too deep, the environment might be too hard to administer and troubleshoot.
Assign your user ID to the agent position. Select Demo Call Center Agent Position and click on the assignment icon. Select the Holder User line and click on the enter icon. Select your user ID from the list of users and click on the enter icon. Save your organizational structure (Figure 10). This is a simple organizational structure for example purposes (organizational structure – position – user ID). Normally this structure would be more complex.

Figure 10
The final assignment between the user ID and the position
Assign the ZDEMO IC WebClient profile to the Demo Call Center Org.Unit node created in the previous step. This is one of the easiest steps to forget, but it is arguably the most important in this sequence. It links the configuration you completed earlier with the organizational structure that contains the demo agent role. Highlight Demo Call Center Org.Unit and follow menu path Goto>Detail Object>Enhanced Object Description. Select IC WebClient Profile in the Infotype Name box.
Click on the create icon. Select the ZDEMO main profile from the drop-down menu in the IC WebClient Profile field and save (Figure 11). At this point, your demo IC WebClient functions and the call center agent you defined in the previous steps can use the functionality.

Figure 11
Set the Planning Status and Validity period for the organizational structure
How to Assign a Dual Role
Often, one agent must perform dual roles. For such instances, SAP created a solution based on the user selection of profiles. Let’s say you assign an agent to two profiles, SAP’s default profile and your ZDEMO profile. Figure 12 shows what this assignment looks like in transaction PPOMW. You assign profiles through the same method previously described (menu path Goto>Detail Object>Enhanced Object Description).

Figure 12
One user with two different profiles
Note that one user ID (e.g., FRATIAG) can belong to multiple positions, but a position can belong to only one organizational structure. Upon launching IC WebClient, the system allows the agent to select between the two profiles (Figure 13).

Figure 13
Profile selection for a user assigned to multiple profiles
|
Table 1 contains several references you should check before you create your demo IC WebClient. As always when talking about documentation, your mileage will vary. I suggest that you browse extensively through SAP Service Marketplace to gather information about IC WebClient implementations. I also recommend that you register with SAP’s Software Developer Network (SDN) at www.sdn.sap.com. SDN has useful forums where you can ask technical and functional questions.
|
|
| Table 1 |
You need a login ID to access SAP Service Marketplace documents. IDs are free for SAP partners and customers. |
|
George Fratian
George Fratian is a CRM project manager with more than 11 years of experience in the SAP arena (CRM and R/3). The past five years were dedicated to various projects implementing mySAP CRM systems in different industries such as Oil & Gas, Health Care, and High Tech. He has designed and implemented complex mySAP CRM-based solutions for Fortune 20 companies in the areas of Internet Sales and Online Sales, Sales Force Automation, Case Management, and Interaction Center WebClient.
If you have comments about this article or publication, or would like to submit an article idea, please contact the editor.