The key to a successful delta update is the proper creation of the CO-PA DataSource. Here's how it's done.
Dear BW Expert,
We recently uploaded all our CO-PA data to SAP's BW without a hitch. Delta updates, however, have been a problem. The job always terminates, and a message says we have an error in the source system. This is confusing since it worked for full updates. We are on 4.6C in R/3 and have BW version 2.1C. Please help.
Barbara Kreider, Cumberland Swan
Dear Barbara:
I've seen this problem before, and I believe you have encountered a known bug that happens occasionally in BW 2.0 and 2.1. OSS Note 363885 describes it in detail. Unfortunately, the only solution is to delete the DataSource in R/3, create a new one with the same name, and then replicate it into BW. With this method, you do not have to change anything in BW, so the problem is solved quite quickly.
Creating a CO-PA DataSource for BW presents more of a challenge than doing so for some other R/3 modules. The Profitability Analysis (PA) submodule of R/3's Controlling (CO) module is customized to the needs and standards of each company. Therefore, SAP has no standard DataSource in Business Content for CO-PA, so you must create your own.
It might help other BW Expert readers to know how to create a custom DataSource for uploading CO-PA data to BW. SAP documentation on the topic is sparse, and the training classes do not provide enough detail. I will explain the complete process step by step and give you the background you need to understand it. I used BW 3.0B to capture the screenprints for this article, but they should be sufficiently similar to BW 2.x screens.
Creating a CO-PA DataSource for Uploading to BW
On the R/3 side, you are able to use a template that allows you to easily and quickly create a DataSource in R/3 for BW. Most importantly, it allows you to use the delta mechanism. The delta reduces the amount of data that has to be loaded daily into BW, speeding up the data-loading process. Normally, you would not have the delta mechanism when you create your own DataSource, called a generic DataSource. The template creates a DataSource for the tables that are customized for your business (CE1XXXX to CE4XXXX) and allows you to load a delta. In BW 3.0B, delta loading is possible for any generic DataSource.
To create a CO-PA DataSource, use transaction code SBIW, or IMG menu path Business Information Warehouse> Settings for Application-Specific DataSources>Profitability Analysis>Create DataSource. If you only want to create a CO-PA DataSource, you may also use transaction code KEB0. SBIW allows you to do more, like maintain the DataSource.
Tip!
If your source system is not R/3, you load a file or (if you have BW 3.0B) link the database to BW and load the selected fields directly into BW.
You may enter any name, but the template requires that the first seven characters are 1_CO_PA. If you do not have your own naming convention, the system will automatically place %CL by the client and &ERK by the operating concern. Look at Figure 1. To create a new DataSource, flag the Create option, enter the operating concern for which you want to create the DataSource, and flag whether the DataSource is Costing-based or Account-based. After that, click on the process button or press the F8 key.

Figure 1
First Screen for creating a CO-PA DataSource.
You should now see the screen shown in Figure 2. Here you select all the CO-PA fields that you want to load into BW. The system is taking most of the fields from the customized CO-PA module in R/3. You also have to fill in a description for Short text, Medium length text, and Long text.

Figure 2
Choose the fields to be loaded into BW
After choosing the relevant fields, go back one step by clicking on the green arrow and save the DataSource. The system will then create the DataSource, which you can now upload to BW.
Loading the DataSource into BW
You must perform the following steps to load the DataSource into BW:
- Create an InfoSource.
- Link the DataSource to that InfoSource.
- Define an InfoPackage.
- Initialize the delta process with the InfoPackage.
1. Create an InfoSource
Go to the Administrator Workbench in BW and right-click on InfoSources. Enter the name in the InfoSource field and fill out the Long Description field at the next screen (Figure 3). Click on the green checkmark to save the InfoSource, which will appear in the Application Area. Note that for release 2.0B, the screen will look slightly different.
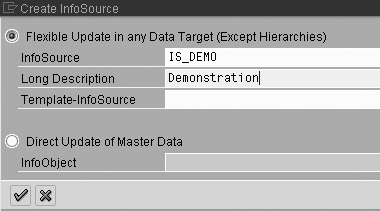
Figure 3
Input the InfoSource name and description
2. Assign a DataSource to the InfoSource
After creating the InfoSource, you need to assign a DataSource to it by right-clicking on the InfoSource as shown in Figure 4. After assigning the DataSource, move all the InfoObjects listed in the ISource fields window to the Communication Structure window. (See Figure 5.) You may now activate the InfoSource.
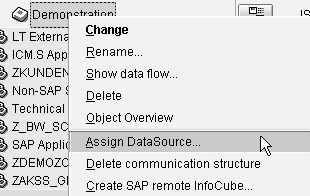
Figure 4
Assign a DataSource to the InfoSource

Figure 5
Move all InfoObjects from the InfoSource fields to the Communications Structure
3. Create an InfoPackage
To create an InfoPackage, right-click on the Source System of the InfoSource and then select the Update folder. (Figure 6). All information necessary to load data out of the source system has to be defined in the InfoPackage. You define certain dataloading procedures in the InfoPackage (e.g., which data target to choose; full or delta upload process; selection criteria for certain fields; and batch jobs for automatic dataload at certain times). The data loading from the source system into BW is then done automatically.
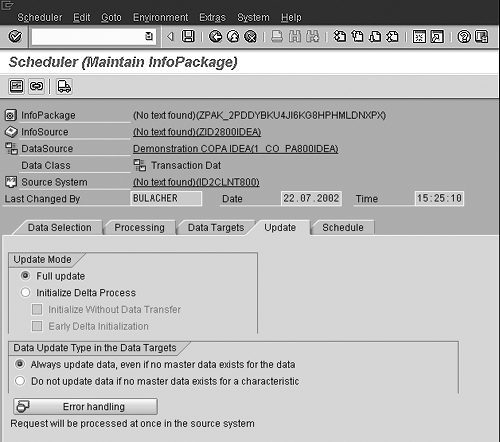
Figure 6
Create an InfoPackage
4. Initialize the Delta Process
Before you can use the delta update, you must initialize the delta process in the Update folder of the Maintain InfoPackage screen. This is possible with or without performing a data transfer. It takes longer with a data transfer, because all the data is loaded from the CO-PA source system. Flag the Initialize Delta Process option and then check the Initialize Without Data Transfer option, as shown below.1

After you initialize the delta process, choose Delta update the next time you run the dataload (Figure 7). In the case that your first delta upload failed, you have to initialize the data loading again. Therefore, you first have to delete the old data from the data targets and the old requests from the PSA (Persistent Staging Area). You can reach the PSA through the menu path Administrator Workbench>Modeling>PSA. The requests are stored under the InfoSource name for which you loaded the data. For more information on the delta update, see the sidebar “Delta Control in R/3.”

Figure 7
Choose Delta update when you run the dataload after initializing the delta process
Now go back to the InfoPackage. Go to the menu of the InfoPackage via the menu path Scheduler>Initialization options for SourceSystem. You will see the initialization packages as shown in Figure 8. Mark the initialization package and click on the rubbish bin. After that, you can initialize the new data upload.

Figure 8
Initialization packages for an InfoPackage
If you have a large amount of data, do an initialization without data loading to lower your time for initialization. Initialization can be done at any time without missing any documents, as there is a 30-minute delay in R/3 before documents are available for a delta load to BW.
You now have the entire procedure for creating a CO-PA DataSource. Thank you for your question; I'm sure that other readers will learn from your experience.
More About Delta Updates
The delta update is used to load smaller amounts of data at once and accelerate the loading process. This is especially important if a lot of data is in the source system. If only a small amount of data is in the source system, a full upload might be better, as it could take longer to load a delta. When you start a delta upload, the system creates a timestamp in the source system to indicate when the data was last loaded. To see if there is any new delta data in the R/3 system, you can use transaction code RSA7 in the R/3 system. (Note that delta update is only available for R/3 DataSources.)
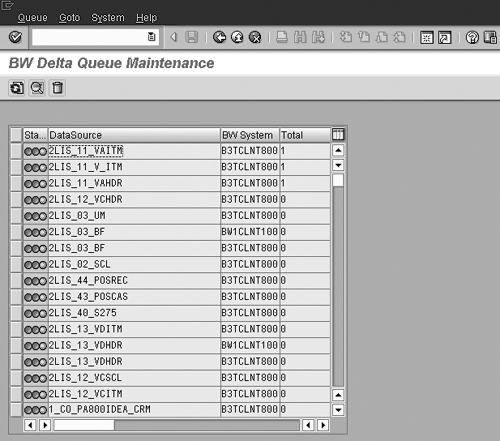
If the leftmost column on the screen shown on the left is green, the DataSource has no error. The Total column on the right indicates if there is any new delta that has to be loaded into BW.
1 In BW 2.0B, after you initialize the delta the first time, the update folder will give you the option for delta processing.
Frank Bulacher
Frank Bulacher is manager of SAP CH at Alstom Switzerland. He has worked in BI for more than 14 years in the United States and Europe. Prior to that, he was a consultant in data warehousing and SAP FI/CO. His career has taken him to top-tier and boutique companies. Frank is a graduate of the University of Augsburg in Germany and the University of Wales in Swansea, UK, with majors in banking and computer science.
You may contact the author at f.bulacher@gmail.com.
If you have comments about this article or publication, or would like to submit an article idea, please contact the editor.