Learn about SuccessFactors Payroll Time Sheet functionality. This functionality is included in Employee Central to store employee attendance time and overtime information per companies’ requirements. Gain a good understanding of the Payroll Time Sheet, how it records employees’ attendance or overtime in the Payroll Time Sheet module, and its capabilities, which provide project teams with how-to solutions for requirements.
Key Concept
SuccessFactors Employee Central has leveraged and upgraded its Payroll Time Sheet module since its introduction in the August 2014 release to help companies manage their employees’ attendance and overtime recording in the system. This module allows employees to record the attendance hours or the overtime information on a daily/weekly basis so that employees, managers, and HR administrators can view, approve, or reject employees’ time sheet requests. In addition, time data can be released to the payroll system for further processing.
When a company is implementing the Payroll Time Sheet in SuccessFactors Employee Central and designing the attendance types and time evaluation rules, approval hierarchy all these processes plays a major role that determines a lot of process-design decisions. These include finalizing holiday calendars and work schedules, shortlisting attendance types, designing the security setup, finalizing the approval hierarchy, and providing training to end users about how to enter their attendance data. Once the attendance data is in the Employee Central system, companies should be ready to integrate with the payroll system to process the payroll based on the time evaluation results. With the introduction of the Employee Central Payroll Time Sheet, organizations gain the ability to define and better organize their time and payroll management process integration.
The following is a detailed description of the Payroll Time Sheet functionalities available in SuccessFactors Employee Central and an introduction to the basic configurations required for Payroll Time Sheet and workflows, business rules, security set up, and recording the time sheet.
Overview of the Payroll Time Sheet Functionality
The Time Off module allows users to request any leave or time off to which they are entitled, and stores only the absences. The Payroll Time sheet functionality, on the other hand, allows employees to record their attendance, working time, and overtime hours in the time sheet and request the approvals before sending the data to the payroll system.
Companies have a great deal of flexibility when designing Payroll Time Sheets in Employee Central. To meet company-specific requirements, they can create different attendance types and time type groups for various time evaluation calculations. These options, in turn, give managers and HR administrators more flexibility in the results and approval workflow processes.
Figure 1 shows the different objects involved in the Payroll Time Sheet and the Time Off functionality. Holiday calendars and work schedules are defined in the Time Off module that are used as the basis for Payroll Time Sheets. As a prerequisite to this process, they should already be available in Employee Central. I discuss each of these Payroll Time Sheet objects in more detail as follows.

Figure 1
Overview of the Payroll Time Sheet objects
Time type groups: These are used to group the time types to calculate the time valuation. These help calculate the final results for the time valuation.
Time valuation: This helps calculate the results for payroll. Based on the time type groups and time data stored, the results are calculated to send the final time data to the payroll system.
Time recording profile: This profile is used to set the default time type for employees to record their attendance in the Payroll Time Sheet. This helps in grouping all the Time Sheet configuration and helps end users to select and store the Time Sheet that is applicable to their respective assigned time profiles.
Next I show how you enable the Payroll Time Sheet functionality.
Enable the Payroll Time Sheet in Employee Central
To access the Payroll Time Sheet in the SuccessFactors Employee Central portal, you need to activate the Payroll Time Sheet functionality in PROVISIONING. PROVISIONING is the web-enabled tool that allows trained users who have access to activate or deactivate such functionalities in SuccessFactors. PROVISIONING is provided to partner users to implement the SuccessFactors product.
Note
PROVISIONING is also used to upload the XML code of the configuration
each time the coding is changed, but that topic is beyond the scope of
this article as XML code is not being loaded in the example scenario.
Log on to PROVISIONING with the user name and password provided by SuccessFactors (this is unique per partner user). Once logged into PROVISIONING, you can see the number of instances or systems attached to the log-on ID on the main screen, as shown in Figure 2. In my example, there are six instances aligned with the logged-in user ID. Here you select the system or instance for which Payroll Time Sheet needs to be enabled. In this example, I am enabling the Payroll Time Sheet and generic objects functionalities to activate the modules to the Article Demo system. To achieve this, follow these steps.

Figure 2
The initial PROVISIONING screen showing the instance details
Note
In this article, the terms instance and system are used interchangeably.
To change the company settings to enable the Payroll Time Sheet and Generic Objects, select the instance Article Demo (boxed in Figure 2). Once you click the Article Demo system link, the screen in Figure 3 opens, where you are able to access all the possible settings for the selected system.
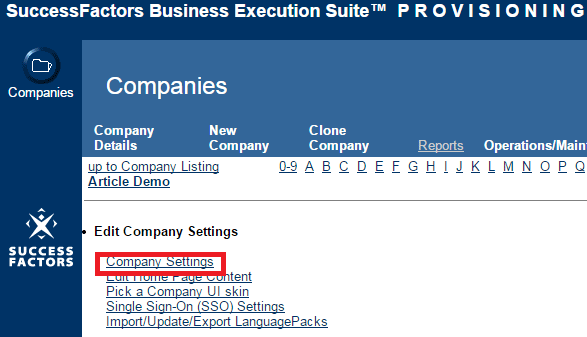
Figure 3
Open the Company Settings link to edit it
Under the Edit Company Settings section, click the Company Settings link (Figure 3). This opens the screen in Figure 4 where all the system-level configuration settings are maintained. Scroll down the page to look for the Enable Time Sheet and Enable Generic Objects options and select the requisite check boxes (if they’re not selected already). Then click the save features icon to save your changes.

Figure 4
Enable the Payroll Time Sheet and Generic Objects options
Once you’ve completed these simple steps, the Payroll Time Sheet and Generic Objects functionalities are available in the system for configuration. Log out of PROVISIONING to proceed with the next steps.
Activate the Payroll Time Sheet Tab
Next you activate the Payroll Time Sheet tab so that it appears on the Employee Central employee maintenance screen for the users to perform the transactions. This is done under Administration Tools (commonly referred to as Admin Tools or OneAdmin) in the SuccessFactors Employee Central instance. Log on using the link and the user credentials provided for your implementation. This opens the OneAdmin screen shown in Figure 5. Under the Employee Files option, select the Configure Employee Files link.

Figure 5
The OneAdmin screen
This opens the Design Employee Files Layout screen (Figure 6). Select the Time Sheet check box and save your changes. These settings give users access to the Payroll Time Sheet screen in the Employee Central system, where they can make changes.
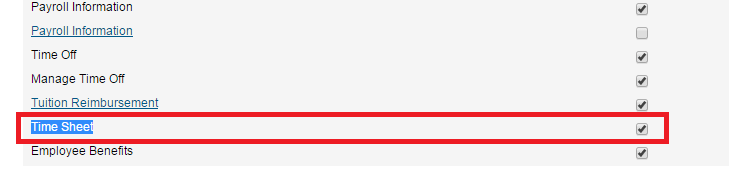
Figure 6
Select Time Sheet to activate to access for the user
Enabling Security to Access the Payroll Time Sheet
Once the Payroll Time Sheet and Generic Objects functionalities are enabled in PROVISIONING, you need to grant permission to users to access and configure the Payroll Time Sheet and Generic Objects. This is done in the Employee Central portal under OneAdmin. First, determine what level of accessibility to give to the user for the Payroll Time sheet (e.g., view, create, edit, or delete). Then set up the security access in Employee Central for the user or role to manage the security using the system admin access, the security role/user setup, or the implementation.
Set-Up User Permissions
Once the Time Sheet tab is activated, you need to give approved users access to this tab so that they can update their time sheets. Most companies allow employees to initiate, view, and cancel time sheet requests themselves, but only give access to managers or HR administrators to create or modify employees’ time information and approve the time sheet. For that reason, I am using those parameters in my example scenario. This access is set up as follows.
In the OneAdmin screen, click the Set User Permission icon (Figure 7) and, from the options that open, select the Manage Permission Roles.

Figure 7
Configure the user’s permissions
The Manage Permission Roles link opens the Permission Role List where all the defined roles for the implementation are created. In this example, you are creating a new role as Employee Self-Service to provide access at the employee level. Click the Create New button as shown in Figure 8.

Figure 8
Set up the permissions for the defined role
The Permission Role Detail screen in Figure 9 opens, where you configure the security settings for the new role to be created. Enter the Role name and Description as shown in Figure 9 to set up the selected fields or portlets by role. Then click the Permission… button to open the Permission settings screen (Figure 10), where you set up the security settings for the role.
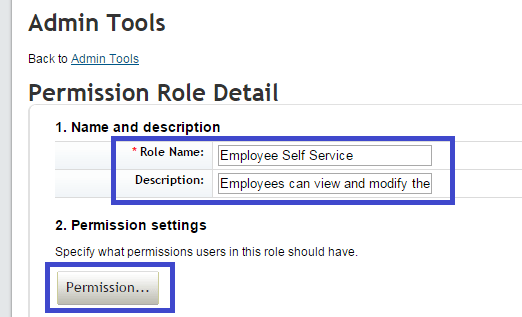
Figure 9
Set up the permission details for the role

Figure 10
Activate employee access to the Time Sheet screen
Here (Figure 10) you set up the different levels of access to the different screens, portlets, or modules available to the employee in SuccessFactors. In this example, you’re setting up the security for the Time Sheet module. Select Employee Views to activate the Time Sheet portlet for the user. This opens the pane in the right of Figure 10 where you give the user access to the Time Sheet functionality. Select the Time Sheet check box and click the Done button (not shown) to save your settings. Once these options are selected and saved, the Employee Self-Service role has access to see their Time Sheet screen in the employee view section of Employee Central.
By activating the Time Sheet feature for the selected user role, the Time Information section is now available to the employee under their Employee Records section in Employee Central. The next step is to enable employees with the Employee Self-Service role to view their Time Information data on the Job Information portlet.
Under User Permissions, select the Employee Central Effective Dated Entities option (Figure 11), which opens the pane to the right where you can see the Permission Settings for that role. Select the check boxes next to the permissions you want to allow—in this example, Holiday Calendar, Work Schedule, Time Profile, and Time Recording Profile. Then click the Done button (not shown) to save your changes. Now employees with the Employee Self-Service role are able to see the fields under Job Information as shown in Figure 12.

Figure 11
The job information and time information access settings

Figure 12
The time Information field settings on the Job Information screen
HR administrators (or the role responsible for managing employees’ time information) need additional access to manage employees’ time sheet data. To manage the time data, select the time-data-related fields (available on the Job Information portlet security screen) that you want to provide to the user, as shown in Figure 13 (in this example, for the HR Administrator role).

Figure 13
Permission Role settings for additional roles
In this example, the Holiday Calendar, Work Schedule, Time Profile, and Time Recording Profile check boxes are selected to give access for these fields to the HR Administrator role for their assigned employees on the employees’ Job Information portlets. In the Manage Time Off section, tick the Select All and Time Account check boxes and the All radio button. This gives this HR Administrator the ability to View Current, View History, Edit or Insert, Correct, and Delete time data (e.g., to give all levels of access to the HR Administrator to act on for the employee’s time information fields). Click the Save button (not shown) to save your changes to the Permissions settings section. Note that, based on company-specific requirements, these settings may change per implementation.
Once these field-level settings are done, you need to provide access to HR Administrators to manage employees’ time accounts, time structures, and time off calendars. These security settings are under the Administrator Permissions > Manage Time Off section. Make the same security settings as shown in Figure 3 to complete the security configuration.
Once the settings for accessing and configuring the Time Sheet feature are set up, the next step is to start configuring the Payroll Time Sheet settings.
Define Attendance Types
In Employee Central, all the company-specific attendance types (e.g., business travel, overtime, trainings, and so on) are defined following menu path Company Settings > Manage Time Off Structures > Create New > Time Type (Figure 14).

Figure 14
Attendance Type creation screen
In this example, business travel attendance, which is to be recorded hourly, is being created as shown in Figure 14. If the attendance type is specific to any country, select the relevant country from the country field drop-down options; otherwise, leave it as No Selection. Select Attendance as the Category if not selected from the drop-down list and Hour(s) as the Unit. Choosing the Unit option gives users the ability to select attendance to be recorded either in hours or days. Select the unique External Code and Attendance Name (BUS_TRAVEL and Business Travel in this example).
Create Time Type Profiles
The time type profile defines the types of attendances (e.g., time types) that employees are entitled to record in their Time Sheet. Time types (attendances/time offs) are assigned to the time profile for employees to record during the Time Sheet request process. Time profiles are assigned to employees in the Job Information portlet.
In this example, the Global Standard Profile time type profile is created to which the attendance time types along with the time-off time types are assigned (Figure 15). When an employee is assigned this profile in their Job Information portlet (Figure 16), they have these assigned attendance types in their Time Sheet portlet to select and record.

Figure 15
Configure the new time type profile
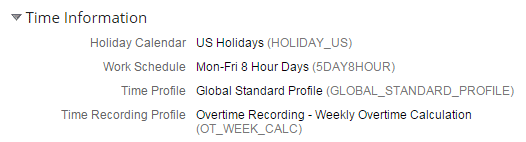
Figure 16
Job Information portlet with the assigned Time Profile and Time Recording Profile
Create the Time Type Groups
Time type groups are created to help with time valuation. Attendance types of a similar nature are grouped and assigned to one time type group. For example, all overtime or working time types (like business travel and training) are included in one time type group.
Based on the time type groups assigned in valuation, the final time results are calculated to send the results to the payroll. In Employee Central, time type groups are defined from OneAdmin by following menu path Employee Files > Manage Data > Create New > Time Type Group (Figure 17).

Figure 17
Time type group with the time type assigned to it
In this example, you are creating the Global Recorded Working Time group. Here (Figure 17) you define the Time Category, the Time Type grouping, and the source from which the time data gets updated. In addition, you select the time valuation results (which affects any pay components) to be transferred to the payroll system using the Application Programming Interfaces (APIs). In this example, the working time and vocational training time data that is entered by the employee is used to calculate the time sheet results.
Table 1 is a handy guide to the sections and fields shown in Figure 17. This table lists all the fields and their options, definitions, and attributes.
| Field name |
Definition/Attributes |
External Name
|
The name of the time type being created. In the example scenario, this is stored as Global Recorded Working Time.
|
UI Component
|
This field has Yes or No drop-down options.
|
Time Category
|
This field helps in defining the source of time data and what type of time type the group is carrying. These are the options from which to choose:
1. Recorded Working Time or Recorded Overtime: Time data is considered only for those time data entries that are entered in the Payroll Time Sheet for the time types assigned in the selected time type group.
2. Paid Absences, Unpaid Absences, or Unpaid Overtime Relevant absences: Time data is considered only for those time data entries that are entered in the Time Off portlet for the absence time types assigned in the selected time type group.
3. Paid Holidays: This is where the time data is captured from the assigned holiday calendar. For this category, the time types are not assigned to the time type group.
4. Scheduled Working Time: This is where the time data is captured from the work schedule assigned to the employee. For this category, the time types are not assigned to the time type group.
5. Calculated Time: If this option is selected, the time data is calculated based on the output generated from the valuation for the time types grouped in the selected time type group. For this category, the time types are not assigned to the time type group.
|
Pay Component
|
This is a drop-down field with Yes or No options. If the valuation results needs to be sent to the payroll system using APIs, select the Yes option, otherwise select No.
|
Comment box
|
This field is for any comments about the time type group. Users can enter instructions or details for how and what this time type is to be used. This is an optional field.
|
External Code
|
This field is the unique ID used for each implementation to create the unique time type group to follow the naming standards used in the implementation.
|
| Time Type |
In this field the relevant time type is assigned for the group being created. In the example scenario, the Working Time and Vocational Training time types are assigned. When this time type group is assigned to the valuation, only these assigned time types are used for valuation.
|
Table 1
Time type group reference guide
Set Up the Time Valuation
Time valuation helps in calculating the results for the payroll system. Based on the time type groups used and the time data stored, results (in hours) are calculated to send the final time results to payroll.
In this step, you assign the time type groups as input that needs to be considered for the valuation calculation for the output value. This is supported by the threshold time type group or fixed threshold value, which provide a reference point for getting the results. For example, if you are calculating the weekly overtime (as per the example in Figure 18), all the time type groups to be considered for entering the time data are assigned. Assign Scheduled Working Hours as the Threshold Group. This acts as a reference point for calculating the overtime that is beyond the scheduled working hours. In Employee Central, Time Valuations are defined from OneAdmin using the path, Employee Files > Manage Data > Create New > Time Valuation (Figure 18).

Figure 18
Time Valuation with Time Type Groups assigned
Table 2 is a handy guide to the sections and fields shown in Figure 18. This table lists all the fields and their options, definitions, and attributes.
| Field name |
Definition/Attributes |
External Name
|
This field is the name of the time valuation being created.
|
Time Type Group Below
|
The time type group defined in this field is used as the output time type group for the time valuation results up to the given threshold value. Only the Calculated time category time type groups should be selected for this field from the drop-down options.
|
Time Type Group Above
|
The time type group defined in this field is used as the output time type group for the time valuation results above the given threshold value. For this field, too, only the Calculated time category time type groups should be selected from the drop-down options.
|
Threshold Group
|
The time type group assigned in this field gives the threshold value to be considered when running the time valuation results. If the Threshold Type is selected as a time type group, then only this field is selected with the relevant time type group. The group selected here sets the reference point for calculating the output of the valuation results.
|
Valuation Method
|
In this field you select how the valuation needs to be calculated; for example, if the valuation needs to be done per day or for the entire weekly time sheet.
|
Threshold Type
|
This field defines how the threshold should be calculated, either based on a fixed value or using the time type group selected.
|
| Threshold Value |
If the threshold type chosen is a fixed value, then the threshold value should be entered as hours in this field. |
External Code
|
This field is the unique ID used for each implementation to create the unique time type group to follow the naming standards used in the implementation. |
| Input Time Type Group |
In this field you define all the time type groups that need to be calculated for the time valuation output. |
Table 2
Time valuation reference guide
Create the Time Recording Profile
The Time Recording Profile is used to set the default time type an employee can use in the Payroll Time Sheet. This helps in grouping all the Time Sheet configurations and helps end users store selections and the Time Sheet data applicable to their assigned respective time profiles. In Employee Central, Time Recording profiles are defined (from OneAdmin) by following menu path Employee Files > Manage Data > Create New > Time Recording profile (Figure 19).
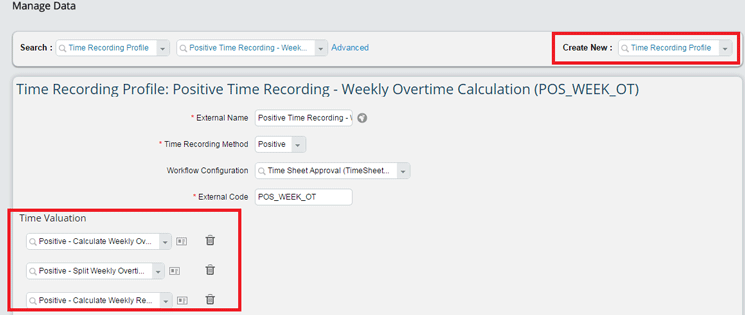
Figure 19
The Time Recording Profile with Time Valuation assigned
In this example, you are creating a Positive Time Recording. This allows users to enter the positive time data that uses the Time Sheet approval workflow to approve the time data entered by the end users. Here you assign three time valuations to calculate the time data that is to be sent to the payroll system. This profile uses a three-stage valuation.
Table 3 is a quick guide to the different sections and fields shown in the screen in Figure 19. This table lists all the fields and their options, definitions, and attributes.
| Field name |
Definition/Attributes |
| External Name |
The field for the name of the Time Recording Profile being created.
|
| Time Recording Method |
This field defines the time recording method. The drop-down options for storing the time data from the Payroll Time Sheet are Positive, Overtime, and Only Absences.
|
| Workflow configuration |
This field is where the workflow used to approve the Time Sheet created by the end users is attached.
|
| External Code |
This is the unique ID used in each implementation to create the unique time valuation to follow the naming standards used in the implementation.
|
| Time Valuation |
This field is where the user enters the relevant time valuation for the selected Time Recording Profile. Based on the number of time valuations assigned, this profile runs a valuation per the assigned time valuations before calculating the final time data.
|
Table 3
Time Recording Profile reference guide
Assign the Time Recording Profile
Once the Time Recording Profile is created, it should be assigned to the Employee’s Time Information section under the Job Information portlet as shown in Figure 20.

Figure 20
The Time Recording Profile is assigned in the Job Information portlet
Create a Workflow for Time Sheet Approval
Based on the requirements, workflows are created for approving the Time Sheet. In this example, you create a workflow that requires the employee’s manager’s approval and sends notification to the employee’s HR Administrator. In this workflow, when the employee creates and submits the Time Sheet, the request is passed on to the employee’s manager for approval. The manager then has the option to approve or reject the request.
In Employee Central, workflows are created in One Admin by following menu path Employee Files > Manage Organization, Pay and Job Structures > Create New > Workflow (Figure 21).

Figure 21
Workflow configuration for the Time Sheet approval process
In the Step 1 section, select Manager from the Approver Role drop-downs options; this gives the manager permission to approve (or reject) Time Sheets. In the Cc Role section, select Employee HR in the CC Role field for notification. Once the employee creates the time sheet and submits it for approval, the manager receives a notification and alert in his or her To Do list on the Employee Central home page. Once the manager approves (or denies) the request, the employee’s HR Administrator receives a notification.
Create a Business Rule for Generating the Workflow
After creating the workflow, a business rule needs to be created and assigned to the employee Time Sheet to trigger the workflow whenever the employee creates a time sheet. Business rules can be created in OneAdmin by following menu path Company Settings > Configure Business Rules > Create New Rule (Figure 22).

Figure 22
Business rule configuration to initiate workflow
Figure 22 shows the business rule created for initiating the workflow whenever the employee creates and submits a Time Sheet. Per this workflow, if the approval status is in the To Be Submitted or To Be Approved stage, Time Sheet Approval workflow is triggered and sent to the employee’s manager. Once the business rule is created, this rule needs to be assigned to the Employee Time Sheet object. To access the Employee Time Sheet from OneAdmin, follow menu path Company Settings > Configure Business Rules > Object Definition > Employee Time Sheet > Make Correction (Figure 23).

Figure 23
Attach the business rule to employee time sheet
In the screen in Figure 23 (the employee time sheet object screen), click the Details link under Rules. In the screen that opens on the right, select the Time Sheet Approval WF business rule in the saveRules field drop-down list. Click the Done button to save these settings
These are the basic configurations required for successfully running the Payroll Time Sheet Feature of Employee Central. Based on your company’s specific requirements, additional configurations may be added.
Manjunath Bannur
Manjunath Bannur has been in the IT industry for over 13 years working in various areas of HR, including SAP ERP HCM (for 7 years) and now SuccessFactors Employee Central. He is experienced in implementing SAP ERP HCM and Employee Central globally.
You may contact the author at mbannur@gmail.com.
If you have comments about this article or publication, or would like to submit an article idea, please contact the editor.