Gain a detailed explanation of transaction code PPOME, its layout, and the functionalities behind buttons, icons, and menu items. All the information that can be accessed using this transaction is introduced, along with exact access points. Learn how to customize the look and feel of transaction code PPOME based on your company’s needs.
Key Concept
Structural Graphics is an SAP ERP HCM Organizational Management application tool that you can use to display and edit structures and objects in an organizational plan. The most notable advantage of this tool is that it lets the user view objects and structures and perform a variety of maintenance activities for the objects in a graphical format.
Transaction code PPOME is an integral part of the SAP ERP HCM Organizational Management (OM) component. I explain, in detail, all about the different sections of the screen, and its buttons, menu options, and layout, along with the functionalities and hidden features associated with each. Learning more about this transaction code and its functions helps users get the maximum performance from the system on the way to managing their organizational structure. By using transaction code PPOME effectively, users achieve a faster and more effective OM process.
An Introduction to Transaction Code PPOME
An organizational plan is the functional structure of an enterprise, and is based on departments, positions, employees, and many other object types. In order to carry out business processes effectively, an organizational plan should be maintained within SAP ERP HCM system as a best practice.
Structural Graphics is a tool within the SAP ERP HCM OM application that is used to display and edit the organizational plan in a hierarchical manner. This tool’s advantage is that it gives users the option to maintain the organizational structure simply by using drag-and-drop functionality, and shows changes immediately in the display, graphically. Several transaction codes provide access to the Structural Graphics tool, including:
- PPOME – Change Organization and Staffing
- PPOSE – Display Organization and Staffing
- PPOCE – Create Organization and Staffing
- PPST – Structure Display/Maintenance
Transaction code PPOME is by far the most favored interface for accessing structural graphics—it is the heart of the OM component. In addition to presenting all the functionality on a single screen, the customizability of this transaction’s functions is a big plus.
Before delving into the details of transaction code PPOME, however, the concept of a hierarchy framework deserves some clarification.
The Hierarchy Framework
The hierarchy framework is a platform provided in the standard SAP ERP system used to program applications for visualizing and modifying hierarchical structures and objects. The interface layout created using the hierarchy framework consists of a screen with discrete panels (Figure 1). On the left is the object manager and on the right are a validity area, an overview area, and an optional detail area. The hierarchy framework offers a wide range of configuration options and each specific configuration of the hierarchy framework is represented by a hierarchy framework scenario.
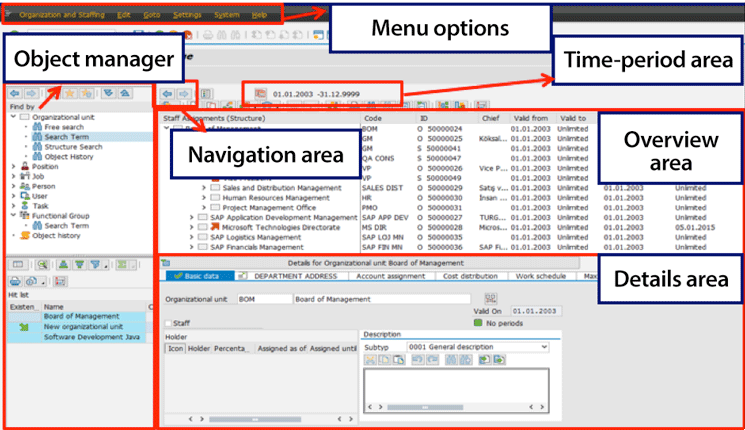
Figure 1
The hierarchy framework layout
The Interface Layout of Transaction Code PPOME
The screen elements of transaction code PPOME (shown in Figure 1) follow the standard interface layout of the hierarchy framework. In the rest of this article, I discuss each of these layout elements and provide more detail about when and why you would use them.
The Object Manager
The object manager is a permanent entry help (Figure 2). Using the object manager, you can search for and select the objects to be displayed by the system that can be edited and displayed. The object manager is composed of two subparts, the search area and the selection area.
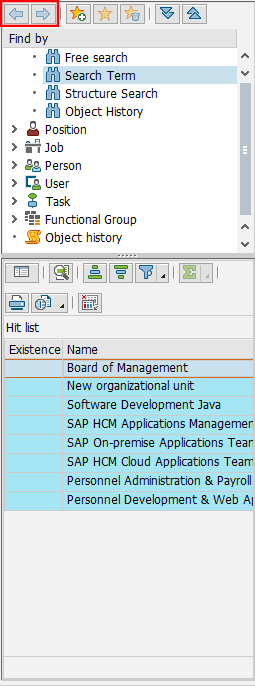
Figure 2
The object manager
Search area: In the search area, each object type has one or more search functions (e.g., the search term and the structure search functions). Each search function is marked with a binoculars’ icon  . In addition, the object types are marked with an object type-specific icon—for example, an organization-unit icon (
 ) for each organizational unit and a position icon (
 ) for each position. In addition, each object type itself contains a search function that can be launched when an object type name (e.g., organizational unit or position) is selected. In the search area, a search variant creation function lets users re-use previous search criteria or hits.
Selection area: In the selection area, the system displays the objects that end users have searched for and found. Based on the search function itself, this can be either a hit list or a structure. For example, if the structure search function is selected, the resulting objects are represented in a tree format. On the other hand, if the term search function is used, the resulting objects are displayed in a list. By right-clicking any object in the selection area, you can call up generic object services for that specific object.
Note
By following menu path Settings > Hide Object Manager (in Figure 1),
you can hide the object manager to make the screen area bigger (details
for doing this are provided below). You can use standard report
RH_DELETE_OM_USER_SETTINGS to reset the object manager settings for a
specific user.
The Navigation Area
Using the icons in the navigation area, you can switch back and forth between structures (boxed in red in Figure 2). This allows you to analyze object types in relation to other object types in diversified relationship types. Using these icons, you can navigate back to prior analysis results and return to the latest structural environment.
The Time-Period Area
The validity for the objects to be reported, created, or maintained is determined using the start and end dates and the time period fields in the time-period area. In the screen in Figure 1, double-click the icon on the left of the time period to open a screen like the one in Figure 3. Depending on the values entered here, the snapshot of the organizational structure in that specific time period is displayed. Furthermore, the objects and relationships created or maintained have the start and end dates specified in this area.
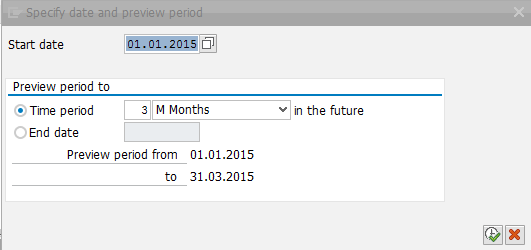
Figure 3
Enter the time period specifications using a date range
To determine time periods, you first need to specify the start date. Once this has been specified, then you can assign a time period range that is relative to the start date or enter a specific end date (Figure 4). In either case, the system automatically populates the Preview period from and the Preview period to dates.
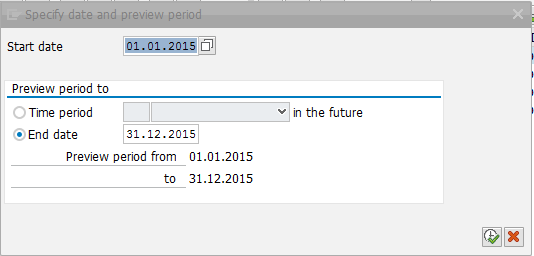
Figure 4
Enter the time period specifications using a specific end date
The Overview Area
The selected object along with its environment is displayed in the overview area. The environment refers to the object being analyzed as well as other object types related to this object type using diverse relationship types. There are numerous icons at the top of the overview area (the ribbon), shown in Figure 5. The details for their functionality are as follows.

Figure 5
The ribbon of the overview area
Services icon  : By using this icon, you can switch between the different representations of an object’s environment—in other words, you can select the evaluation path used for generating the environment (i.e., the objects and relationship types in between).
Create icon  : This icon is used to create an object along with the necessary environment.
Copy icon  : This icon is used to copy an object along with the necessary relations. You can copy objects one by one or mass copying is possible.
Assign icon  : This icon is used to assign an existing object to another existing object. All the necessary relationships are automatically generated by the system.
Delimit icon  : This icon is used to delimit (e.g., specify an end date) either an object or an assignment (i.e., relationship).
Delete icon  : This icon is used to delete either an object or an assignment.
Move up and down icons  : Using these icons, you can align objects with object IDs in ascending or descending order by default in the overview area. To change alignment, use these icons to move objects up or down within the environment.
One-level-up icon  : You can use this icon to move the upper object of the top node (if there are any) into the environment that is displayed in the overview area.
Print icon  : You use this icon to print a current snapshot of the object and environment.
Find icons  : You use this icon to search for a specific object or proceed to the next object fitting the search options.
Expand/Collapse node icons  : You use these icons to expand or collapse the specific part of the tree being analyzed.
Display-evaluation-path icon  : You can use this icon to view the details of the selected evaluation path. An example is shown in Figure 6.

Figure 6
Staff assignments along organizational structure and evaluation path details
Format-structure-graphically icon  : If the OrgPublisher program is installed and properly configured, you can use this icon to report the organizational structure within that program. The rest of the overview area presents the object along with its environment as shown in Figure 7.

Figure 7
Object and object environment overview subarea
The Details Area
All relevant infotypes of the selected object are displayed in the details area (Figure 8).
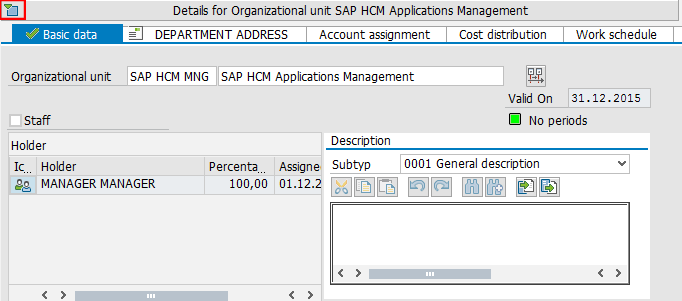
Figure 8
Details area
Information specific to the object can be maintained by selecting the relevant tab of the specific infotype. You can use the details icon (boxed in red) at the top of Figure 8 to hide and show this area (the specific name of which depends on the object being maintained).
Transaction Code PPOME Menu Options
You can access the transaction’s menu options in the ribbon at the top of the PPOME main screen (Figure 9). Some of these menu options are used to make system settings whereas some of them provide shortcut access to other organizational management features and screens. I explain some of the most used menu options in the following sections.
Create Jobs
Jobs are generally tied to positions in order to end up with a thorough organizational structure. Jobs can be created via transaction PO03 (the expert mode transaction for Job object). However, using the relevant menu option, one can create jobs within transaction PPOME and eliminate the time and effort of working in a separate transaction. This function is particularly advantageous when you’re creating a new position and you realize that the job to be tied to the position is missing. To execute this menu option, go to the screen in Figure 1. Click Edit in the ribbon at the top, and then the Create jobs… option. This opens the pop-up screen in Figure 9 where you can make your entries to create a new job.
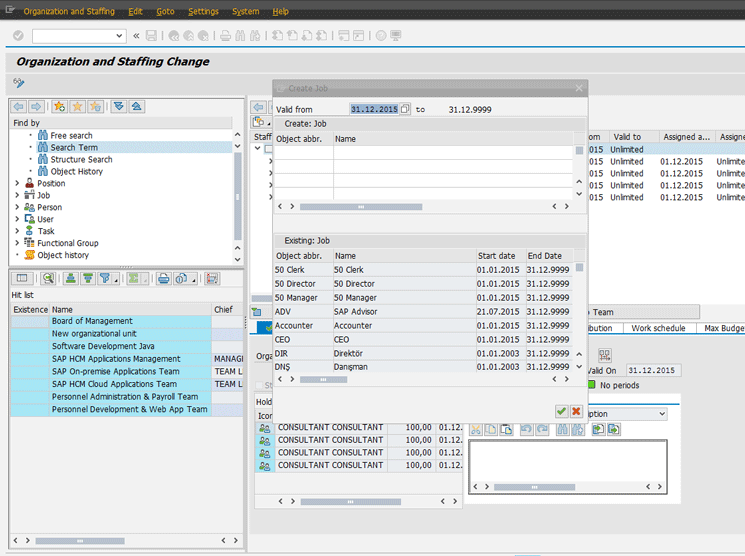
Figure 9
Create a new job without executing transaction code PO03
Enhance the Object Description
The expert mode transaction PP01 gives more room to the user to enhance organizational objects in maximum detail. This transaction code (e.g., expert mode) is used for displaying, creating, or editing the infotypes of a specific object using specific plan statuses (i.e., Active, Planned, Submitted, Approved, or Rejected). In some cases, the user of transaction PPOME may need to access some other infotypes of an object that are not residing in the detail area. They also may have to work in different plan statuses and need to access transaction PP01.
For these cases, the system provides a shortcut to expert mode transaction code PP01 within transaction code PPOME to eliminate the time and effort of working in a separate transaction. To open transaction code PP01 click Goto in the ribbon in Figure 1 and select Detail object and then Enhanced object description. This opens the Maintain object screen (transaction code PP01 for the selected object) as shown in Figure 10.
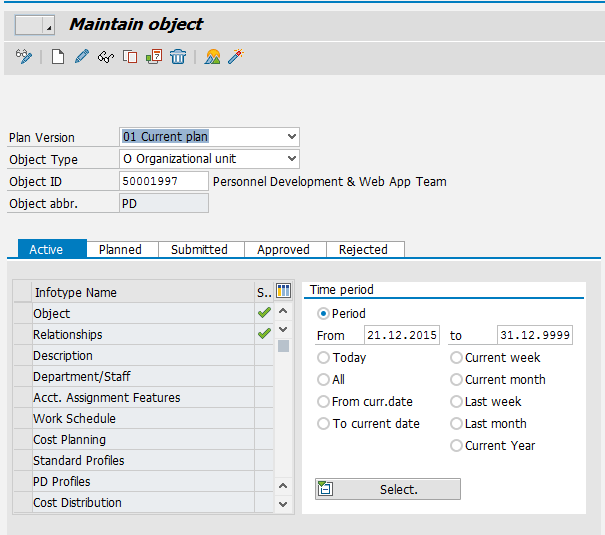
Figure 10
Maintain infotypes in expert mode
In transaction code PP01, select a plan status tab (e.g., Active, Planned, Submitted, Approved, or Rejected) for the selected object and infotype name. Then, using the function icons in the top ribbon (e.g., the create infotype, change infotype, display infotype, and so on), select the appropriate icon to make your changes to the infotype.
In the example in Figure 10, the Relationships (1001) infotype is being maintained for Organizational unit object 50001997. The validity period of the infotype is set in the Time period section on the right.
Switch Organizational Structure Views
To switch the organizational structure, again click Goto in the ribbon in Figure 1 (shown in Figure 11, on the left), but this time select the Switch views…. option, which opens the pop-up on the right. This option lets users switch between different views of the organizational structure. In other words, you can switch between transactions that are using the hierarchy framework (e.g., the view OME1 refers to transaction code PPOMW – Organization and Staffing [Workflow] Change).

Figure 11
Switch between different transactions that use the hierarchy framework
Maintain the Interface
To maintain the interface, go to Figure 1, but this time click Settings in the ribbon and then select Maintenance interface… from the drop-down options (not shown). This opens the screen in Figure 12 with transaction code PPOM. (Transaction code PPOM [Organizational Plan/Change] is an older version of the PPOME transaction that is still preferred by some users as it requires very little system knowledge.)
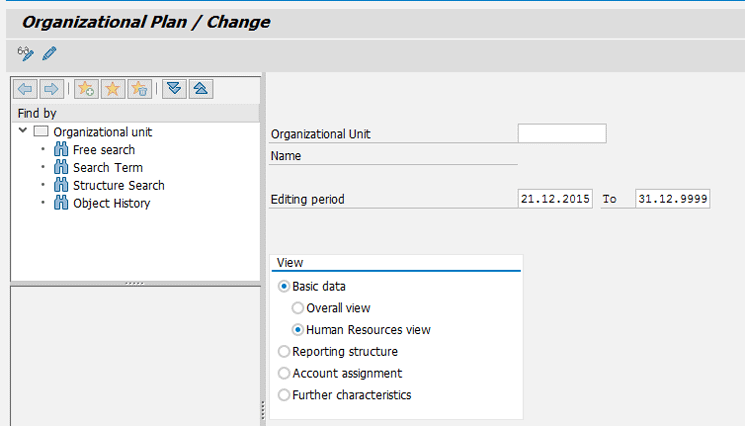
Figure 12
Access transaction code PPOM from transaction code PPOME
When you select an organizational unit, time period, and view in transaction code PPOM, the system opens the organizational unit and its environment in an interface where the options are limited and the end user needs minimum knowledge to carry on the necessary edits (Figure 13).

Figure 13
The organizational structure accessed via transaction code PPOM
Create Several Objects
To create several new objects at once, click Settings in Figure 1 and choose the Query Time Period/Create Several Objects option. In the screen that opens on the right of Figure 14 you can specify that, when organizational changes are carried out using a drag-and-drop functionality, the system queries the validity period of the change. This option is especially beneficial for eliminating object/relationship validity periods for organizations in which mass data changes are carried out extensively.

Figure 14
Turn on (or off) time-period querying when mass changing/creating objects
Dilek Adak
Dilek Adak has her MBA and is a computer engineer working as an SAP HCM Applications Manager for Vektora, Turkey. She has over 12 years of consultancy experience in SAP HCM, SuccessFactors, and SAP Analytics applications. Dilek is a frequent speaker at various international events on SAP HCM topics.
You may contact the author at dilek.adak@vektora.com.
If you have comments about this article or publication, or would like to submit an article idea, please contact the editor.


