SAP Access Control 10.0 uses the standard SAP Business Workflow for all approval processes in the application, including user access requests. This very robust workflow engine supports more flexible multitiered routing and approval matrices. At the same time, workflow configuration in version 10.0 is one of the areas that underwent significant change and therefore requires delta training for implementers who are already proficient with the previous release 5.3 of the application. Learn how to configure the workflow engine in version 10.0 leveraging SAP NetWeaver’s Business Rule Framework Plus (BRF+).
Key Concept
SAP Access Control 10.0 comes with a variety of capabilities to analyze and mitigate access risk, manage user and emergency access, and manage business roles. Many of these capabilities include approval steps managed by a workflow engine in their business logic. The previous Java-based release 5.3 of Access Control came with its own proprietary workflow engine. With the recoding of version 10.0 in ABAP, it became possible to leverage the SAP Business Workflow, which is a standard technology already delivered with the SAP NetWeaver Application Server ABAP on which the application is deployed. The SAP Business Workflow technology opened the door to more state-of-the-art workflow features to determine the correct routing of workflow items. Its configuration is very flexible and can be based on pre-delivered content for quick results. It also supports the inclusion of SAP NetWeaver’s Business Rule Framework Plus (BRF+) rules, function modules, and ABAP classes to cope with responsibilities in more complex organizations.
SAP Access Control 10.0 relies heavily on workflow to process not only access requests but also other tasks supported by the diverse capabilities of the application. Table 1 lists all workflow-enabled processes in the application. In this article, I focus on access request approval workflow, but the other workflow processes work likewise. On a high level, each of these workflow processes comprises the following elements (Figure 1):
- One initiator rule: Different from the previous version, 5.3, there can be only one active initiator rule for a given process (e.g., for access request approval workflows). The initiator rule evaluates the request attributes (e.g., request type, employee type, and role names) and returns a result value, which corresponds to a workflow path to route the request along.
- One or multiple paths: Depending on the request attributes, the initiator rule can return different result values and route the request along different paths.
- One or multiple stages per path: Each path can contain multiple stages to request approval from different stakeholders in your organization, such as line managers, role owners, or security administrators.
- Optional routing rule and detour paths: A (standard) path can fork into a detour path, if a specific condition specified in a routing rule is met. An example for a routing rule is the absence of a role owner in the master data of a requested role. This routing rule is useful in cases in which a stage in the standard path requires role owner approval. Again, a detour path can consist of multiple stages.
It is possible to configure access request approval workflows for automated provisioning to the target systems as soon as the request is approved in the last stage. This step is done via IMG menu path Governance Risk and Compliance > Access Control > User Provisioning > Maintain Provisioning Settings. Because of the resulting topology allowing for multiple paths and stages per path, the workflows are called Multistage-Multipath (MSMP) workflows.
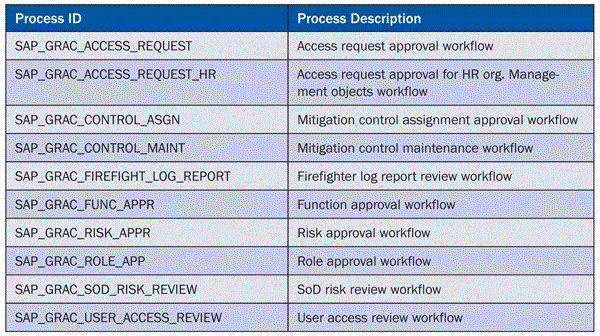
Table 1
Workflow processes in SAP BusinessObjects Access Control 10.0

Figure 1
High-level structure of a workflow process in SAP BusinessObjects Access Control 10.0
With the change in technology in version 10.0, some key terms in the context of workflow have changed. Table 2 summarizes the changes, and the remainder of the article examines their use.

Table 2
Changes in workflow key terms in SAP BusinessObjects Access Control 10.0
Note
For more detailed information on client and server components making up the SAP BusinessObjects GRC Suite 10.0, new features coming with SAP BusinessObjects Access Control 10.0, and the migration procedure to the new release, refer to my articles, “
An Overview of the New Harmonized Version 10.0 of SAP BusinessObjects GRC Solutions,” “
How to Migrate Your Current SAP BusinessObjects Access Control Deployment to Version 10.0,” “
Get Your System Clean with Compliant User Provisioning,” and “
What’s New in Version 10.0 of SAP BusinessObjects Access Control?”
Also, note that this article assumes that the application is installed and all post-installation steps are completed, including the activation of the Business Configuration Set (BC Set) GRC_MSMP_CONFIGURATION containing pre-delivered workflow content. For detailed instructions on those steps, refer to the material you find in the SAP Community Network under https://www.sdn.sap.com/irj/bpx/grc in the key topic section for SAP BusinessObjects Access Control.
Maintain MSMP Workflow
The configuration tool can be launched via IMG menu path Governance, Risk and Compliance > Access Control > Workflow for Access Control > Maintain MSMP Workflows. It provides a guided procedure in seven steps to configure a workflow (Figure 2). The following subsections examine each step in more detail. It is important to understand that the configuration tool is used to plug existing initiator, agent, and routing rules into a workflow process; however, the rules themselves are created outside the tool, as I explain later.

Figure 2
The configuration tool for MSMP workflows
Step 1. Process Global Settings
Select the process for which you want to customize the workflow — for example, the access request approval workflow. Click the Display/Change button to switch to edit mode (Figure 3). In the lower part of the screen, you can specify the optional settings that apply for the selected process across all paths and stages. These are the escalation settings, which haven’t changed with version 10.0, and notification settings. The latter determine if and to whom email notifications are sent in the event of a request submission and a request closure and specify the email template to be used for the notification. There are more places in the course of workflow configuration where you can invoke email notifications, and there is also the option to create custom templates and include variables. This topic, however, would justify an article on its own and is excluded from this article. Refer to the guide available on this topic in the SAP Developer Network.
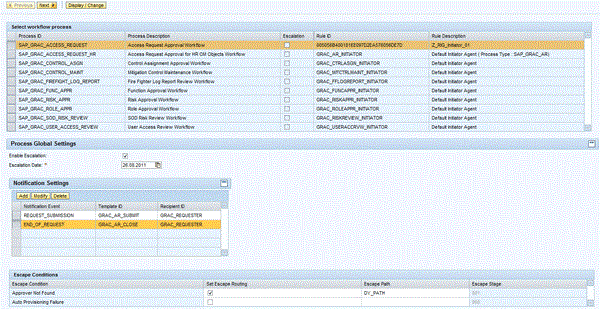
Figure 3
Process global settings
Step 2. Maintain Rules
Clicking the Next button in Figure 3 takes you to step 2 (Maintain Rules) for the process selected in step 1. The List of Rules section of the screen shown in Figure 4 lists all pre-delivered rules available for the selected process. There are four different rule types:
- Initiator Rule: Determines the path to route a request through
- Agents Rule: Determines approvers from request attributes
- Routing Rule: Contains conditions to route a request from a given stage into a detour path
- Notification Variables Rules: Determines the variable values at runtime used in notification emails

Figure 4
Maintain rules
You can create additional rules outside the configuration tool to meet the requirements of your organization and include them via the Add button into the list of available rules. A rule that appears in the list isn’t necessarily used in the workflow process. It is just available to be picked up in later steps of the configuration. Technically, there are different ways to code a rule. These coded rules are called rule types, and they include these examples:
- Function module-based rules: A function module is coded to output rule results.
- ABAP class-based rules: An ABAP Class is coded to output rule results.
- Business Rule Framework Plus (BRF+) rules: Rules are defined in the BRF+ workbench to return rule results, depending on conditions inside the rule.
- BRF+ Flat Rule (line item by line item): A BRF+ rule is defined for only one line item (the rule is called once for each line item in the request). It is also referred to as BRF+ Easy.
I explain later how to create a simple BRF+ flat rule. For now, I assume that all rules needed are already in the system. If you select an initiator or a routing rule, the Rule Results section appears (Figure 4). It displays all result values that the selected rule can return. If you created the rule yourself, you need to add the result values manually by clicking the Add button. In step 6, they are mapped against paths.
In the Global Rules section shown in Figure 4, choose a Process Initiator rule and a Notification rule available in the list of rules for the selected process. Usually, you select a custom initiator rule to reflect your organization, but rely on the pre-delivered notification variables rule GRC_NOTIF_VAR_RULE_AR.
Step 3. Maintain Agents
There are two different purposes for agents being approvers and recipients of email notifications upon specific workflow events (Figure 5). The application comes with a number of pre-delivered agents such as manager and roles owner. However, you are likely to want to create additional agents to meet the requirements of your organization. Technically, there are different options — available in the application known as Agent Types — that help you create additional agents:
- Directly Mapped User: This option is the less flexible way, as you directly assign user IDs to the agents.
- PFCG User Groups: A user group created in transaction SUGR is assigned to the agent. All users assigned to this group turn into approvers or notification recipients.
- PFCG Roles: A role created in transaction PFCG is assigned to the agent. All users assigned to this group turn into approvers or notification recipients.
- GRC API Rules: This option is the most flexible, as it allows for any custom logic to derive agents from request attributes. Technically, you can create rules of any type mentioned in the previous subsection. The rule must already exist in the system. You simply assign your rule to the newly created agent and select the agent purpose — approver or notification recipient.

Figure 5
Maintain agents
Step 4. Review Variables and Templates
Specific events in the workflow cause email notifications to be sent out to agents with the Agent Purpose set to notification. Each workflow process supports a number of events for notifications:
- New work item
- Approval
- Escalation
- Request submission
- Request closure
- Reminder
Workflow events correspond in the application to message classes. Each message class is associated with a document object containing the message body. The application comes with pre-delivered document objects, but you can create customized document objects to replace the pre-delivered ones. You can look up the document objects in use for each message class in the Notification Templates section in the screen shown in Figure 6 and display or modify them in transaction SE61. Each workflow process comes with notification variables that are listed in the lower part of the screen. They can be included in customized document objects to refer to items such as user names or requested role names. Refer to the respective How-To Guide in the SAP Community Network to learn about more details.

Figure 6
Variables and templates
Step 5. Maintain Paths
This step in the configuration tool is where workflow paths and stages are actually assembled. You create a new path consisting of an ID and a description. Then, you add a sequence of stages to the path. You can add stages that are already in use for other paths or create new stages (Figure 7). The stages correspond to approval steps and have to be associated with an agent with purpose “approval.” This step is done on the bottom of the screen where you maintain the stage-path details (Figure 8).

Figure 7
Maintain paths

Figure 8
Maintenance of stage-path details
You can also assign further optional settings such as a routing rule for detour workflows and escalation settings. The example in Figure 8 shows a stage that is set up for approval by the role owners of the requested roles. If a role has multiple owners assigned in its master data, the approval of any one of them is sufficient. If no role owners at all were maintained in the master data of a requested role, the routing rule routes the request to a detour workflow. The path of the detour workflow is assembled as a separate path again in step 5 of the configuration tool, but later, in step 6, associated with the result value of the routing rule. Finally, the example also contains escalation settings that route the request to the security agent if it is not approved within 2880 minutes (two days).
If you click the Modify Task Settings button shown in Figure 8, the pop-up screen shown in Figure 9 appears. The Task Settings influence the actual execution of an approval or rejection of a request in that stage. The end user personalization (EUP) ID assignment allows for personalization of the approver screen. It is maintained via IMG menu path Governance, Risk, and Compliance > Access Control > User Provisioning > Maintain End User Personalization and referenced to by its ID. In the upper part of the pop-up shown in Figure 9, you specify the default stage details. They become relevant if you want to reuse this stage in other paths. All settings made in this screen are overwritten by the stage-path details settings explained before. Finally, determine with the Notification Settings button in Figure 8 which workflow events trigger a notification and to which notification agent it should be sent. The following events are available: approval, escalation, request forwarding, new work item ready for approval, and rejection.

Figure 9
Default stage settings and task settings
Step 6. Maintain Route Mapping
In this step of the configuration tool, you associate the result values from initiators and routing rules entered in step 2 with actual paths as defined in the previous step. In the case of initiators, this is straightforward — just remember to associate all possible result values with a path. In the case of routing rules, the association of detour paths depends not only on the result value but also on the Path ID and Stage Sequence Number (Figure 10). This way, the routing rule can be used in multiple paths and stages at the same time and fork each time into a different detour path. The detour path is entered in the To path ID field (Figure 10).
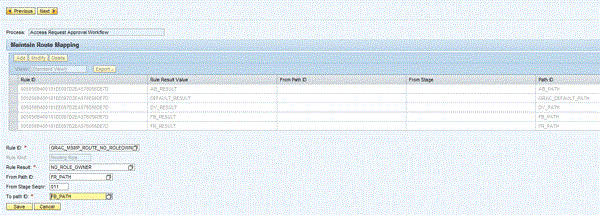
Figure 10
Maintain route mapping
Step 7. Generate Versions
In this last step, you save and activate settings you made in the previous steps (Figure 11). If necessary, you can configure a transport request. Generating workflow versions enables you to change the workflow configuration while there are other active running paths. Excluding Agents and Process Global Settings, all the other workflow configuration settings can be versioned. If the stage task setting Runtime Config Chng Ok in step 5 is enabled, once the change is activated in the system, the stage takes on the new settings; otherwise, the settings are used for any new requests after activation.

Figure 11
Save and activate settings
Workflow Configuration Parameters
Additional configuration parameters influence request and approval of user access requests globally. They are set in IMG menu path Governance, Risk and Compliance > Access Control > Maintain Configuration Settings (Figure 12). Make sure they reflect your needs.

Figure 12
Access Control configuration settings affecting workflow processes
Leveraging BRF+ Rules
The Business Rules Framework Plus is part of the SAP NetWeaver stack and is leveraged in many SAP applications. On a very high level, it is used to turn a business context into one or multiple result values. In the case of user access requests, the business context is given by the request header and line item attributes. In the case of BRF+ Rules for agents, the result values are user IDs of approvers or notification recipients. Initiator and routing rules are just placeholders that are associated with concrete paths through which to route a request, as seen in step 6 of the workflow configuration tool. Now I examine the creation of the most common rule type, the BRF+ Flat rule. Like any other rule type, it is done in two steps:
- Generation of an empty BRF+ Flat rule
- Maintenance of the decision table of the BRF+ Flat rule
Generating an Empty BRF+ Rule
First, generate a BRF+ Flat rule shell that is compatible with MSMP workflow processes. This step is done via IMG menu path Governance, Risk and Compliance > Access Control > Workflow for Access Control > Define Workflow Related MSMP Rules as shown in Figure 13. Generate each Rule ID (Function) to its own unique application/Funct. Group when using BRF rules. Select Rule Type BRFplus Flat Rule (LineItem by LineItem) and Rule Kind being Agent, Initiator, or Routing Rule.

Figure 13
Generation of empty rule shells
Maintain the Decision Table of a BRF+ Rule
The BRF+ Workbench is a user interface (UI) that enables users to define, test, and maintain rules for various business scenarios without the need of ABAP code. It is also where you maintain the decision table of empty rule shells you generated in the previous step.
You open it up via IMG menu path Governance, Risk and Compliance > Access Control > Workflow for Access Control > Define Business Rule Framework. Open the decision table in the left pane under Expression > Decision Table (Figure 14) and click the Edit button. Also view the rule ID under the General tab. Unfortunately, you need this lengthy ID in the workflow configuration tool to refer to this rule. Click the Table Settings button to add request and line item attributes as condition columns to the table.
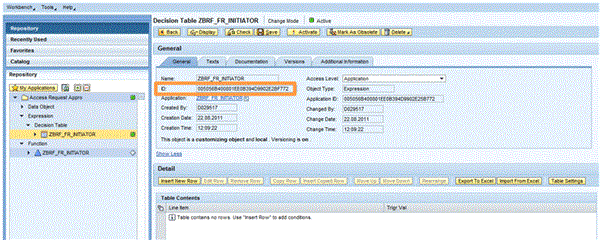
Figure 14
Accessing the decision table and viewing the rule ID
In the Condition Columns section (Figure 15), click the Insert Column button. From the drop-down list that becomes visible, select Context Data Objects in order to add attributes that will be used as the condition items in the Decision Table (Figure 15). Expand the structure GRAC_S_REQUEST_RULE_HEADER and select one or multiple attributes as condition items (Figure 16) – for example, request type (REQTYPE) and employee type (EMPTYPE). Notice that custom fields are only available to rules created after the creation of the custom field. Items can be selected from multiple structures. You find role line items; for example, ROLE_NAME from structure GRAC_S_REQUEST_RULE_LINE. Ensure that both result columns LINE_ITEM_KEY and RULE_RESULT (Figure 15) are checked as mandatory and click the OK button to return to the screen shown in Figure 14.
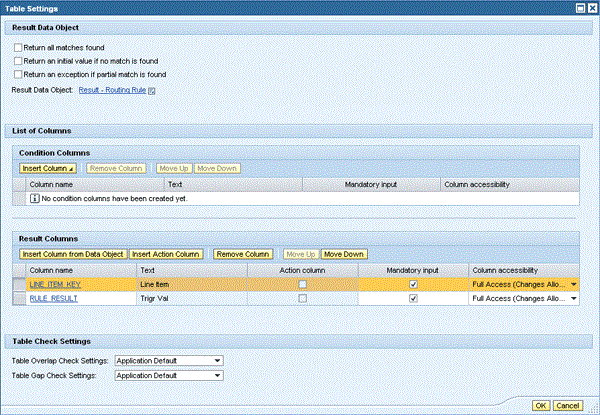
Figure 15
Adding condition columns to the decision table

Figure 16
Selecting request attributes as condition item for the decision table
Click the Insert New Row button (Figure 14) to add new condition statements and result values. Click the icon in the condition columns just added. A drop-down list appears. Select Direct Value Input. An area to add a condition opens in the lower part of the screen (Figure 17). The last two columns of the decision table shown in Figure 17 are the result columns. Click the icon in the result column Line Item (Figure 18) and always add the context parameter ITENNUM.
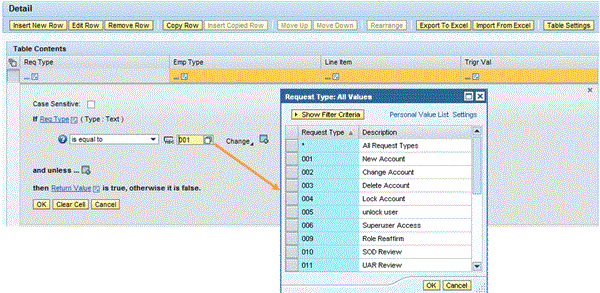
Figure 17
Adding a condition statement to the decision table
The last column in Figure 18 contains the actual rule result values entered via Direct Value Input. For agent rules, result values are user IDs, whereas for initiator and routing rules, they are placeholders for paths to be mapped in step 6 of the workflow configuration tool. Figure 18 shows a decision table of an initiator rule. It returns the result value PATH_NEW_ACCOUNT, if the request type equals 001 being New Account and DEFAULT_PATH for all other request attributes. I recommend having such a catch-all condition as the last row to ensure that a value is always returned from the rule. The evaluation of a BRF+ Flat rule exits as soon as the condition statement of a row is true. Therefore, the catch-all condition can include everything without causing any conflict.

Figure 18
Decision table with two condition statements — the last one being a catch-all statement
Frank Rambo, PhD
Frank Rambo, PhD, is managing a team within SAP’s Customer Solution Adoption (CSA) organization working with customers in the SAP analytics area with the objective to drive adoption of new, innovative solutions. Prior to this position, he worked eight years for SAP Germany as a senior consultant focusing on SAP security and identity management. Before he joined SAP in 1999, Frank worked as a physicist in an international research team. He lives in Hamburg, Germany.
You may contact the author at frank.rambo@sap.com.
If you have comments about this article or publication, or would like to submit an article idea, please contact the editor.