Learn how to unlock a Payroll and Time schema that was locked earlier by a user who either is no longer with the company or who does not exist in the system.
In most implementations, Payroll schemas and Time schemas are often customized as requested by the company. The Personal Calculation Rules (PCRs) are client specific and there is a possibility that the author of the PCR will lock it to prohibit any changes. This is normally done to avoid future changes in the PCRs and schemas to avoid payroll calculation issues and confusion. However, as time goes by, it often becomes necessary to change PCRs per user requirements. Unfortunately, if someone else goes into that PCR to make a change, the system tells you that changes are not allowed. It only allows the changes to be made by the user who created the PCR.
This article helps explain how you can unlock the system Payroll and Time schemas and make changes. My scenario is applicable to all systems from version 4.0B to SAP ERP Central Component (SAP ECC) 6.0.
Unlocking the PCR/Schema
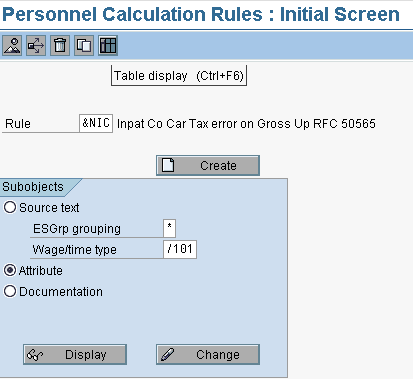
The first place to begin is the PCR Initial Screen (Figure 1). This screen is meant for editing and displaying the PCR. You can reach the screen by following menu path SAP Easy Access > Human Resources > Payroll > Europe > The Netherlands > Tools > Customizing Tools > Calculation Rule or by using transaction code PE02. This menu path refers to the Netherlands, but all PCRs can be accessed through this menu path. If you change the country name in the menu path, you can access respective countries' rule/schema.

Figure 1
Initial screen for display and change of PCRs
There are three subobjects in the screen:
- Source text — The Source text radio button allows rules to be edited. It is not a way to access the text description. The * and /101 on this screen do not mean that the rule applies only to those values. It means that clicking on display or change will access the part of the rule that applies to those values. The rule may apply to other values as well. It consists of a text description of the PCR Employee subgroup (ESGrp grouping), and Wage/time type. The asterisk (*) in the field explains for which ESGrp grouping and Wage/time type this rule is applicable. From the initial screen, you can understand that this rule is applicable to All ESGrp Groupings (*) and applicable only to Wage type /101.
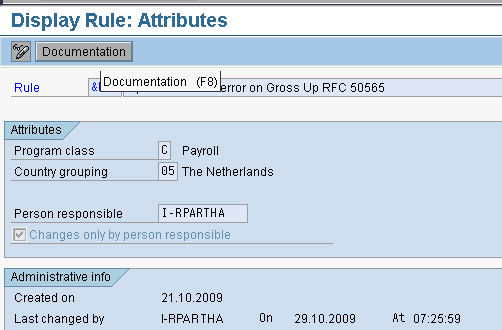
- Attribute — This radio button explains the attributes of the particular rule you need unlocked. Choose Attribute and click the Display button. Now you see the screen shown in Figure 2. This screen explains the existing attribute of this rule.
- Documentation — This radio button refers to the documentation of this PCR. The documentation explains why you need it, and what the logic is behind this PCR.

Figure 2
Display view of attributes of PCR
Figure 2 has the attributes of Rule &NIC, as shown in Figure 1, and the list comprises the attributes of this rule:
- The text description of this rule is the first field on the screen and this is where you can display/edit the text description
- Program class — C refers to Payroll and T refers to Time management
- Country grouping — refers to which countries this rule is applicable
- Person responsible — refers to the user who created this rule
- Changes only by person responsible — Most of the time users activate this. If others try to edit this rule then they get an error message in the system that changes are possible only by the person responsible.
- Administrative info refers to who made the last changes, and when they were made
An Example Problem
Now that you have an understanding of the basic procedure, here is an example problem. In my example, the rule is created by user I-RPARTHA. Any further changes are only possible by this user. However, in many real-time scenarios the user might have left the company or project. To overcome this scenario you need run a program that removes the check mark in the Changes only by person responsible check box.
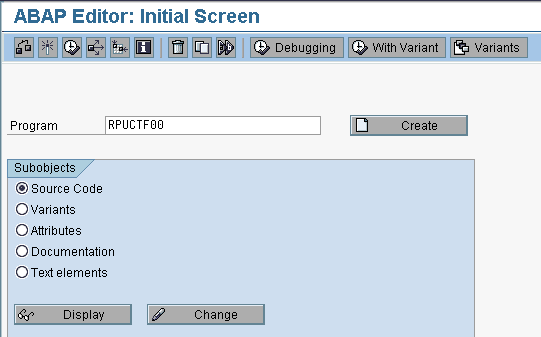
To begin, go to transaction SE38 and enter program RPUCTF00. This is the technical program for unlocking/locking the payroll and Time schemas and personnel calculation rules. Now you should see the SE38 screen (Figure 3). Enter the program as shown — here it is RPUCTF00 — and then click the Execute icon.

Figure 3
ABAP Editor screen for executing this program
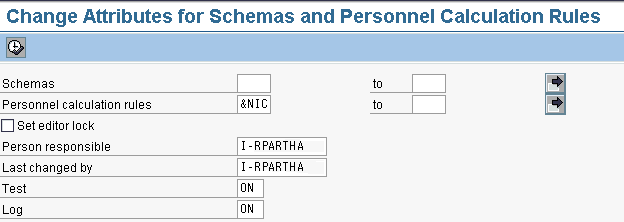
When you click the execute icon, you see the screen in Figure 4.

Figure 4
Schema/PCR attributes change screen
Notice that in Figure 4, the Schemas section refers to schemas and Personnel calculation rules refers to PCRs. In my scenario I have chosen to unlock PCR &NIC (the name of the PCR). If the check mark is set in the Set editor lock check box, then this program locks the PCR. If it is unchecked then the program unlocks the editor lock. Since this example requires unlocking the PCR, leave it blank.
The Person responsible and Last changed by fields refer to the user who made the changes in the latest version. The Test field tells the system to run this program in test mode and the Log field tells the system to display the log after running this program.
Choose ON in both fields as you need the system to run in test mode and need a log for this run. Execute this program by clicking the execute icon. Now you should see the screen shown in Figure 5.

Figure 5
Schema/PCR attributes change log
In Figure 5 the first column, Char20, gives the name of the test PCR you just ran. A check in the first Editor Loc column says whether or not the editor lock is present, which means that the rule has been purposefully locked by the previous editor. The second Editor Loc (third) column says that the editor lock needs to be set to blank. The Person Responsible Earlier (fourth) column refers to the person who made the last changes on the rule before running the program. The Person Responsible Now (fifth) column gives the name of the person executing this report now. The Last Change by Earlier (sixth) column gives the name of the person who made changes previously. The Last Changed by Now (seventh) column says who last changed this attribute.
Now execute this program. Look back at Figure 4. In Figure 4, you can see that the Test field has the word ON in it. Switch it off the test mode by selecting the OFF option available in a drop-down menu. Now use transaction PE02 to check the screen. You can see that the lock indicator is removed as shown in Figure 6.

Figure 6
Display view of attributes of PCR
Now this PCR can be edited by any user without difficulty.
Tip!
If you want to lock the Schemas/PCRs you can achieve this by choosing the Set editor lock option (Figure 4).
Raghavendran Parthasarathy
Raghavendran Parthasarathy works for Hexaware Technologies as a Principal Consultant,where he manages SAP solution design for customers across the globe. He has worked in SAP ERP HCM for over 14 years in various capacities, including payroll projects in the Middle East, Europe, and Asia/Pacific. In addition to payroll, Raghavendran has experience in negative time management, personnel administration, and recruitment. He has also been a part of portal implementations. Currently, he is involved with cloud-based HCM applications such as SAP SuccessFactors and Workday.
You may contact the author at raghs99@yahoo.com.
If you have comments about this article or publication, or would like to submit an article idea, please contact the editor.


