See all the options to sort, group, and subtotal your data with the SAP Enterprise Performance Management (EPM) add-in in one central document.
Key Concept
The SAP Enterprise Performance Management 10.0 Add-In interface includes the report editor sorting feature for sorting data based on transaction data values and the axis member sorting and grouping feature, which is more powerful than the report editor. With member sorting and grouping, you can sort data by member IDs or property values and you can also subtotal data. In addition to sorting based on member IDs, you can use member sorting and grouping to sort and subtotal by properties using local members, also known as a report-specific formula (e.g., the variance between budgeted and actual).
Imagine you are analyzing a report that has gross margin by profit center, and you want to see which profit centers had the highest to the lowest margins. Consider another scenario in which you need to analyze a report that has net earnings by company, and you want to sort the companies based on their local currency and then subtotal by currency. Both of these tasks could be performed in prior releases; however, they are much easier in the SAP Enterprise Performance Management (EPM) add-in interface 10.0. This is because there is a user interface to input the settings, whereas before all the settings and calculations were done in Microsoft Excel in earlier releases.
First, however, I explain how the system sorts members by default. I refer to this process as SAP Business Planning and Consolidation natural sorting. When you create a report with an entity in the rows and time in the columns, the members in the rows are displayed in the same order as they are stored in their dimension in the first hierarchy. The first hierarchy is the first one that is added to the dimension.
In this scenario, say that my first hierarchy is PARENTH1. To demonstrate the process described above, log on to the Web administration. From the Web client, choose Planning and Consolidation Administration and then select a dimension such as entity. Display the members in the Hierarchy view as shown in Figure 1.
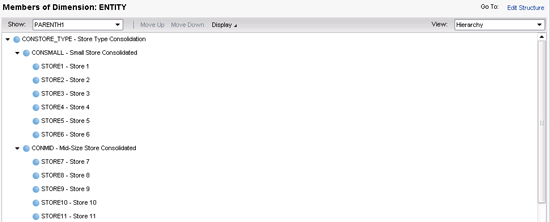
Figure 1
Hierarchy view of the entity dimension for the PARENTH1 hierarchy
In Figure 1, you can see that the members in this example are stored sequentially in the CONSMALL and CONMID parents. Now go to the Excel EPM add-in and look at a report with an entity in the rows. Select the parent CONSTORE_TYPE (in PARENTH1) and choose Member and Descendants from the list of options (Figure 2).
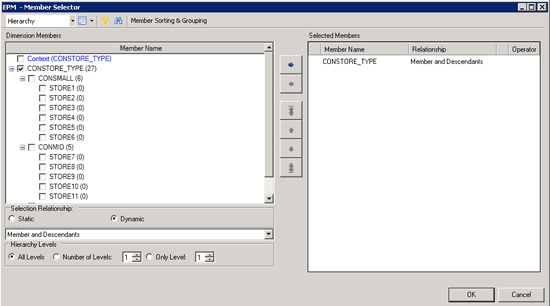
Figure 2
Member Selector for CONSTORE_TYPE Member and Descendants
When you run the report, you see that the members are in the same order as in the dimensional hierarchy (Figure 3).

Figure 3
A report with CONSTORE_TYPE Member and Descendants, with totals above members
The parents appear above the base members because the sheet options Total Placement button is set to display at the Top (Figure 4).
Figure 4
The Sheet Options screen with Totals Placement set to Top
If you select the Totals Placement option Bottom, then you would see the parent members under their children (Figure 5).
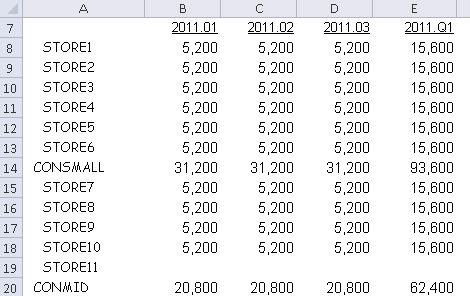
Figure 5
A report with CONSTORE_TYPE Member and Descendants, with totals below members
In a dimension with mulitple hierachies, the first hierarchy in the dimension (PARENTH1) controls the default order and the row or column axis. To see this, enter Entity in the rows and use the selection relationship Base Level (Figure 6).

Figure 6
The Member Selector for an entity and Base Level
When you run the report, the members appear in the order of the PARENTH1 hierarchy (Figure 7).

Figure 7
A report with the default sort order for PARENTH1
If you want the members to appear in an order specified in a different hierarchy, you can use the Member Filtering by Properties feature in the row or column axis. In Figure 8, you can see that I have selected the Property PARENTH2 with an operator of between, a low value of North, and a high value of South.
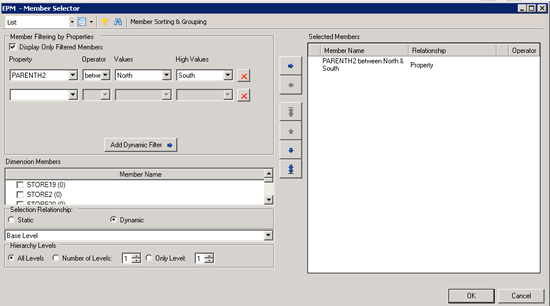
Figure 8
The Member Selector for an entity set filtered on North to South
When you run this report, the rows now appear in the order defined in the PARENTH2 hierarchy (Figure 9).
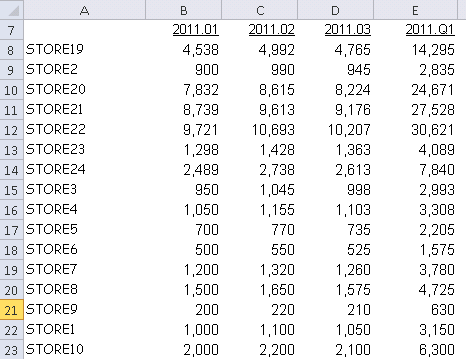
Figure 9
A report with entities in the rows based on the north and south parents
Now, if you look at the dimensional hierarchy PARENTH2 from the Administration view (Figure 10), you can see that they are in the same order (i.e., STORE19 then STORE2 and so on).

Figure 10
Hierarchy view of the entity dimension for the PARENTH2 hierarchy
You now have seen what the system can do by itself without any intervention. Next, I explain sorting and grouping options that you can use to better meet your reporting requirements. If you need to sort data differently than dimensional data storage, the EPM add-in offers two main options:
- Sorting with the report editor
- Member sorting and grouping
Sorting with the Report Editor
You can use the report editor sorting option to sort rows based on transaction data in the columns. For example, say that you need to sort products in rows based on transaction data by year or month in the columns. In Figure 11, you can see an example of unsorted data.

Figure 11
A report without sorting turned on
To turn sorting on, choose Edit Report from the ribbon and navigate to the Sorting tab. Select the Sort Data Using the Following Criteria check box. Select the Member radio button. Use the ellipses button to select a column member, such as 2011.02, and then choose either Ascending or Descending (Figure 12).

Figure 12
Report Editor sorting on 2011.02
Note
Instead of selecting a specific time member, such as 2011.02, you also can choose First Column or Last Column and use those members (for example, 2011.01 or 2011.12 because I have all 12 months in my sample columns).
After you click the OK button, you see that the rows have been sorted in ascending order based on the column values for 2011.02 (Figure 13).
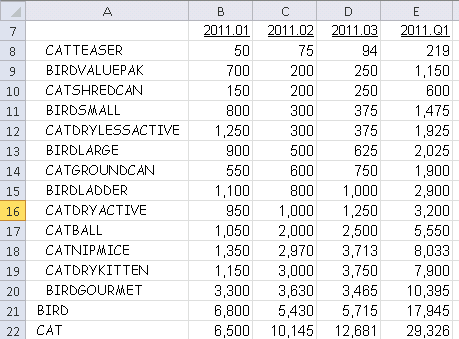
Figure 13
A report with sorting turned on for 2011.02
This might be sufficient for just a simple sort request; however, you may have noticed that the CAT and BIRD products are now intermixed. To fix that issue, turn on Sort Inside Level by clicking the check box in the lower left side of the Sorting tab, as shown in Figure 14.

Figure 14
Report Editor with Sort Inside Level turned on
After running the report with Sort Inside Level turned on, you can see in Figure 15 that the products are sorted, but they are now retained with the appropriate product groupings (i.e., the BIRD and CAT products are all together).
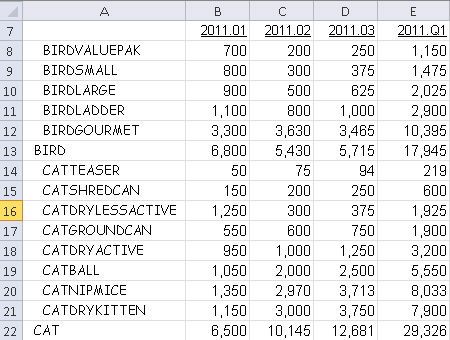
Figure 15
A report with sort inside level turned on
Note
You cannot use the Sort Inside Level feature with nested rows (multiple dimensions in the rows). Also, parent members must also be included in the rows.
You can also sort based on data that is not included in the report. For example, a user may want to sort rows based on 2010.12 data but does not want to display the columns. In Figure 16, you can see the data set for 2010.12. For clarity, the values are the same as 2011.02 except BIRDLADDER, which has been changed to 650.
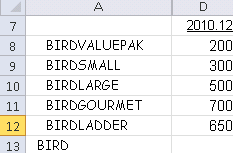
Figure 16
Data set for 2010.12
To sort a column of data that is not included in the column axis, turn the option for Show Only Members Displayed in the Report off. Use the ellipses button to open the Column Selector and choose a time member. For my example, I chose 2010.12 (Figure 17).

Figure 17
Report Editor sorting on 2010.12 data
After you execute the report, you can see that BIRDLADDER appears above BIRDGOURMENT, as expected (Figure 18).

Figure 18
Report output with sorting turned on for 2010.12
The report editor sorting option is a fairly effective way to sort based on relative transaction data values. Next, I explain member sorting and grouping features.
Member Sorting and Grouping
The member sorting and grouping feature uses master data members and properties to sort, group, and subtotal. For example, you can start by sorting entity members in ascending order based on their IDs. To turn this on, you need to go into the row axis. You can access the row axis, as well as the column axis and page axis, from the EPM pane on the lower right side of the screen in Excel (Figure 19).
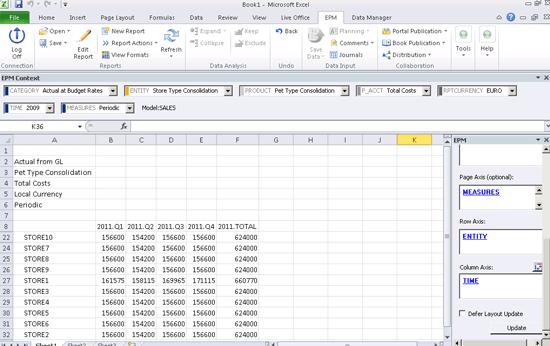
Figure 19
The EPM pane report axis
After you click the ENTITY link in the Row Axis pane shown in Figure 19, you see the Member Sorting & Grouping button. After you click this button, a new area appears on the right side of the screen. Select the check box for Enable Member Sorting and then select the Ascending radio button under Sort Order: (Figure 20).

Figure 20
Member Selector with Member Sorting & Grouping turned on
When you run the new setting, the entity members are sorted by ID independent of the transaction data values (Figure 21).
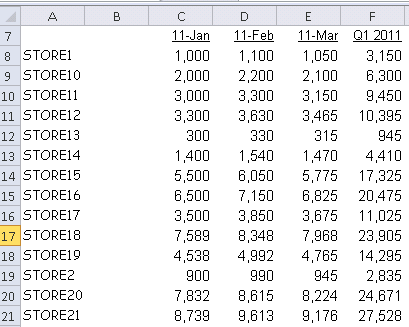
Figure 21
Report with Entity sorting by ID
The data shown in Figure 21 might meet your requirements in some cases, but not if the values represent different currencies. You face this issue if you total values for different currencies. To solve the currency issue, you can sort and subtotal the entities by currency. Go back into the row axis section and again select Member Sorting & Grouping. Next, select Enable Member Sorting just as before, but in addition, select the check box for Group by Property and choose Currency in the drop-down menu (Figure 22).
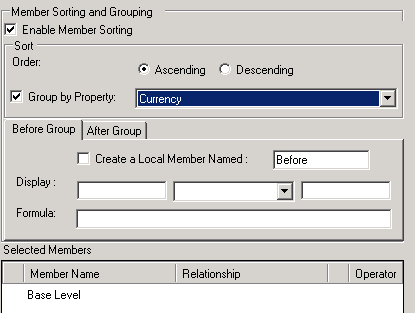
Figure 22
Member Sorting and Grouping by Currency
Because the business requirement for this example is to display the subtotals after each group of entities, you need to click the After Group tab and then select the Create a Local Member Named: check box. This action results in a local member called After and a Formula as shown in Figure 23.
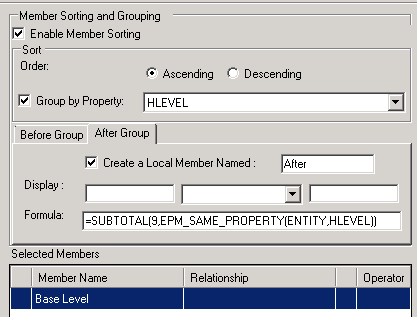
Figure 23
Member Sorting & Grouping with local member turned on
For the display, you want the word SubTotal to be followed by the Property Value of the currency and the word Currency (Figure 24).
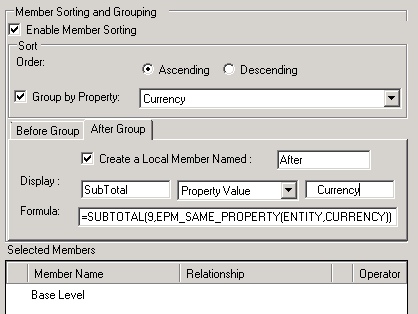
Figure 24
Member Sorting and Grouping ready to run
Note
I added three spaces after the word SubTotal and three spaces before the word Currency for display spacing purposes.
When the report is executed, you see that the entities are indeed sorted and subtotalled by currency (Figure 25).
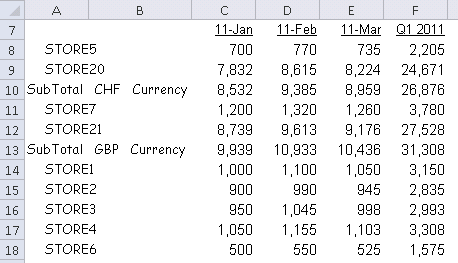
Figure 25
Report output with subtotals by currency
If you look at the contents of cell C10, for example, you see the SUBTOTAL function (Figure 26).
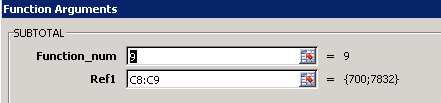
Figure 26
SUBTOTAL function
The parameter Function_num value of 9 is used to SUM the values. If you need to count or average the values, you have 11 options to choose from (Figure 27).
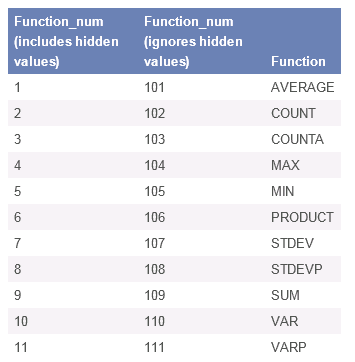
Figure 27
SUBTOTAL options
You now know how this process works; however, you might want to insert blank rows to separate the different currency values. To generate a blank row before each currency, you can again use member sorting and grouping. This time, use the Before Group tab (to insert a blank before each currency). When you select the local member, you can then delete the formula, as shown in Figure 28.

Figure 28
Member Sorting and Grouping Before Group without a Formula
In essense, you trick the system by deleting the formula, thereby creating a blank row (Figure 29).

Figure 29
Report output with blank rows before each currency
Until this point, I have been explaining how to work in the report editor or in the row axis to change sorting behavior. However, end users might want to control this from the workbook instead.
You can override sorting in the workbook with the EPMMemberSortingOverride function. This function allows users to change member sorting and grouping without going into the row or column axis. To use the EPMMemberSortingOverride function, go to any empty cell (e.g., above the report) and enter =EPM. You see a drop-down list. Double-click the EPMMemberSortingOverride function and then select the Insert Function button in the formula bar. Configure the functions as shown in Figure 30.
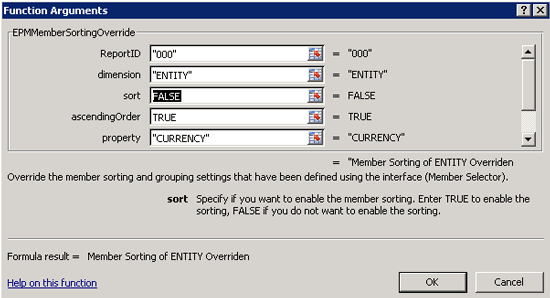
Figure 30
EPMMemberSortingOverride function
The EPMMemberSortingOverride function parameters are defined as follows:
- ReportID — enter 000
- Dimension — enter the dimension in the rows, for example
- Sort — enter TRUE to turn on member sorting and grouping, FALSE to turn it off
- AscendingOrder — enter TRUE for ascending, FALSE for descending
- Property — enter the property to sort and subtotal on
- AddLocalMemberBefore — enter TRUE if yes, blank if not
- AddLocalMemberAfter — enter TRUE if yes, blank if not
To make this even more user-friendly, you can create Excel drop-downs for the user to turn sorting on and off, as well as to sort ascending and descending (Figure 31).
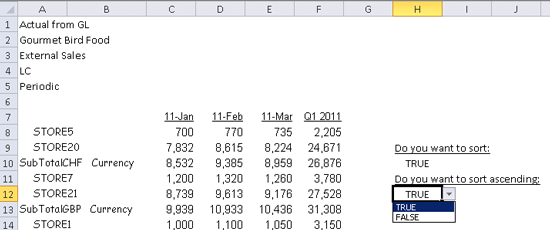
Figure 31
The sorting and ascending drop-downs
Finally, you can then cell-reference selections into EPMMemberSortingOverride function Sort and Ascending order parameters to make member sorting and grouping dynamic.
Charles "Tim" Soper
Charles “Tim” Soper is a senior education consultant at SAP. For the last 17 years, he has been teaching SAP classes on a variety of topics in financial and managerial accounting, business warehouse, business consolidations, and planning. He is the planning and consolidation curriculum architect and has written SAP course manuals. He also works as an SAP Senior Educational Consultant. Early in his career, he worked for Eastman Kodak Company in Rochester, NY, as a senior financial analyst. He has an undergraduate degree in economics and an MBA in finance from the University of Rochester.
You may contact the author at Charles.Soper@sap.com.
If you have comments about this article or publication, or would like to submit an article idea, please contact the editor.