Many organizations use territory management to organize their sales force. In SAP CRM 7.0, SAP fundamentally changed the design of territory management by introducing the concept of rule-based territory definition. See how to define the scope of territories and then model and assign them.
Key Concept
Business rule-based territory definition lends flexibility to defining the scope of the territories. You can use one or more standard or custom rule conditions to define the rules. It supports the use of numerous operators (e.g., “is between” or “is greater than”) when combining the rule conditions. You can use value ranges for the conditions used in rules, and it also supports exceptions in rule conditions. This results in a more flexible definition of the territory scope and faster system performance.
Numerous new functionalities come with territory management in SAP CRM 7.0. The most important change is that business rule-based territory definition replaces the former attribute-based territory definition.
The use of business rules enables the following:
- Flexible definition of a territory using several rule attributes and their combinations — as well as various operators — to combine the rule attributes
- Faster performance by establishing the relationship data between territories, accounts, products, and sales areas
- Viewing territories in terms of accounts, products, and sales areas within the territory overview page
- Ability to override an account’s association to a territory by defining a higher priority business rule in the accounts overview page
- Simulation mode allows you to analyze what-if scenarios by simulating changes to your territories by predefined or custom-defined key performance indicators (KPIs). You can perform this analysis without actually changing the territory data. The simulated changes can then either be saved or discarded.
You can switch territory-based authorizations on or off at the transaction type level and control them at a user level. In SAP CRM 7.0, you can use territory ID and territory description as search criteria when searching for accounts, products, and transactions. Integration with external third-party territory applications is also made easier by the availability of several enterprise services.
First, I’ll discuss these two key preliminary steps in setting up territory management:
- Plan and define scope of territories: During this stage, management defines the aim of territory management, establishes guidelines on how the territory definitions will evolve, and simulates the effect of the territory definitions in terms of defined KPIs.
-
Model territories and assign them: A more granular definition of the territories is established after the tasks in the planning stage, such as defining territory hierarchies, defining the scope of territories (rules), and assigning employees through the assignment of positions.
Plan and Define Scope of Territories
To plan the creation of territories, you need to understand what your organization aims to achieve. Typically, you use territory management to structure and organize a market by dividing it into small manageable units. You can use it in business processes such as lead management, opportunity management, sales forecasting, quota planning, incentives management, and reporting. Territory management involves the ability to define the scope of the territories and assign accounts and salespeople to each territory. It aims to make it clear who is responsible for which account, which can facilitate account management and the identification of the appropriate responsible employees in transactions. The new rule-based definition allows you to flexibly define the scope of a territory.
Guidelines in Defining Territories
Territory design is closely aligned with customer segmentation. If customers are fairly homogeneous in terms of geographical distribution and are visited in person, then geographically based territories may be the most appropriate. This is also the case when lead generation requires a local presence and networking. If significant differences exist between the needs of customers in different industries and salespeople need to be matched to the various industries, it may make the most sense to use product- and industry-based territories. If your customers need different handling based on account size, then the best approach may be to allocate territories that way (e.g., a set of national account territories that have only one account per territory or are broken up into multiple territories by product line). A mix of these strategies is often the best option for some companies.
Ideally, the territory definitions should ensure that the territory matches the knowledge and skills of the salesperson involved and provides a reasonable level of potential business so that no territories are underrepresented. The territory definition should also ensure that the entire business’ scope is adequately covered.
Model Territories and Assign Employees
Modeling territories in SAP CRM 7.0 involves setting up the following:
Territory Hierarchy Structure
To define the structure of the territory, you first specify the levels of the territory. For example, the root node is the highest level node and usually represents the highest level of the territory structure. You must then specify what each level corresponds to and the number of characters in the territory ID of each level. You must also decide if the territory ID is system generated or manually entered. An instance of an SAP CRM system may have only one structure definition, so careful planning should go into defining the hierarchy. Figure 1 shows a sample implementation of a defined structure.

Figure 1
Example of a territory hierarchy
Every territory you create has a validity period. This functionality comes with the implementation of SAP Note 1367618. You can specify the validity period of a territory by creating a validity period for a new or existing territory or by changing the validity period of a territory. You can change the Valid From date as long as the dates are not in the past. If this date is in the past, then the field is display only. You can edit the Valid To date if the date is in the future and is the last validity period of the territory. The new dates you enter should align with the selected validity of the higher-level territory if a parent territory for the given territory exists. Adjusting territory validity automatically adjusts the validity of the rules and position assignments. If you advance the validity date of the territory, the system adjusts the validity of territory rules accordingly.
The territory hierarchy has several buttons, including Show Validity Period, New Validity, and Delete Last Validity. You can select a particular territory and click the Show Validity Period button to select the required validity period. The territory overview page is refreshed based on the selected validity period. The territory hierarchy is refreshed based on the Valid From date. You can define a new validity period by selecting a territory and clicking the New Validity button. You can select a territory and click Delete Last Validity to delete the validity period you last created.
Note that in a territory hierarchy, the validity period of lower-level territories should be within the validity of its parent territory. If the territory you create has a higher-level parent territory, the system automatically uses the validity period that the parent territory is currently using.
If this period lies in the past, the system enters the current date as the Valid From date. The Valid To date you enter should be equal to or greater than the Valid From date. You can define more than one validity period for a territory, but you cannot have validity periods that overlap each other. You cannot have any time period gaps between the end of a validity period and the beginning of the next one. Every territory must be continuously valid. When you change the validity period of a territory by extending it or by shortening it, the system automatically moves the adjacent validity periods so there are no gaps.
To enable the territory hierarchy setup, you need to define the following in customizing by following menu path Customer Relationship Management > Master Data > Territory Management > Define Territory Hierarchy Levels (Figure 2):
- The levels of the territory hierarchy
- The Offset, the number of characters permitted for the territory ID at each level, and the Number Object Interval if you are using internally generated numbers for the territories (Figure 3). You can do this by selecting any level in Figure 2 and clicking the Details icon (the magnifying glass icon; note this is not shown in Figure 2).

Figure 2
Define the territory levels
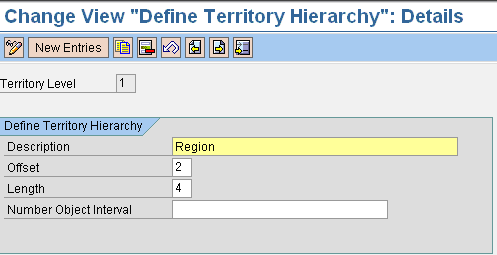
Figure 3
Customize territory levels
Once you define the territory levels, the number of characters for the territory ID at each level, territory structure, territory rules, and position assignments, you should not change the territory levels or the number of characters for the territory ID. For all practical purposes, you cannot change the territory structure once you build a hierarchy.
You should plan adequately so that no change is required at a later stage. You can use any number of levels — even less than the number that is defined in the standard system. While it is technically feasible to have multiple territory hierarchies (root nodes), usually an organization has only one territory structure. If you have more primary nodes, none of them can have different structures (e.g., level 0 for all structures will be n characters). Regardless of how many primary nodes you may have — from one per country to one per global region — they must all have the same structure in terms of offset or length.
The offset at any territory level should be exactly the same as the sum of the offset of the previous (higher) level and the number of characters of the previous (higher) level. A territory ID cannot be duplicated across the levels of the territory. Therefore, before starting an implementation of a territory hierarchy structure, you should carefully plan the nomenclature of the territory IDs. The maximum number of characters allowed is 30. This is the sum of the length of all the territory levels. Because the structure decision is essentially binding unless you completely rebuild the hierarchy, make sure that you define sufficient characters to support growth.
Territory Rules
The next step is to define the scope of the territories. As I stated earlier, in SAP CRM 7.0 the scope of the territories is defined by a rule-based definition that replaces the earlier concept of attribute-based definition.
Rule Attributes in a Rule-Based Territory Definition
You can create rules using the rule policy builder, a new functionality in SAP CRM 7.0, which you can reach via menu path Customer Relationship Management > Master Data > Territory Management > Permitted Hierarchy Types for Business Partner Group Hierarchies. You define a rule policy and then a rule set within a rule policy. Each rule set can then have many rules defined within it. Each rule is a combination of rule statements, and each rule statement is built using attributes, operators, and attribute values. Rules are always created with a validity period so that they are effective in the future and valid only for a specific time period. Rules have the flexibility of using exclusions (e.g., accounts in postal code = XXXXX to ZZZZZ excluding postal code = YYYYY). You can use various attributes to define rules. You can group attributes into three broad groups:
- Account-related attributes
- Product-related attributes
- Sales area data
Account-related attributes typically include:
- Geographical attributes (e.g., country, region, or postal code)
- Named accounts: The direct assignment of an account ID
- Hierarchy nodes: Customer hierarchy nodes indicating all accounts that belong to the hierarchy or to nodes directly below the assigned node
You can use SAP-standard attributes to define the rules. Product-related attributes include product category, product ID, and more. In customizing, you can define which account hierarchy categories will be used in territory rules (Figure 4).
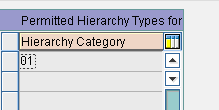
Figure 4
Indicate the hierarchy categories to be used
You can also define custom attributes to use in the rules. First, determine if you want to create a custom attribute of the account, product, or sales area data. You can then create custom attributes by following menu path Customer Relationship Management > Master Data > Territory Management > Territory Attributes > Maintain Territory Attributes. For example, you can create an attribute called CITY. Enter the Rule Policy Type ID Type TM (for territory management), select the Condition Group ID BP, and click the Attributes folder on the left side of the screen. You get to see the list of available attributes within the Condition Group ID BP. Now click the New Entries button and create your custom attribute CITY (Figure 5). Enter the appropriate Reference Table and Reference Field and select the operators you need to use for the attribute in the rules (e.g., Equal).

Figure 5
Define a custom attribute
If you add custom attributes for your rules, then you need to implement Business Add-In (BAdI) CRM_TERRMAN_ATTRIB. Here, you can set F4 helps for your custom attributes (method GET_F4_HELP_CUSATTR), check validity of field values entered (method FIELD_CHECK), or process the relationships with accounts, products, and sales areas (method: PROCESS_RELNSHPS).
Create a Rule
As I stated previously, you create a rule using the rule policy builder. The three steps involved in creation of a rule are:
Step 1. Create a rule policy
Step 2. Create a rule set
Step 3. Create rules within a rule set
You need rule policies because the rules are used in different applications, and the policy identifies which application can use each rule. It also filters the rules visible for assignment with the application.
You can create rule policies if you are logged in with the business role Sales Professional in the CRM WebClient UI. Select the Sales Operations work center and then click Rule Policies for Rule builder under the Search list. In the screen that appears, you can search for existing rule policies or click the New button to create new rule policies. When you click this button, a pop-up screen appears in which you can select the rule policy type Territory Management. Give an appropriate description for the rule policy (Figure 6). I named my policy Rules – Geographical Rules.

Figure 6
Create a rule policy description
Once you have created the rule policy, you create the rule set. A rule set is a group of rules, and rules are also created within a rule set. Highlight the rule policy you created and click the Node button. This produces a pop-up screen in which you can choose whether to create a Rule Set or a Rule Set with a Template (Figure 7). For this example, I chose Rule Set. Within a rule policy, you can easily create multiple rule sets in a hierarchical way (Figure 8).
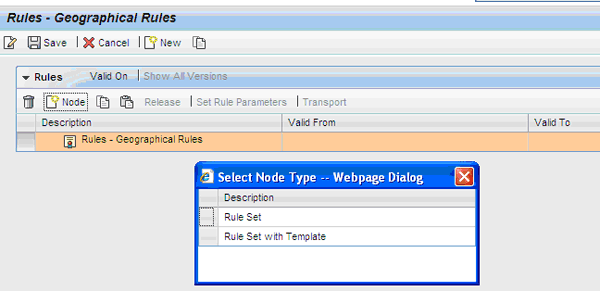
Figure 7
Select Rule Set
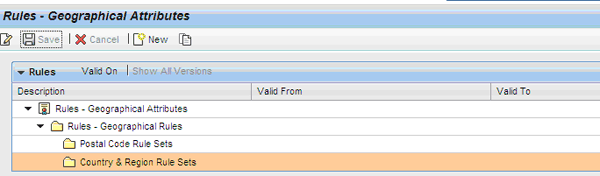
Figure 8
Multiple rule sets and descriptions within a rule policy
Once you have created the rule sets, you can create rules (Figure 9). Highlight the rule set and then click the New button. In the pop-up screen, select the option to create rules. Provide a description for the rule and rule validity, select the rule attributes (Country and Region in my example) and enter the value of the attributes for the specific rule. When creating a rule, you can select one or more attributes to define the rule and a set of values for the attributes used in the rules. Additionally, you can indicate the territory for which this rule is applicable.

Figure 9
Rule creation using account attributes of Country and Region
I created two different figures to show that it is possible to use account attributes or product attributes in rules. In Figure 9, you can see the creation of a rule using account attributes. I created a rule with the description NY area using the rule set Rules - Geographical Rules and the rule attributes Country and Region. In Figure 10, I created a rule with a combination of account and product attributes. This rule has the description Geographical & Product category. The rule attributes are Postal Code and Product Hier./Cat. The value of the Postal Code attribute is 08800 to 08999, and the value of the Product Hier./Cat. is Product Subtype : Finished Product.

Figure 10
Rule creation using account attribute and product attribute
Note
When setting the values of the attributes in a rule, you use several operators to define the rule. The operators you can use are Or, And, Is between, Is not between, Is not, Is less than or equal to, Is greater than, and Is greater than or equal to. Note that these operators are not shown in any figures in this article, but are simply the general operators available in an SAP system.
You assign a rule to a territory from within the territory hierarchy structure in the rules assignment block. Alternatively, you can also assign a rule within the definition of the rule itself while assigning the rule attribute values. One rule is always created and assigned to only one territory. For my example, I need to create multiple rules. Once you have created the rules for a territory, the rules will appear in the rules assignment block in the territory. Figure 11 shows how the Rules assignment block.
I highlighted four buttons and icons in Figure 11:
- The copy icon (to copy a rule)
- The Release button (to release an inactive rule)
- The Edit List button (to edit the rules and activate the row of buttons and icons below the Edit List button)
- The edit icon (to display or edit the conditions used in the rule)

Figure 11
Editing rules
You can edit a rule by clicking the Edit List button. The conditions used in the rule are displayed in Figure 12, which is the screen that appears after you click the edit icon.

Figure 12
Conditions used to define rules
Once a rule is released, it has an Active status (Figure 13). You cannot edit a rule that is already active. You can, however, revise the rule. If you click the Edit List button, the Revise button is enabled. Click the Revise button to create a copy of the rule along with the attribute values for a new rule. In the new rule, you can change the attribute values for the selected attributes. You can also add or change the rule attributes by clicking the Set Rule Parameters button. Once the new rule is saved, you can terminate the older rule by setting its Valid To date as today’s date. The revised rule will begin the next day.
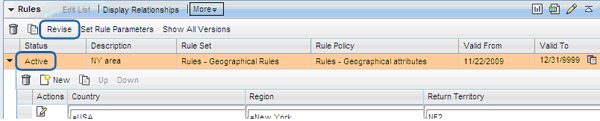
Figure 13
Revise an active rule
If you want to create a copy of the existing rule but keep the old rule, click the copy icon (which is to the right of the New button). This retains the existing rule and creates a new rule by copying the rule attributes and the attribute values. In addition, you can view the valid rules as of today, in the past, or on a future date by clicking the More button and selecting the appropriate option from the drop-down menu that appears.
Rule Logic
Now I’ll look at how the rule logic works. A territory can have multiple rules assigned to it. The scope of the territory is a summation of the scope of the individual rules. Between two rules for the same territory, it is OR logic (union logic). One rule can have many different attributes assigned to it. Between two different attributes in the same rule, it is AND logic (intersection logic). One attribute within a rule in a territory may have many attribute values. Between two attributes in the same rule, it is AND logic (intersection logic). Rules can have exclusions on certain attribute values (e.g., accounts in postal code = XXXXX to YYYYY excluding account = AA). Here are two examples:
Scenario 1: Territory scope: All accounts in CA (region: California) for product category PC1, PC2
Rule definition:
Rule 1: (two attributes)
Account-state = CA
Product category = PC1, PC2
Scenario 2: Territory scope: All accounts in CA and account AA for product category PC1, PC2
Rule definition:
Rule 1: (two attributes)
Account-state = CA
Product category = PC1, PC2
Rule 2: (two attributes)
Account ID = AA
Product category = PC1, PC2
The validity dates of rules are aligned with the validity dates of territories. Creating or changing rules does not affect the territory validity. When you create or change a rule, the validity period of a rule cannot be longer than the selected territory validity. You cannot have validity dates of a rule that span two territory validity periods. If you assign territories from the Accounts Overview page (in the territory assignment block), ensure that the validity period of the assignment is within one of the territory validity periods.
Employee Assignment to Territories via Positions
You can assign employees to territories in the employee assignment block. Employees are assigned to the various territory levels via positions in the organizational structure. When a position is assigned to a territory, all the employees (business partner in the role of employees) are automatically assigned to the territory. You can assign multiple positions to a territory. When employees are added to the territories via the position, they can be characterized using partner functions to indicate their role in that territory. Examples of such partner functions are sales managers, sales representatives, and product engineers. Each employee within a position has the same partner function and validity period. Assignment of positions to a territory is time dependent (i.e., it has a validity period).
You must indicate the employee’s main position in a territory by checking the Main Position of Ter… check box. If an employee is assigned to multiple territories, you should indicate the employee’s default territory. The employee assignment block after adding employees (through Positions) to a territory is shown in Figure 14.

Figure 14
Employees assigned to a territory
An employee’s association with a territory is aligned with the validity of the territory. When you assign a position to a territory, the validity date of the position’s assignment to a territory should be within the validity period of the territory itself.
After setting up the territory hierarchy and the rules, you can run the program CRM_TERRMAN_PROC_REL in the initial mode. This sets up the relationship of the territories with the accounts and the products. Once the program is run, you can view the territories to which the account belongs to in the territory assignment block of the account. Subsequently, this program should be scheduled to run in delta mode at periodic intervals.
Once you have set up territory management, you can search for territories. When logged in the role of sales professional, click the work center Sales Operations and then click Territories under Search. The Search Territories page comes up and you can search for territories using various selection parameters (Figure 15). The commonly used search parameters are: territory description, territory ID, territory levels, and by employees.
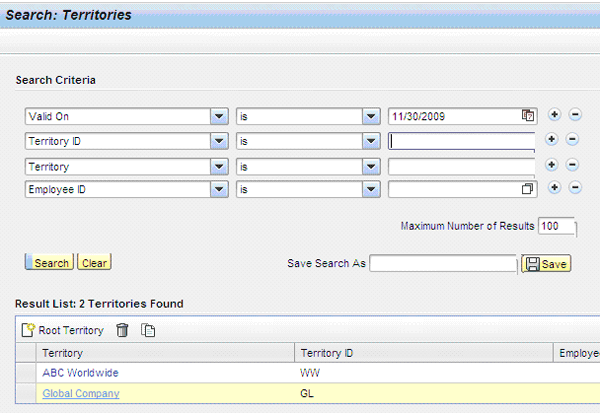
Figure 15
Search territories
You can view the details of the territory by clicking the hyperlink (e.g., Global Company). You can further expand the territory structure nodes to drill down to the lowest level. You can click on any of the rows to see the details of the selected territory. This brings up the two assignment blocks Rules and Employees for the territory selected in the first assignment block Territory (Figure 16).

Figure 16
Detailed view of a selected territory
Kaushik Ray
Kaushik Ray is an experienced consultant specializing in SAP CRM and outbound logistics with knowledge of SAP NetWeaver BW and SAP Solution Manager. He has more than 12 years of experience in implementing SAP solutions in the capacity of project manager, lead consultant, solution architect, and trainer for customers in industries such as telecom, process & discrete manufacturing industries, and high tech. Kaushik has been involved in the implementation of more than 10 CRM projects and more than 13 projects in SAP products. His SAP consulting experience includes seven years of consulting experience in big consulting organizations including PricewaterhouseCoopers and SAP. He has been heading the CRM practice in consulting organizations and is currently heading the SAP CRM practice at Globalsoft Solutions Inc. Kaushik has a bachelor of technology degree and an MBA.
You may contact the author at kaushik.ray@globalsoftsolutions.net.
If you have comments about this article or publication, or would like to submit an article idea, please contact the editor.