Change Request Management (ChaRM) security is not a subject about which you can easily find complete organized information. Sam Gassem discusses ChaRM security in detail.
Key Concept
Transaction code PFCG is where you maintain roles and authorization. Business role SOLMANPRO is where you control the navigation bar and logical links. A technical role is used to control authorization objects to allow a technical component of the system to run. A composite role consists of two or more single roles.
- Business Role
- Authorization Role
- Adopt Authorization Objects
- Remote Function Call (RFC) Authorization and Trusted System Authorization
- How to Adopt All of the Above
- Authorization Trace via Transaction Code ST01
Note
This article assumes basic knowledge of SAP security and
authorizations. This article is for security, configurator, and
technical staff. The security or configurator or technical person needs
the following roles to be able to follow this article.
- SAP_CM_CHANGE_MANAGER_COMP
- SAP_SM_CRM_UIU_FRAMEWORK
- SAP_SM_CRM_UIU_SOLMANPRO
- SAP_SM_CRM_UIU_SOLMANPRO_CHAR
Do not assign SAP-delivered authorization roles to end users.
Business Role
Business role SOLMANPRO controls the navigation bar and logical links in ChaRM. With this role you can define the structure of the navigation bar and which links are available on the work center pages and the direct link group.
Next, I show how to copy business role SOLMANPRO to role ZSOLMANPRO, including all its following dependencies:
- Role Config. Key
- Navigation Bar Profile
- Layout Profile
- Technical Profile
- PFCG Role ID
Business Role SOLMANPRO
Business role SOLMANPRO is a required authorization. If this is not assigned to any user, you see the screen in Figure 1 when attempting to log on.

Figure 1
The SOLMANPRO not assigned error message
Figure 2 is the SAP-delivered business role SOLMANPRO.

Figure 2
Business role SOLMANPRO
I am going to use standard business role SOLMANPRO as a template and define a customer space business role. As you can see in Figure 2, there are some other profiles (Role Config. Key, Nav Bar Profile, Layout Profile, Technical Profile, and PFCG Role ID) that you need to copy to Z customer space naming.
To do so follow these steps: follow menu path SPRO > IMG, and search for the Define Business Role menu. Execute it by clicking the Define Business Role execute icon (clock icon)  . Then you are taken to the screen shown in Figure 3.
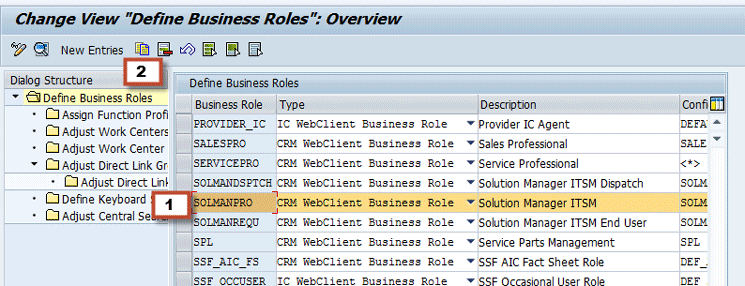
Figure 3
Copy SOLMANPRO
Select SOLMANPRO (1 in the figure) and click the copy icon (2). In the next screen (Figure 4), change SOLMANPRO to ZSOLMANPRO (as per the red arrow) and press Enter.

Figure 4
Create ZSOLMANPRO
You then see the following pop-up screen (Figure 5).

Figure 5
SOLMANPRO dependencies
Click the green checkmark icon and then save your changes by clicking the save icon. The new Business Role ZSOLMANPRO should now look like what you see in Figure 6.

Figure 6
Business role ZSOLMANPRO
You have created your ZSOLMANPRO business role. Next, I show you how to configure subcategories of ZSOLMANPRO, which are required to complete this section of ChaRM security.
Role Config. Key
I show how to change SOLMANPRO to ZSOLMANPRO in this step.
Since the Role Config. Key is a part of ZSOLMANPRO you need to create a customer name for it. The configuration key is used in the Configuration tab in the workbench to create the configuration. This key is assigned to the business role to identify the configuration that is to be used. To do so follow menu path SPRO > IMG and search for the Define Role Configuration Key. Execute it by clicking the execute icon. Then you are taken to Figure 7.

Figure 7
Copy SOLMANPRO
In Figure 7, select SOLMANPRO (1) and click the copy icon (2). You are taken to the next screen (Figure 8).
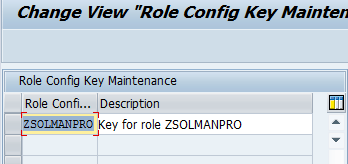
Figure 8
Create ZSOLMANPRO
Press Enter and then save your changes by clicking the save icon.
Navigation Bar Profile
The next object to work on is the Nav Bar Profile in ZSOLMANPRO. With the Nav Bar Profile you can restrict menu options on the WebClient UI. A navigation bar profile is comprised of logical links, work centers, work center link groups, and a direct link group (Figure 9). It is a logical link to all pages and has the following items:
- Work centers: You must define all links that are shown in the main area of the navigation bar as work centers. When work center groups are assigned, they become menus.
- Groups for work center links: The work center menu is structured by using work center groups that define the individual links that are shown in a menu. A work center can have many groups assigned to it. You must assign links that are to be part of a work center group.
- Direct links group: Provides direct access to work center menus
- Logical links: Provide second-level navigation

Figure 9
The Web UI
Follow these instructions to restrict the work center, direct link group, and logical links: Follow menu path SPRO > IMG, and search for Define Navigation Bar Profile. Then click the execute icon. As before, select SOLMANPRO. Then click the copy as icon  and name it ZSOLMANPRO. Press Enter. A pop-up window opens (Figure 10) indicating that there is a dependency. Click the copy all button.
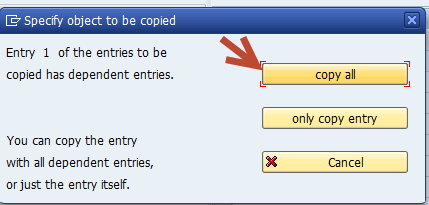
Figure 10
Navigation bar profile dependencies
A screen like Figure 11 opens.

Figure 11
Navigation bar profile screen
You need to assign work centers to the navigation bar profile. Make sure ZSOLMANPRO is selected as shown in Figure 12. Double-click Assign Work Centers To Navigation Bar Profile.

Figure 12
Assign the work center to the navigation bar profile
You now see a screen like Figure 13, which corresponds to the upper left of Figure 9 (work centers).

Figure 13
ZSOLMANPRO work centers
You can add or remove items from the WorkCenter column in Figure 13. This integrates with the Web UI. The Calendar title in Figure 13 is the Calendar in the menu option of the Web UI as shown in Figure 14 (3).
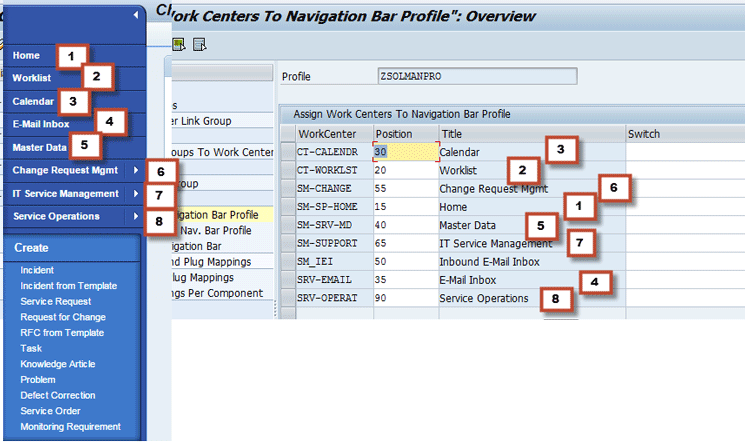
Figure 14
Web UI work centers to ZSOLMANPRO
If you want to add a new work center, click New Entries in Figure 13 and select from the list. Now I want to eliminate some menu options under Change Request Mgmt and only provide users with the options that they need. In other words, I want to make Figure 15 look like Figure 16.

Figure 15
Default menu option
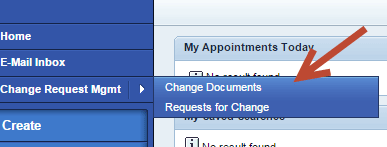
Figure 16
Custom menu option
This is how you change the Web UI menu options. Follow menu path SPRO > IMG and search for the Define Business Role. Execute it by clicking the green checkmark icon to the left of Define Business Role. Select ZSOLMANPRO. Double-click the Adjust Work Center Group Link. This opens a screen like Figure 17. The work center for change request is SM–Change. Scroll down until SM–Change is visible. Under the In Menu column, un-tick the options you want to remove.
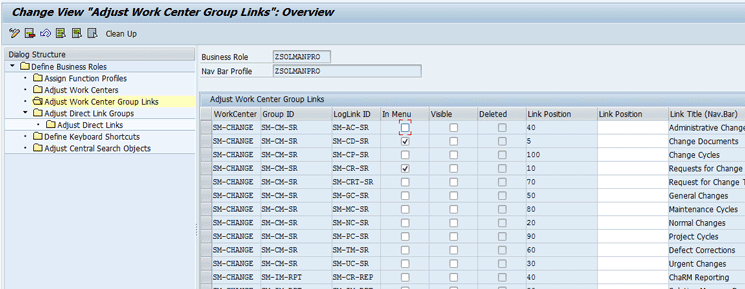
Figure 17
Adjust the work center group links
For example, in Figure 17 the Change Documents and Request for Change check boxes are ticked; therefore, those two menu options are available to users. You can do this for all menus to which you want your users to have access.
Now I want to eliminate some of the direct link group’s items. In other words, I want Figure 18 to look like Figure 19.
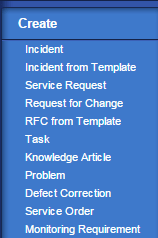
Figure 18
Default direct link
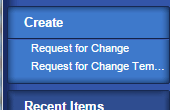
Figure 19
Custom direct link
To do this, go to Define Business Roles and select ZSOLMANPRO (Figure 20). Double-click the Adjust Direct Link Groups. In the pane that opens (the right of Figure 20) select SM_CREATE and double-click the Adjust Direct Links option.

Figure 20
Adjust Direct Link Groups
Here you can make a link visible by checking the box or invisible by unchecking it, as shown in Figure 21.
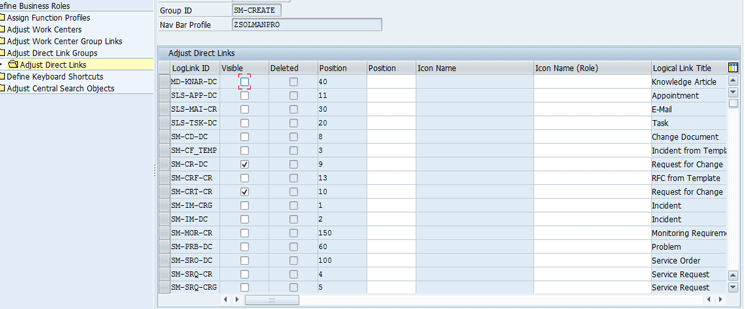
Figure 21
Adjust the direct link for SM-CREATE
As the result of the entries in Figure 21 users get a screen like Figure 19.
Layout Profile
The next object is the Layout Profile in ZSOLMANPRO. You can define the layout of the navigation frame (Figure 22), which consists of the following: header and footer areas, work area, and navigation bar. You use the standard layout profile and copy it to the customer space. Follow menu path SPRO > IMG and search for Define Layout Profile. Select CRM_UIU_MASTER and click the copy as icon.

Figure 22
Layout definition
Rename CRM_UIU_MASTER to ZCRM_UIU_MASTER and press Enter. There are some dependencies, so you get the pop-up window shown in Figure 23. Click the copy all button.

Figure 23
Layout definition dependencies
Save your work by clicking the save icon. You should now have a screen that looks like Figure 24.
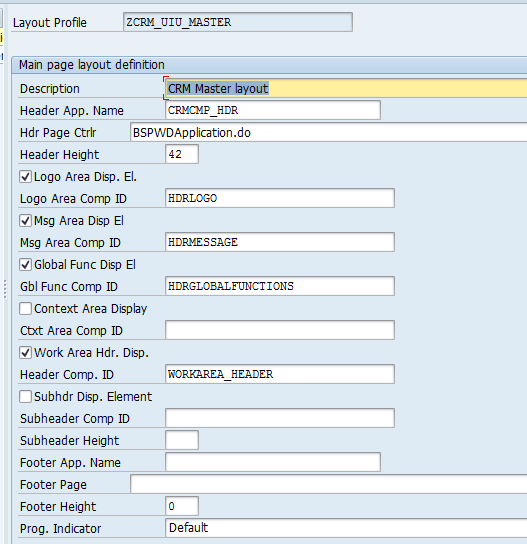
Figure 24
Completed ZCRM_UIU_MASTER
Technical Profile
The next object is the Technical Profile in ZSOLMANPRO. Follow menu path SPRO > IMG and search for Define Technical Profile. Execute it by clicking the green checkmark to the left of Define Technical Profle. Select DEFAULT_SOLMANPRO, copy it as ZDEFAULT_SOLMANPRO and then save it. You should then have a screen that looks like Figure 25.
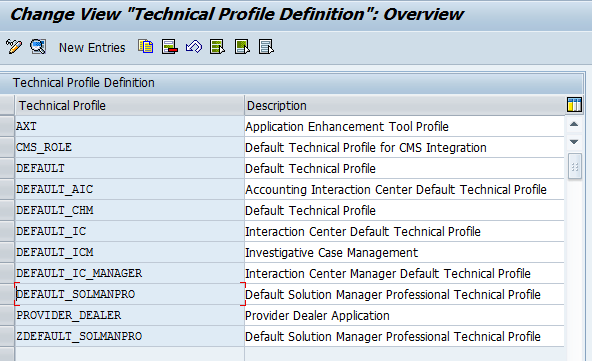
Figure 25
Technical Profile definition
PFCG Role ID
The defualt PFCG role ID that the SAP system assigns is SAP_SM_CRM_UIU_SOLMANPRO. Copy this role to the customer space. Navigate to transaction code PFCG (Figure 26). Enter SAP_SM_CRM_UIU_SOLMANPRO (1) and then click the copy icon (2).

Figure 26
Transaction code PFCG
In the next screen (Figure 27) enter your new customer space role according to your company’s naming conventions.

Figure 27
Copy the role
Click the Copy All button. Now you have your new custom role and you are taken to Figure 28 where you can edit the role.

Figure 28
Edit the role
Click the edit icon. By default the icon by the Authorizations tab (Figure 29) is yellow. When you generate the role, it turns green (Figure 30).

Figure 29
Role not generated
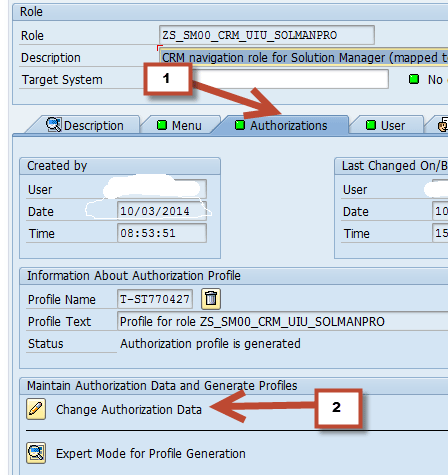
Figure 30
Authorizations tab on PFCG
Go to the Authorizations tab in Figure 30 (1). Click the change (pencil) icon by Change Authorization Data (2). You need to generate your new role. On the next screen (Figure 31) click the generate icon.

Figure 31
Activate the role
Now it is time to integrate all you’ve done to the business role ZSOLMANPRO, To do so follow menu path SPRO > IMG, and search for Define Business Role. Click the execute icon, which takes you to Figure 32.
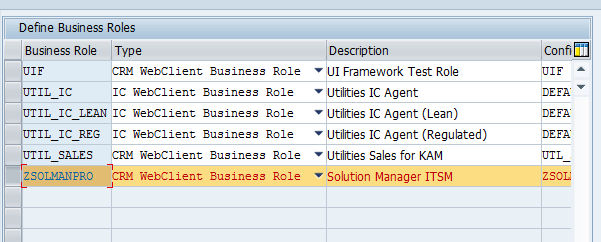
Figure 32
ZSOLMANPRO
Double-click ZSOLMANPRO, which takes you to Figure 33.
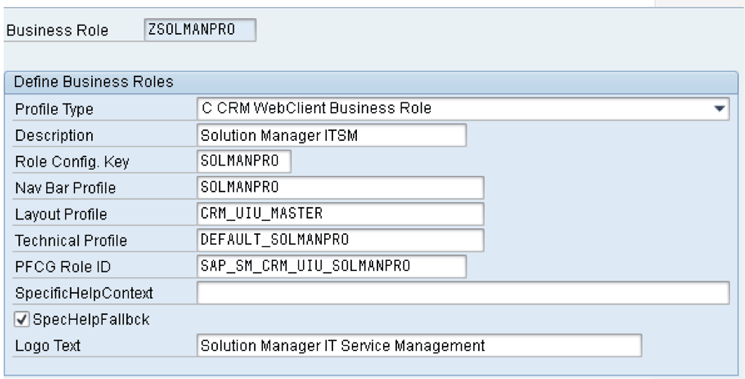
Figure 33
ZSOLMANPRO business role
Rename all the entries in Figure 34 to your customer name space.
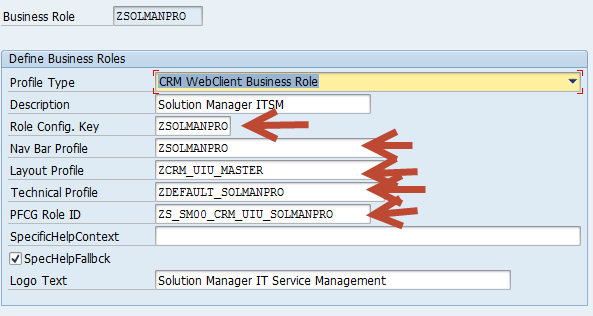
Figure 34
Completed ZSOLMANPRO
Authorization Roles
Authorization roles (PFCG) are used to implement security concepts. Using authorization roles you protect the system against unauthorized access to the SAP systems. This section covers composite roles, single roles, and assigning roles to users.
Composite roles are special roles that consist of many single roles. ChaRM comes bundled with composite roles according to functional areas. It is a best practice to copy any role—either single or composite—to a Z role. Then use these Z roles and modify them. Table 1 shows a few composite roles.
Composite roles
|
Description |
| SAP_CM_ADMINISTRATOR_COMP |
Composite Role Change Manager - Administrator |
| SAP_CM_CHANGE_MANAGER_COMP |
Composite Role Change Manager - Change Manager |
| SAP_CM_DEVELOPER_COMP |
Composite Role Change Manager - Developer
|
SAP_CM_OPERATOR_COMP
|
Composite Role Change Manager - Operator
|
| SAP_CM_TESTER_COMP |
Composite Role Change Manager – Tester |
SAP_CM_REQUESTER_COMP
|
Composite Role Change Manager - Requester |
| SAP_CM_SUPPDESK_ADMIN_COMP |
Master: Service Desk Administrator
|
| SAP_SUPPDESK_CREATE_COMP |
Master: Service Desk Key User |
| SAP_SUPPDESK_DISPATCHER_COMP |
Master: Service Desk Dispatcher
|
| SAP_SUPPDESK_PROCESS_COMP |
Master: Service Desk Processor |
Table 1
SAP-delivered composite roles
Composite roles make the administrator’s job much easier. That is because a composite role contains two or more single roles. When you assign a composite role to a user, all single roles within the composite role are automatically added.
Note
Single roles consist of 0 to many transaction codes and many authorization objects.
- Identify which functions or capabilities of Solution Manager scenarios you use.
- Create a menu matrix according to these functions or capabilities.
- Identify your roles.
- Populate your menu matrix.
- Create your roles from SAP template roles. Use a unique naming convention.
- Maintain your roles.
- Test your roles.
Adopt Authorization Objects
Role profiles contain authorization objects to specify user authorizations such as change, display, or delete authorization for business transaction types. Often you need to adopt these objects to keep up with business process changes and new developments. For example, a ChaRM developer creates a new business transaction type (B_USERSTAT). In this case you need to adopt the new value into authorization object B_USERSTAT.
Figure 35 shows what an authorization object looks like. Authorization object B_USERSTAT in this custom role gives access to create a document and change the status of the document for profile ZMCRHEAD only.
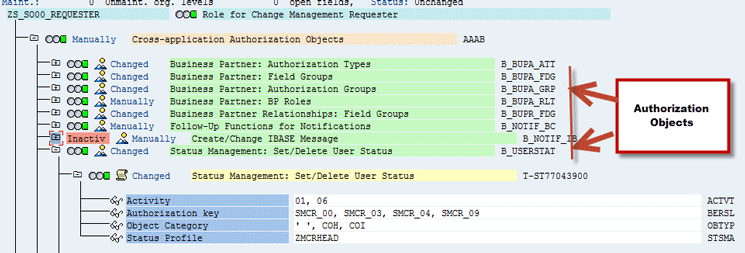
Figure 35
Sample authorization object in a role
ChaRM authorization objects delivered by SAP contain minimal authorizations. Sometimes you may need to add or remove an authorization object in a ChaRM role because a business requirement has changed; for example, a new user status has been added.
How to change an authorization object is out of scope of this article; however, I’d like to point out some important authorization objects in ChaRM:
- B_USERSTAT determines which actions (User Status) can be taken against a document
- CRM_ORD_PR controls which business transaction types the user can process
- CRM_ORD_LP is used by organizational levels
- CRM_APPRVL allows you to approve a document
- UIU_COMP is used to restrict access to the components defined in the WebClient UI or which items are displayed on the UI
- CRM_TXT_ID controls the possibility to read and write a description in a service desk message. The description is not deleted after you save the service desk message.
More information on this topic can be found at the following link: https://wiki.scn.sap.com/wiki/display/SMAUTH/Authorization+Objects+Overview.
RFC Authorization and Trusted System
Let’s begin with a definition of what a trusted system is. When you use an RFC trusted/trusting relationship between two SAP systems, then passwords are no longer sent for logging on to the trusting system. How to create RFC trusted systems is a Basis task and is out of scope of this article. However, the user logging on must have the corresponding authorization object S_RFCACL in the trusting system. The trusted system always corresponds to the RFC client role, and the trusting system to the RFC server role.
You can create a role for RFC and embed it to necessary composite roles. Figure 36 is a typical Z naming space RFC role. Note that the best practice is to enter the client and system ID of the caller and receiver.
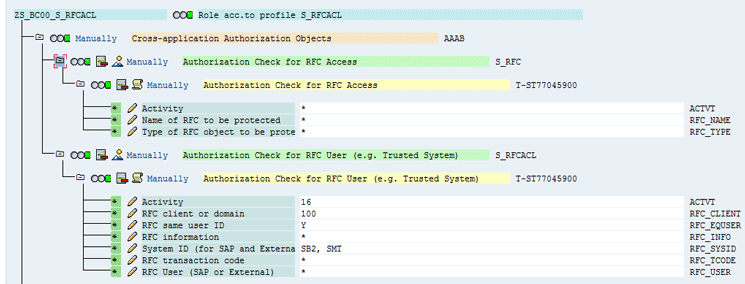
Figure 36
S_RFC and S_RFCACL
A common error message users get is No Authorization to logon as Trusted System (Trusted RC = #).
Refer to Table 2 for return codes, what they mean, and how to resolve them.
| Return code |
Explanation |
To do |
| 0 |
Invalid logon data (user and client) for the trusting system |
Create a corresponding user in the client system for the user in the server system (trusting system) |
| 1 |
The calling system is not a trusted system, or the system security ID is invalid |
Create the trusted RFC connection again |
| 2 |
The user has no authorization containing the authorization object S_RFCACL
|
Give the user authorization
|
| 3 |
The timestamp of the logon data is invalid
|
Check the validity date of the logon data
|
Table 2
Return codes for trusted systems
Apart from the trusted RFC, three core RFC connections for SAP Solution Manager are:
- READ RFC
- TMW RFC
- BACK RFC
All three RFC connections are automatically generated in transaction code SOLMAN_SETUP.
More information on this topic can be found at the following link: https://help.sap.com/saphelp_nw70/helpdata/en/8b/0010519daef443ab06d38d7ade26f4/frameset.htm.
How to Adopt All of the Above to a User Profile
SAP Solution Manager ChaRM comes bundled with composite roles that you can use. If for some reason you don’t want to use composite roles, the following roles are mandatory for every user to be able to use the web UI:
- ZS_SM00_CRM_UIU_FRAMEWORK
- ZS_SM00_CRM_UIU_SOLMANPRO
- ZS_SM00_CRM_UIU_SOLMANPRO_CHAR
I conclude that:
- It’s the best practice to copy standard SAP roles to a customer-space name. So I have copied SAP_SM_CRM_UIU_FRAMEWORK, SAP_SM_CRM_UIU_SOLMANPRO, and SAP_SM_CRM_UIU_SOLMANPRO_CHARM into their corresponding Z names.
- Also ZS_SM00_CRM_UIU_SOLMANPRO is the PFCG Role ID that I embedded into ZSOLMANPRO business role.
That’s how you marry business role ZSOLMANPRO to user profiles.
Assign Roles to Users
For users to be able to use resources in an SAP system, they must have authorization to do so. The security team assigns roles to users for that purpose. To be able to use ChaRM, they must have roles for the specific functions they are supposed to carry out. However, they also need roles to be able to access the web UI and the resources within it. Table 3 shows the roles that must be assigned to all users who need to access the web UI.
| Z customer space name |
SAP role name |
| ZS_SM00_CRM_UIU_FRAMEWORK |
SAP_SM_CRM_UIU_FRAMEWORK |
| ZS_SM00_CRM_UIU_SOLMANPRO |
SAP_SM_CRM_UIU_SOLMANPRO |
| ZS_SM00_CRM_UIU_SOLMANPRO_CHARM |
SAP_SM_CRM_UIU_SOLMANPRO_CHARM |
Table 3
The web UI roles
Note that in the second row in Table 3 you are entering the same name that you entered in the business role ZSOLMANPRO. By default the above three roles are included in SAP delivered composite roles. If you create your own composite role, the three above roles must be included there.
To assign a role to a user go to transaction code SU01. Enter the user name and click the pencil icon to enter change mode as shown in Figure 37.
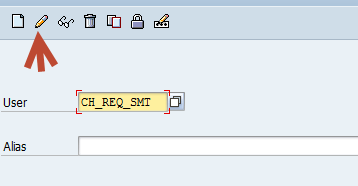
Figure 37
Assign roles to users
Go to the Roles tab (Figure 38). Enter the composite role name or single role name. Save your settings.
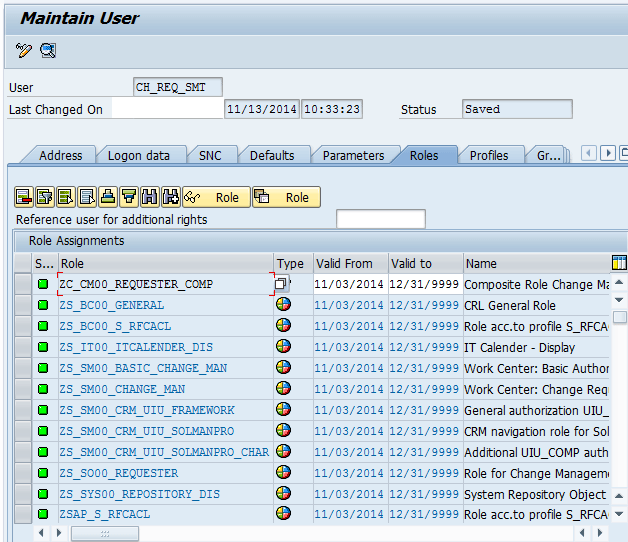
Figure 38
Completed requester role
If your user has a composite role, all single roles are automatically added in blue color. All other roles are black. Figure 38 shows the requester roles.
Authorization Trace via Transaction Code ST01
All security personnel are fully familiar with transaction code ST01. For those who don’t know much about ST01, here is a brief introduction. If users are getting an authorization error message, transaction code /NSU53 is a way to see what authorizations are missing for the action they last executed. To see all authorization objects for a given task, execute transaction code ST01. You’ll see a screen like Figure 39.
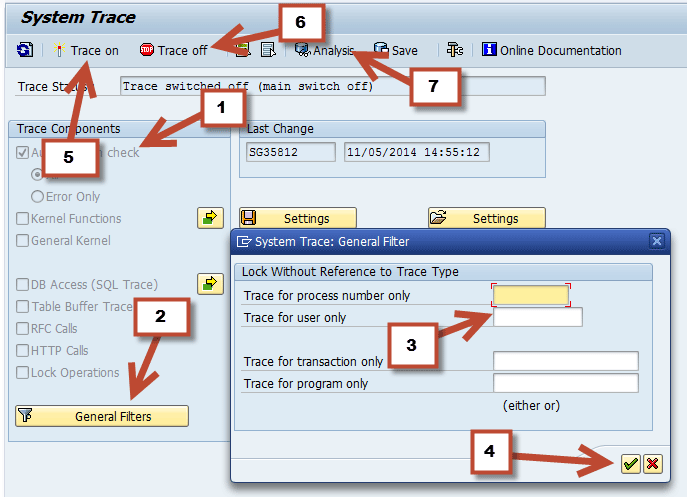
Figure 39
Transaction code ST01 screen
Below is the description (for the corresponding number) for Figure 39.
(1) Make sure Authorization check is ticked
(2) Click the General Filters button
(3) Enter the user name you want to trace
(4) Click the green checkmark icon
(5) Turn on the trace by clicking Trace on
Now have the user go through the complete process for the given task.
(6) Turn off the trace
To look at the trace
(7) Click Analysis
On the next screen (Figure 40) enter the user name for which you had activated the trace and then press F8 to show the report.

Figure 40
Display trace for user
When you press F8, you get a report showing all objects including their authorization return code (RC). Figure 41 is a sample screen.

Figure 41
Transaction code ST01-generated report
In Figure 41 all the RCs are 0 and therefore all are green, which means that there are no authorization issues. If you see anything other than 0, you’ll need to analyze and modify your roles depending on what the authorization object is.
Further information can be accessed by the following links: https://wiki.scn.sap.com/wiki/display/SMAUTH/Authorization+Objects+Overview.
Source: https://service.sap.com/instguides > SAP Components > SAP Solution Manager > <current release> > Operations
Sam Gassem
Sam Gassem is senior business consultant and SAP BW lead at Rural Sourcing, Inc. (RSI). He has 13 years of experience on SAP NetWeaver BW. RSI is a leader in domestic sourcing, a cost-effective, on-shore alternative to the traditional model for IT outsourcing. RSI specializes in software development and support and maintenance for critical business applications. Its development centers are located in second- and third-tier cities across the United States. RSI was founded in 2004 by the former CIO of Baxter Healthcare with the intention of bringing jobs to areas of the United States in which historically the job market was dominated by agriculture and manufacturing.
You may contact the author at sgassem@gmail.com.
If you have comments about this article or publication, or would like to submit an article idea, please contact the editor.


