One of the major difficulties for SAPUI5 developers today is the lack of documentation on how to get started in a real-world project. Sarah Lottman outlines the steps necessary to develop an application using Eclipse as the platform.
Key Concept
SAPUI5 is a collection of development libraries that is used to build both desktop and mobile applications that run in a web browser. SAPUI5 is built on the JQuery platform and uses HTML5 web development standards.
Five development steps apply to any SAPUI5 development project that you can use as a guide during the development stage of the application. With each of the following five steps I give an example to assist you in understanding what is needed for a real implementation. The simple application built in this example pulls up a drop-down of the states in the US. Once a user clicks the Display Capital button, the capital city appears in a UI5 TextView control.
The five steps are:
- Create the UI5 project in Eclipse
- Define the JavaScript Object Notation (JSON) model for testing
- Create the view
- Define the events (controller) logic
- Use SAP Gateway services to bind the user interface (UI) controls to your oData model
These development tools are required:
- Eclipse Integrated Development Environment (IDE): Both Juno and Kepler, which are different versions of Eclipse IDE, are suitable for SAPUI5 development. I prefer Juno, but Kepler works as well. For instructions on the prerequisites and installing Eclipse click here: https://tools.hana.ondemand.com/#sapui5.
- SAP Gateway; the latest release is 2.0. The installation for SAP Gateway varies depending on which version of SAP NetWeaver your system is on, but SAP Gateway is included with SAP NetWeaver 7.4. Check this link below for installation and prerequisites for SAP Gateway: https://help.sap.com/nwgateway20.
Step 1. Create the UI5 Project in Eclipse
The first step in the UI5 development process is to create the SAPUI5 project in Eclipse and to include the necessary libraries needed in the index.html file. After you create a new UI5 project, the controller, view, and HTML files are generated automatically for you. The only manual step you need to complete is to specify which UI5 libraries you will be using for development. To create the SAPUI5 project in Eclipse, follow menu path File > New > Other (Figure 1).
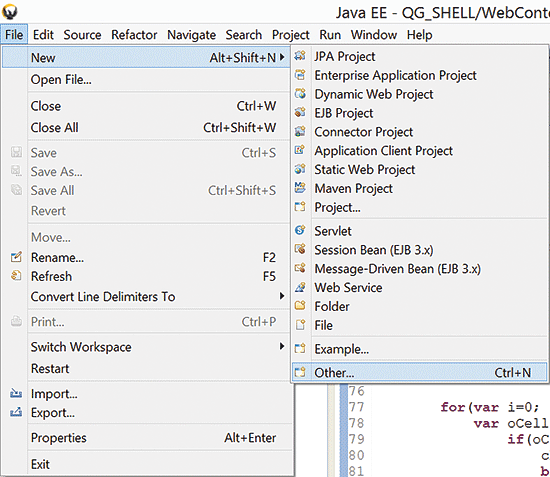
Figure 1
Create a new project
A pop-up screen opens (Figure 2). Follow menu path SAPUI5 Application Development > Application Project. Click the Next button. This action navigates you to Figure 3.
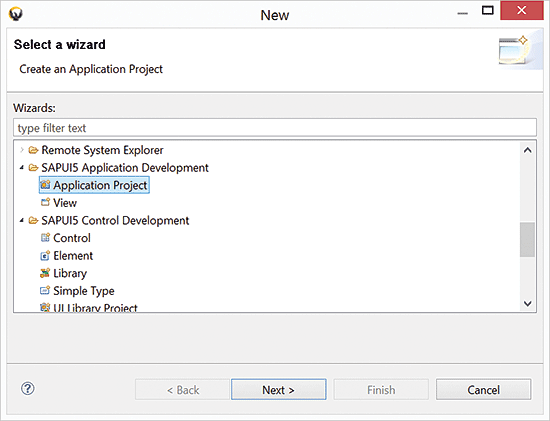
Figure 2
The new project wizard
You must enter a project name. Note that you are forced to choose either the desktop or mobile library controls. The desktop controls only render correctly using the desktop browser, but mobile controls render on desktop and mobile browsers. Check the Create an Initial View check box and click the Next button. This navigates you to Figure 4.
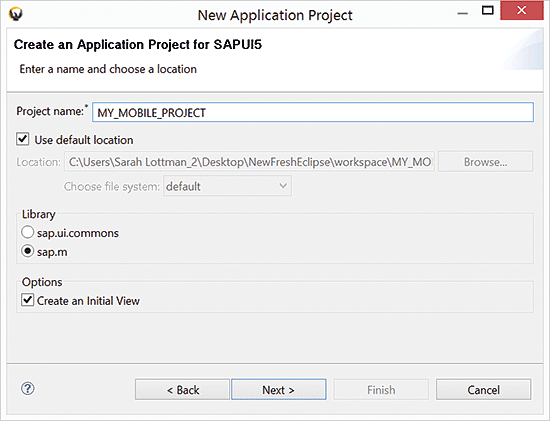
Figure 3
The New Application Project selection screen

Figure 4
Create a new view
You need to enter a Project Name. Unlike typical SAP development objects you do not have to prefix it with a Z. Next, you are asked to specify the view. For this example, I use the JavaScript view (although you can also choose HTML, XML, or JSON view types). The view type that you choose depends on your comfort level with the development language used and the purpose of your application. For development projects in which the data is dynamic and data manipulation is required, JavaScript is the preferred method. For rapid development, XML is a good option. Enter a name for the view in the Name field and click the Finish button.
You now have created the UI5 project. The next step is to add the necessary UI5 libraries. Figure 5 shows the newly created project in the navigation pane in Eclipse.
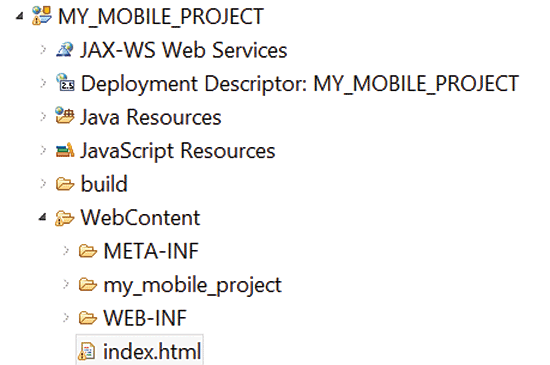
Figure 5
SAPUI5 project added
SAPUI5 is composed of several libraries that are separated by function and by user interface (UI) controls that SAP provides. Here are some of the commonly used libraries and a basic description of the controls that they provide:
- sap.ui.commons: These controls make up the most commonly used desktop control libraries. If you are building an application specifically to be consumed via a desktop browser, this library should be used.
- sap.m: This contains the common controls used for mobile development. If your project is being built to be consumed via mobile devices, you want to include this library.
- sap.ui.table: If you plan on including any kind of table in your application, you must include this library. This library includes the regular table control, and the special table types: data, analytical, and tree.
- sap.ui.ux3: This library contains all UX3 controls, including the popular Shell control, the exact browser, and the Collection and Thing inspector. These controls provide desktop layout controls that offer advanced search and personalization capabilities.
To change the libraries, click the index.html file shown in Figure 5. Note that there is already prepopulated code in this file (Figure 6).
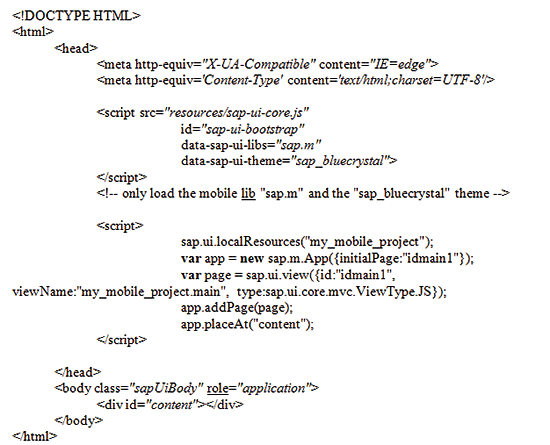
Figure 6
Index.html source code
Data-sap-ui-libs already has sap.m prepopulated, as this is what I specified during setup. I want to add an additional library – sap.ui.commons – to be able to leverage both the mobile and desktop controls. I add the definition to the code as shown in Figure 7.

Figure 7
SAPUI5 library definition
You can add as many libraries as you need.
Step 2. Define the JSON Model for Testing
The next step is to create a JSON model to be used for testing. SAPUI5 gives you two different data models to use. One is JSON, which can be created on the fly and used to ensure that your UI5 controls work correctly. The other model used is oData, which is generated through SAP Gateway services. These services are usually developed separately from the UI, so JSON is a good alternative to test my controls. I discuss integrating the controls with the oData model in step 5.
My example model has two components: a state and a capital city. For now, I create a JSON model to use for testing to ensure that my controls work correctly. To create the JSON model, I use a method defined in the controller. During standard Model View Controller (MVC) development (which is what SAPUI5 uses) all events and non-UI logic belong in the controller. The method looks like the code in Figure 8.
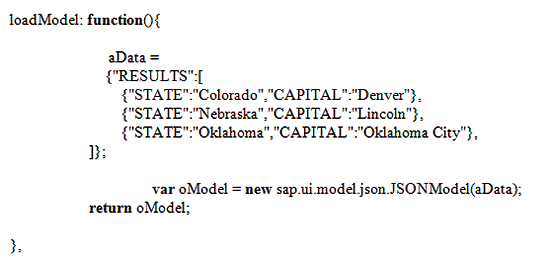
Figure 8
Load model function
For creating the JSON model, you just need a few records to ensure that your UI controls work as planned. The last step of the creation process usually involves binding the UI controls to the oData model that you receive from SAP Gateway. Incorporating oData is usually the last step of the development cycle because you want to ensure that all UI logic is correct. oData is the standard protocol that is used when retrieving records from the SAP back end.
Step 3. Create the View
The view portion of the MVC architecture holds all the UI controls. I build those now. For my example, a drop-down box holds all the states. It has a button with the text Display Capital and a TextView control that shows the capital city of the selected state.
When you open the view, you see that there is a prepopulated method: createContent. This is a hook method that is used to return the controls that are rendered when the application launches.
To make the code reusable and easier to read, separate the UI controls into separate methods that are called from createContent. Note that this is a simple example, so the methods do not contain much logic, but separation of code is an important concept of object-oriented and MVC development.
First, you build the drop-down list. Figure 9 shows the method.
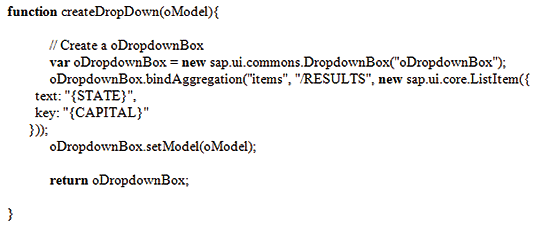
Figure 9
Build the drop-down list
Next, you create the button control as shown in Figure 10.
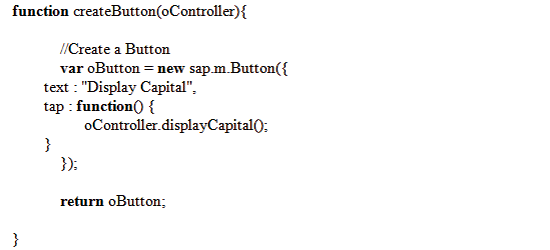
Figure 10
Code to create a button
Figure 11 shows the method to create the TextView.

Figure 11
Create the TextView
The final step in the view is to add the logic to load the JSON model, gather all the UI controls, place them in a matrix layout, and place them in a mobile page control. Figure 12 shows the final logic.
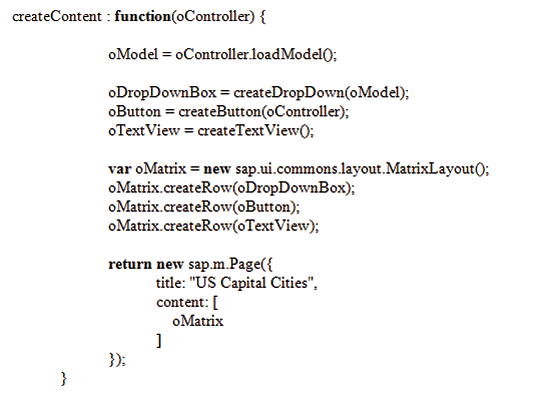
Figure 12
Final logic
Step 4. Define the Events (Controller) Logic
In the MVC architecture, all logic that is unrelated to the UI must go into the controller. In more complex scenarios, you would have several events that need to be created. These events should be placed in separate functions for readability and code reuse.
When you click the controller (suffixed in the project as controller.js), you are provided with standard hook events. These are predefined events that are fired during predetermined processing of the application. For my example, there is no need to place logic in them, but it is important to recognize these events. They are often used in real-world development examples. Figure 13 shows the predefined code that is provided in the controller.
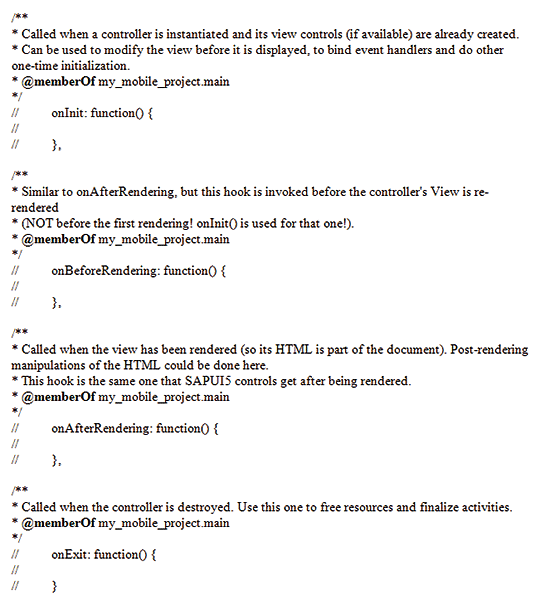
Figure 13
Predefined code in the controller
My example has one event—the button click. You must define a method in the controller to handle the button click and put the corresponding capital city into the TextView control. Figure 14 shows the logic.
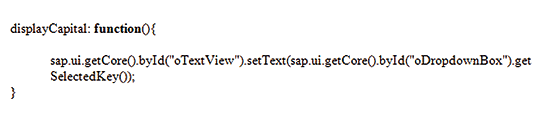
Figure 14
Logic for defining a method to handle the button click
Step 5. Use Gateway Services to Bind the UI Controls to Your oData Model
The final step before completing development is to bind the UI controls to the real model that is used. As discussed earlier, there are two model types that can be used within an SAP system. The JSON model that I created earlier is typically used for testing purposes only or for very simple use cases in which the data is known in advance (not dynamic) and does not come from SAP. While it is technically possible to just use a JSON model in a production-ready application, SAP recommends the use of the oData protocol.
In my example, there is no reason to create an oData Service to obtain the data. The information is known in advance and there is no reason to retrieve it from SAP using business logic. For illustration purposes, I show you how to call oData Services to retrieve the models.
The oData models are created and consumed using SAP Gateway. SAP Gateway is the interface between your SAP back end and the UI—in this case SAPUI5. They are called from the UI using Ajax. You can consume the models directly into an oData model or you can automatically transform the retrieved data in JSON format. The recommended way is to transform the data to an SAPUI5 JSON model. The reason for this is twofold.
First, oData can be difficult to read if you are attempting to troubleshoot and debug an application. JSON provides an easy-to-read format to determine where the records are coming from. Figures 15 and 16 compare oData versus JSON. This sample data compares oData and JSON taken from Northwind Service (a commonly used database to test SAPUI5 applications). You can reach it via to: https://services.odata.org/V4/Northwind/Northwind.svc/. oData appears as shown in Figure 15.

Figure 15
oData
The same data in JSON looks like what you see in Figure 16. As you can see, the JSON data is clearer to read, more concise, and easier for a developer to debug.

Figure 16
Data in JSON
Second, JSON data results in a much lower payload. oData can at times result in a higher payload and performance issues when you are trying to retrieve large amounts of data. Figure 17 shows the logic that you need to call SAP Gateway from UI5 and transform the data into JSON.
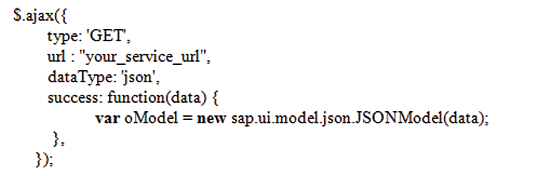
Figure 17
Logic for calliing SAP Gateway
Typically, you create a separate JavaScript file in your project to handle the model logic. The example in Figure 17 shows how to retrieve the data from SAP Gateway, but there are other cases for which you need to update, delete, filter, and create new records.
Each call to the SAP Gateway Service needs to differentiate what type of call you are trying to achieve. This single file that contains the logic needed for obtaining the oData (the model) completes the MVC development for the application.
Testing the Application
The only thing left to do is to test the application. Eclipse enables you to test it internally using a preview option. Note that if the web app preview is not sufficient for your needs, it is always possible to copy and paste the URL from Eclipse into your preferred browser. You can also click the Globe option, which opens the application in your default Internet browser. You accomplish this by right-clicking index.html and following menu path Run As > Web App Preview (Figure 18).
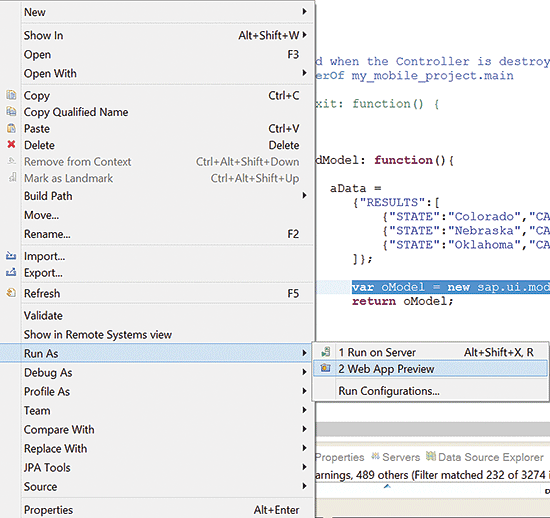
Figure 18
Test your application in Eclipse
After you select the Web App Preview, a new window opens inside Eclipse that shows the application (Figure 19).
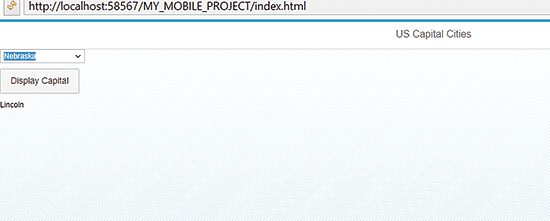
Figure 19
The application
The above steps apply to every SAPUI5 development project. This guide helps any developer faced with creating an application to get started. From a simple application such as my example, to more complex business scenarios, the same steps can be used time and time again to create any SAPUI5 scenario for a production-ready application.
Sarah Lottman
Sarah Lottman has more than seven years of technical experience in SAP user interface technologies, including SAPUI5, Fiori, and Web Dynpro. Sarah worked at SAP as a technology consultant helping customers build desktop, tablet, and mobile applications that interface with SAP. She currently works as a senior software developer for SAP Custom Development and is working on new user interfaces for S4/HANA. She graduated from the University of Central Oklahoma with a bachelor of science degree in computer science and holds numerous certifications including ITIL, SAP HANA, and SAP ABAP.
You may contact the author at sarah.lottman@sap.com.
If you have comments about this article or publication, or would like to submit an article idea, please contact the editor.