You can create your own custom feature if you want to default values into a standard SAP field or a customer field that does not have an existing feature.
Key Concept
An SAP Human Resource feature contains rules that are primarily used for programming and specifying default values. These default values can be called by time or payroll schemas. However, most of the time a feature defaults a field value onto an infotype screen. An example of an SAP feature is the ABKRS feature. This feature is used to default a value into the infotype 0001 (organizational assignment) payroll area field.
Even though many users are familiar with what an SAP feature is, they may not be aware of the benefits of being able to create their own custom feature. If you create your own custom feature, you can default a value into a custom field or even an SAP standard field. This allows you to control what values are stored within the field and eliminates some user keying errors. I’m going to show you how features work and then explain how to create one. First, I’ll give you two examples of custom features I created to demonstrate the type of functionality you can gain.
What Features Can Do
The first example is a custom feature that checks how many “other bank” subtype records an individual could have at one time on infotype 0009 (bank details). The business requirement was that in the US and Canada, employees could have as many “other bank” subtype records as they wanted. However, in Europe employees were to be limited to only one “other bank” infotype.
R/3 allows for an individual to have up to 99 “other bank” subtype records on their bank details infotype. This subtype also has a time constraint of three, which means that you can have multiple subtype records at one time with gaps between the validity dates of the various subtype records.
The benefit of allowing multiple “other bank” subtype records is that I might want $100.00 to go into my personal savings account, $100.00 to go into a vacation account, $25.00 to go into my child’s college fund, etc. If I were to set up each of these accounts as “other bank” records on infotype 0009, I would have the amount specified go directly into these accounts (providing I had enough money in my paycheck.) In Europe, we did not have integrated payroll and thus would have to pay additional money to send the money to the various other banks/accounts.
I created a custom feature that looked at the user’s country and returned how many “other bank” subtypes that country was permitted to have. In the process after input (PAI) user exit, I read the custom feature to see if the user had exceeded the number of “other bank” subtype records. I could have simply coded the number of “other bank” subtype records into the user exit directly. However, by using a feature, I did not have to hard code the values into the code. If a policy changes later, I do not have to change the code to allow a country to increase or decrease the number of “other bank” subtypes. Instead, I can simply make a slight change to the feature and move the new value up.
The second example is a custom feature that defaults a value into the contract field on the infotype 0001 (organizational assignment) screen. Again, I could have hard coded the values into the user exit or I could have used a dynamic action. A feature, however, is easier to read and simpler to change than a dynamic action and ABAP code.
How Features Work
Features have been around since the R/2 days. The features’ interface screen has changed over the various versions, though the functionality remains the same. For the purposes of my example, I’ll use a 4.6C system. To start, you should go to the features’ initial screen via transaction PE03. You have the following options:
• Decision tree
• Attributes
• Documentation
Let’s review the ABKRS feature to show how a feature works. Type ABKRS in the Feature field (Figure 1). Once you press the Enter key on your keyboard, the long name of the feature ABKRS appears on the screen — ABRKS Default value for payroll accounting area. Leave the default button set to Decision tree.
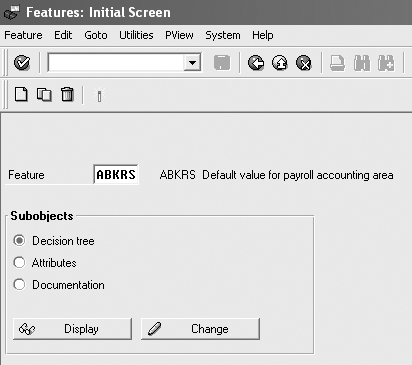
Figure 1
Select the ABKRS feature
Select the Display button. The system displays the feature ABKRS (Figure 2). Note that the name of the feature ABKRS appears in the upper left corner of the screen.
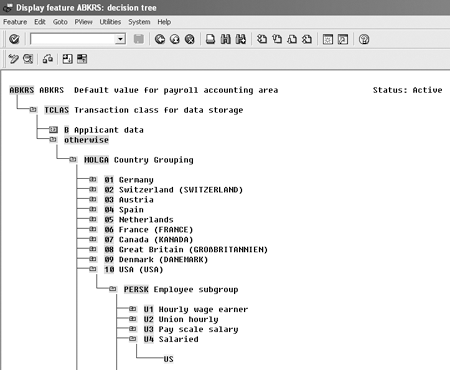
Figure 2
Display the decision tree
From here the program looks at the TCLAS value to help determine the next decision or the return value for the payroll area field. In my example, the sample person is a salaried employee. In looking at the feature ABKRS, the program logic checks to see if the individual is an employee or an applicant (based on the master data record.) Since my example person is an employee, the feature then looks at the employee’s country grouping. The sample employee is based in the US and therefore the MOLGA is 10. (The MOLGA value is determined by the personal area relationship to the country code on the infotype 0001 record.)
Next, the feature looks at the employee subgroup. My sample employee is in employee subgroup U4 (meaning that the individual is a salaried employee). Therefore, the feature returns the payroll area US into the payroll area field on infotype 0001.
Go back to the features initial screen via transaction PE03 (Figure 1). Select the Attributes button. Using the attributes function, you can list the person who is responsible for the feature. If you check the Changes only by person responsible check box, it means that only the user ID that is in the Person responsible field can make changes to the feature.
The same logic applies to the structure/field names. If you wish to see what structure the feature is based on, you can select the Struct. button (Figure 3). To view what country or HR component can use this feature, select the Country/component assignment button. For an overview of what the attributes screen looks like, refer to Figure 3.
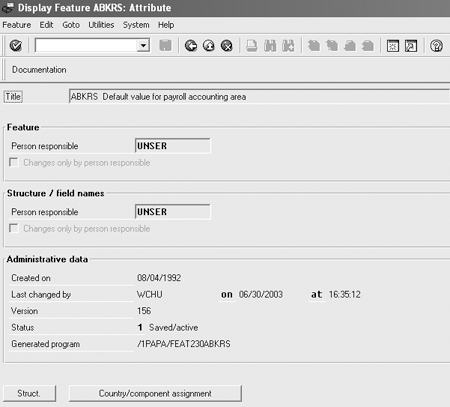
Figure 3
Attributes screen with Person responsible and Country/component selected
Go back to the features initial screen via transaction PE03 (Figure 1). If you wish to read more information on what ABKRS is used for, you can select the Documentation button to read the documentation associated with this feature.
How to Create a Custom Feature
Now that you have seen how a feature works, I’ll show you how to create your own custom feature. Let’s default a value into the contract field on the infotype 0001 screen.
Step 1. Go to transaction PE03 (Figure 1).
Step 2. Type in the name of the new feature. Let’s call it ZANSV since the contract field’s name on infotype 0001 is ANSVH. (I will use a Z at the beginning to indicate that this is a custom feature and, since the field is only five characters long, I will leave off the H on the end.)
Step 3. Click on the create icon.
Step 4. Type in the title of your new feature. I’ll call this one Contract Field. (Figure 4).
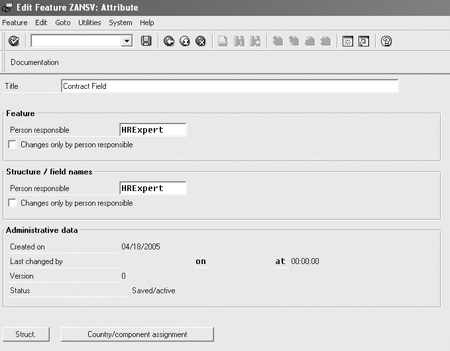
Figure 4
Select a title
Step 5. Since you want to use this field on infotype 0001, state that the component is master data. Any country can use this feature. Highlight All countries and Master data management, and click on the save icon (Figure 5).
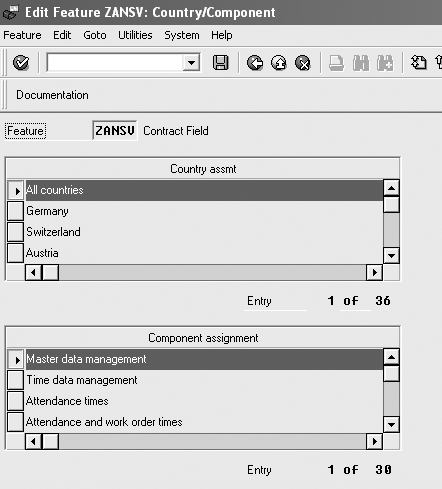
Figure 5
Highlight country and component assignments
Step 6. From the PE03 Features: Initial Screen select the Attributes button, then select the Struct. Button (Figure 3). Enter a structure that contains the decision fields that you can use to help default your value into the contract field on the infotype 0001 screen. I’ll use the employee’s company code, the personnel area, personnel subarea, the employee’s MOLGA, and the employee group or the employee subgroup to help determine the default value. The structure PME04 happens to have all these fields. Therefore, enter the structure PME04 into the Edit Feature: ZANSV: Structure field and highlight the following fields: Company code, Personnel area, Personnel subarea, MOLGA, Employee, and Employee subgroup.
When you are done, the screen should look like Figure 6. Remember to click on the save icon.
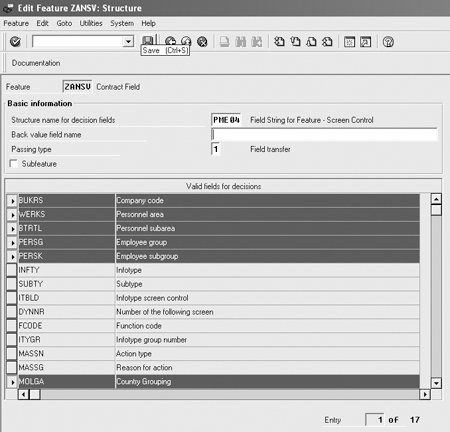
Figure 6
Completed screen with fields selected
Step 7. Document your feature. Go to the main feature interface screen transaction PE03 (Figure 1) and type in the name of your feature, ZANSV and select Documentation. Then click the Change button.
Step 8. Complete the decision tree. On the main feature interface screen transaction PE03 (Figure 1), type the name of the custom feature, ZANSV, select Decision tree and click the Change button. Let’s say that if an employee is in the CABB company code, their contract field will be 10. If they are in any other company code, then their contract field will be 99.
To set up the default information in the decision tree, highlight the feature name ZANSV. Select Create, as you will set a condition that will make a decision for the operation. A pop-up box appears giving you a list of options. Select the Field for decision operation. Next, the system needs to know what field to look at to evaluate additional information. Select the Company code CABB. Notice that the system automatically creates an option of Others. Others is a catch-all for values on which you did not make a decision. Highlight the Company code CABB value and click on the create icon. This time you are creating a return value for the system to display. Select the button Return value.
Now indicate what that default value will be. In my example, I will use 10. Highlight the otherwise node and Create. Select the Return value button. Type in 99. This means that individuals who are in company code CABB will have a value of 10 in their contract field on infotype 0001 once the code has been added to the process before output (PBO) user exit. Individuals who are in a company code other than 10 will have a default value of 99 for their contract field on infotype 0001. When you are done, your screen should look like Figure 7. Make certain you generate your feature or it will not work.
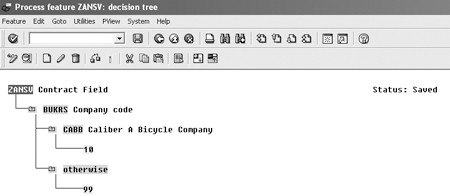
Figure 7
Decision tree for feature ZANSV
Step 9. Now an ABAP team member needs to call the feature in the PBO user exit to populate the contract field value on the infotype 0001 screen. If you wish to display the default value in this field and have the value populated only by the feature, you can indicate this in the customizing table T588M (screen maintenance). This way you are assured that someone cannot inadvertently mis-key a value into this field. One word of caution if you do this — your feature must address every condition as the end user could not override the value.
Tip!
When you transport your feature to the QA or production environments, it might not regenerate. This isn’t always the case, but it does happen from time to time with both custom and SAP standard features. If your feature does not appear to be working correctly, log into the system, go to transaction PE03, type in the name of the feature that is not working, and hit the generate icon on the top of the screen you saw in Figure 1.
Dawn Burns
Dawn Burns is an SAP-certified human resources senior consultant and Quality Assurance Manager and HR Consultant with Howrey LLP. She is a former SAP Human Resources instructor for SAP America and has more than 12 years of experience in human resources and information technology.
If you have comments about this article or publication, or would like to submit an article idea, please contact the editor.


