Become familiar with a method for substituting InfoCube characteristic values that avoids a full data reload: reverse loading.
Key Concept
A characteristic is an object that presents the elementary dimension component in the BW star schema model such as customer, product, company, or sales organization. Key figures of an InfoCube relate to characteristics that supply additional information to each key figure.
Many business scenarios, such as updating inconsistent data, require you to substitute InfoCube characteristic values. In this article, I’ll discuss a technique that involves a reverse load. See my article, “Avoid Full Data Reload: Use Selective Deletion to Substitute InfoCube Characteristic Values,” for steps outlining the procedure of selective deletion and for a table outlining when you might want to use each technique.
Reverse Loading of Old Value Data
In the case of InfoCubes with cumulative key figures with summation aggregation (the major business reality), you can improve the extraction, transformation, and loading (ETL) process by substituting the selective deletion activity for a reverse loading (Figure 1). The old data should be loaded to a temporary InfoCube with key figure value reversing. After loading back to the original InfoCube, the system empties and deletes the data during compressing with zero elimination.
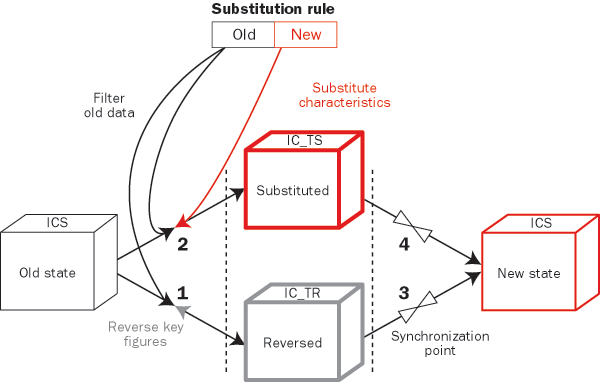
Figure 1
Substitute characteristic value with old data reverse loading
This approach includes the following steps:
Step 1. Reverse load the old characteristic value data
Step 2. Load the old characteristic value data with value substitution
Step 3. Reload the reversed old data (IC_TR) without transformation
Step 4. Reload the substituted new data without data transformation
Step-by-Step Instructions
Step 1. Reverse load the old characteristic value data. Generate an export DataSource for the original InfoCube (ICS) before implementing these steps. I explain the steps involved in this process in my other article.
First, create a temporary InfoCube (IC_TR) as a copy of the original InfoCube (ICS). Create update rules from InfoCube ICS to InfoCube IC_TR with automatically proposed mapping. If you need help with this process, I explained the steps in my previous article. Next, create a start routine for key figures value reversing.
Cut and paste the ABAP code in my sample start routine by clicking this link. Figure 2 shows an excerpt of this start routine. The full routine performs two functions: it isolates only the data that should be deleted and reverses the values for all key figures. This means that if a key figure has the value of 5, the start routine assigns an opposite value of -5 by multiplying the original value by -1. Load the old characteristic value data to InfoCube IC_TR as explained in step 2.
 loop at DATA_PACKAGE .
 sy_tabix = sy-tabix .
 select single *
 from ZCHAR_SUBST
 where OLD_CHAR = DATA_PACKAGE-/BIC/CURR_CHAR .
 if sy-subrc is initial . “ Candidate for a treatment
 DATA_PACKAGE-/BIC/KF1 = DATA_PACKAGE-/BIC/KF1 * ( - 1 ) .
 DATA_PACKAGE-/BIC/KF2 = DATA_PACKAGE-/BIC/KF2 * ( -1 ) .
 modify DATA_PACKAGE index sy_tabix.
 else .
 delete DATA_PACKAGE index sy_tabix.
 endif .
 endloop .
|
| Figure 2 |
Fragment of start routine for reverse loading |
Step 2. Load the old characteristic value data with value substitution. Create a temporary InfoCube (IC_TS) as a copy of the original InfoCube (ICS). Create update rules from InfoCube ICS to InfoCube IC_TS with automatically proposed mapping. Again, I explained the steps in my previous article. Create a start routine for characteristic value substitution. You can use my code that I offer at this link.
As start routines filter the incoming data, the system only passes the relevant records through them. You can reduce the data traffic by filtering at the selection stage. The InfoPackage selection criteria for ZCHAR_SUBST characteristic is presented in the ABAP code InfoPackage Selection Condition.doc. You can download this by clicking this link.
Load the old characteristic value data to InfoCube IC_TS as explained in the next paragraph. Because you select the same ICS InfoCube data portion for steps 1 and 2, I recommend that you load data to both IC_TR and IC_TS InfoCubes (steps 1 and 2) in one ETL activity by one InfoPackage instead of separately loading them.
You could execute loading activities from steps 1 and 2 by one InfoPackage (Figure 3). Perform the same activities as instructed in step 1: Select the InfoSources in the Modeling window of Administrator Workbench. Find the 8ICS InfoSource, select it, right-click, and choose Create InfoPackage. Fill the InfoPackage Description field in the initial screen and click on the save icon to get to the screen in Figure 3. Execute the InfoPackage by clicking on the Start button in the Schedule tab sub-screen. Figures 4 and 5 illustrate the result.
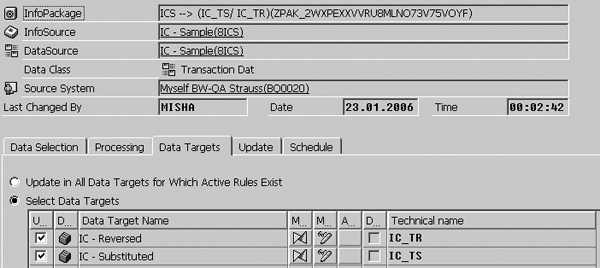
Figure 3
InfoPackage for IC_TR and IC_TS InfoCube loading
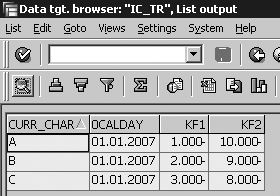
Figure 4
IC_TR InfoCube content with reversed data

Figure 5
IC_TS InfoCube content with substituted data
Step 3. Reload the reversed old data (IC_TR) without transformation. Generate an export DataSource for the IC_TR InfoCube. I discussed how to perform this process in my last article. Create update rules for InfoCube IC_TR to InfoCube ICS with automatically proposed mapping (explained in my last article). Then, reload all data to InfoCube ICS (Figure 6).
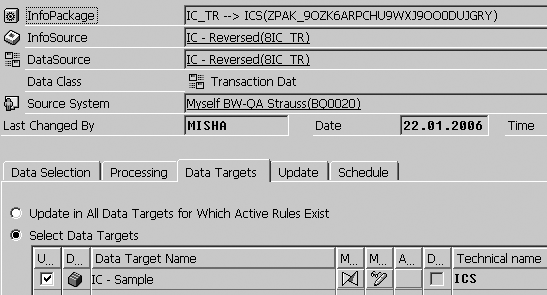
Figure 6
IC_TS InfoCube content with substituted data
Step 4. Reload the substituted new data without data transformation. Generate an export DataSource for the IC_TS InfoCube. Create update rules from InfoCube IC_TS to InfoCube ICS with automatically proposed mapping. Lastly, load all data to InfoCube ICS (Figure 7). As a result of the InfoPackages from Figure 6 and 7 executing, the ICS InfoCube looks as Figure 8 shows.
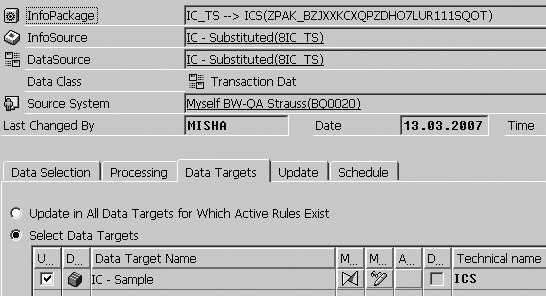
Figure 7
InfoPackage for reloading the substituted data
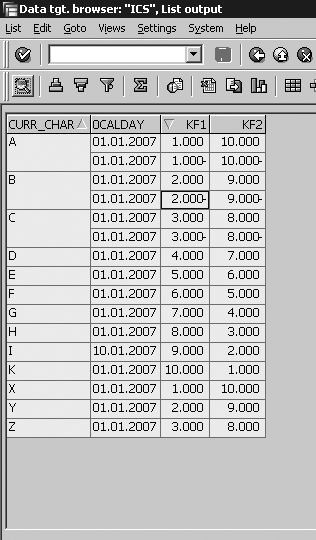
Figure 8
ICS InfoCube content after reloading the substituted and reversed data
Next, compress InfoCube ICS with zero elimination (Figure 9). Select the ICS InfoCube in the Modeling window of Administrator Workbench. Right-click and choose Manage. Select the Collapse tab in the InfoCube’s Manage screen to get to the Figure 9 screen. Select the With Zero Elimination check box and click on the Release button to run the compress. Usually, BW suggests the last available Request ID automatically, but you can fill this field manually. After the compress job finishes, the ICS InfoCube content appears as shown in Figure 10.
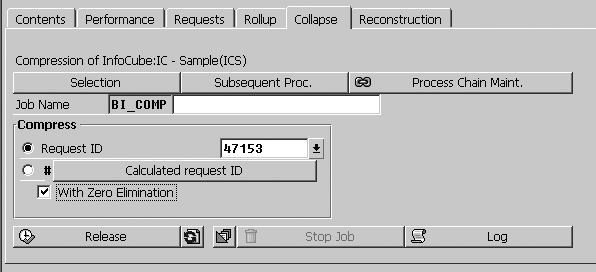
Figure 9
Compress ICS InfoCube with zero elimination

Figure 10
ICS InfoCube content after compression
In comparison to the previous approach of selective deletion, the InfoCube’s downtime is practically zero. This is because it does not require recalculating aggregates. The InfoCube state switches from old to new when the rollup activity finishes. Also, you can perform the data reloading steps in parallel to reduce the elapsed time.
The larger the InfoCube and the more aggregates it has, the more beneficial this method is, especially for minor changes. Moreover, you can create a simple process chain for process automation, repeatable use, and consistency control (Figure 11).
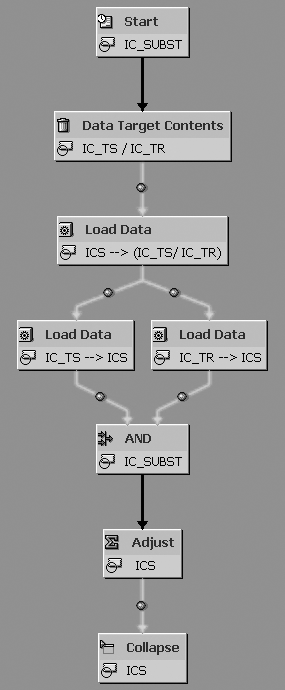
Figure 11
Process chain for characteristic value substitution by reverse loading
Points to Consider
Be sure to reverse all InfoCubes’ key figures! It is a good idea to execute the collapse (compression) step as a separate manually initiated activity. If you discover an error or inconsistency in the process, you can recover the situation by removing two last requests from the ICS InfoCube. It is possible in this case that these requests are not yet compressed. I recommend that you compress these requests after verifying the substitution process.
Don’t forget that this approach applies for summation aggregation key figures. Figure 12 shows how the minimum (Test KF-MIN) and maximum (Test KF- MAX) aggregation key figures act. As you can see, records for A, B, and C characteristic values did not eliminate from the InfoCube because of non-summation key figures (Figure 13).
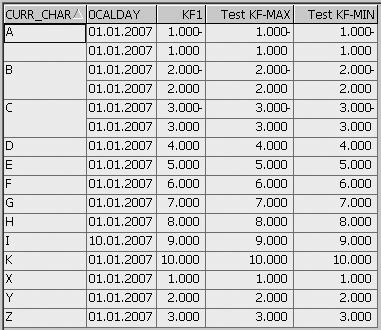
Figure 12
InfoCube content after substitution process
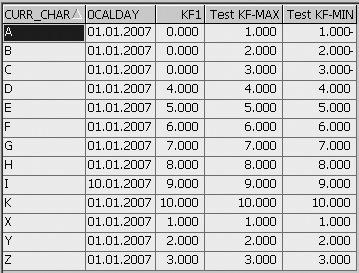
Figure 13
ICS InfoCube content after compression
Optimization Scenarios
In the case of mass changes, a lot of data passes through the temporary InfoCubes. You can reduce the data traffic by substituting one of the temporary InfoCubes for the source InfoCube itself (Figures 14 and 15).
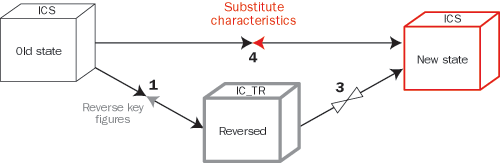
Figure 14
Execute the substitute transformation to the source InfoCube
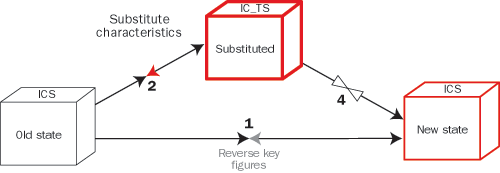
Figure 15
Execute the reverse transformation to the source InfoCube
Pros and Cons
I’ve summarized the benefits and drawbacks of each approach to help you decide which one works best for your situation (Table 1).
| Available for historical data |
Not always |
Yes |
Yes |
| Complexity |
Depends on ETL scenario |
Simple |
Simple |
| Effectiveness for very large cubes |
No |
No |
Yes |
| InfoCube downtime needed |
Yes, grows with InfoCube size |
Yes, grows with InfoCube size |
No |
| Automation and reusability |
Depends on ETL scenario |
Yes |
Yes |
| Process control level |
Medium to low |
Medium |
High |
| Applicable for all key figure types |
Yes |
Yes |
No (available for summation aggregation only) |
|
| Table 1 |
Pros and cons of the three different approaches |
Note
For more information about data warehousing, attend the SAP class BW310 -- SAP BW Data Warehousing or BW360 -- Performance and Administration (BW 3.x). For SAP NetWeaver 2004s options, attend BW310 -- Enterprise Data Warehousing or BW360 -- SAP BI Performance and Administration. For further details, visit
www.sap.com/useducation.
Michael Shtulaizen
Michael Shtulaizen is the SAP NetWeaver technical manager of Strauss Group Ltd., Israel. He has been working with SAP BW since 2002. He has rich development experience in SAP environments (more than 10 years) that allows him to propose original solutions in SAP NetWeaver BW systems.
You may contact the author at Michael.Shtulaizen@Strauss-Group.com.
If you have comments about this article or publication, or would like to submit an article idea, please contact the editor.